
Are you looking to enhance your Arduino projects with precise distance measurement capabilities? Have you considered combining an ultrasonic sensor with a piezo buzzer for real-time feedback? If so, you're in the right place! In this comprehensive guide, we'll delve into the fascinating world of ultrasonic sensors, piezo buzzers, and Arduino to create a reliable distance measurement system.
Practical Application: Smart Parking System
Imagine a scenario where finding an available parking space is a challenge. With our distance measurement system, you can create a Smart Parking System that provides real-time feedback to drivers as they approach parking spots. By integrating the ultrasonic sensor and piezo buzzer with Arduino, drivers can receive audible cues indicating whether they are within the designated parking area. This not only simplifies the parking process but also optimizes parking space utilization, making it a valuable addition to parking lots, garages, and urban environments.
Here's my demonstration:
Understanding Ultrasonic Sensors
Before we dive into the implementation, let's first understand the basics of ultrasonic sensors. These sensors work on the principle of emitting high-frequency sound waves and measuring the time it takes for the waves to bounce back after hitting an object. By calculating the time difference, the sensor can determine the distance between itself and the object with remarkable accuracy.
Choosing the Right Ultrasonic Sensor
When selecting an ultrasonic sensor for your project, consider factors such as range, accuracy, and operating voltage. Popular choices include the HC-SR04 and the US-100, both of which are affordable and widely available. In this project, I will be using the HC-SR04 ultrasonic sensor.
You may read more about the HC-SR04 sensor here: Using the HC-SR04 Ultrasonic Sensor to Detect Objects
Introducing Piezo Buzzers
Piezo buzzers are versatile components commonly used for generating audible alerts and feedback in electronic projects. Unlike traditional speakers, piezo buzzers operate by converting electrical signals into mechanical vibrations, producing sound waves in the process.
You may read more about the piezo buzzer here: Exploring Piezo Buzzer Integration with Arduino: A Comprehensive Guide
Why Combine Ultrasonic Sensors with Piezo Buzzers?
By integrating an ultrasonic sensor with a piezo buzzer, you can create a comprehensive distance measurement system that not only provides accurate readings but also offers real-time feedback through audible signals. This combination is particularly useful in applications where visual displays are impractical or unavailable.
Hardware Setup
To set up your Arduino project with an ultrasonic sensor and a piezo buzzer, you will need the following components:
- 1 x Arduino board (Arduino Uno)
- 1 x Ultrasonic sensor (HC-SR04)
- 1 x Piezo buzzer
- 1 x Breadboard
- Jumper wires
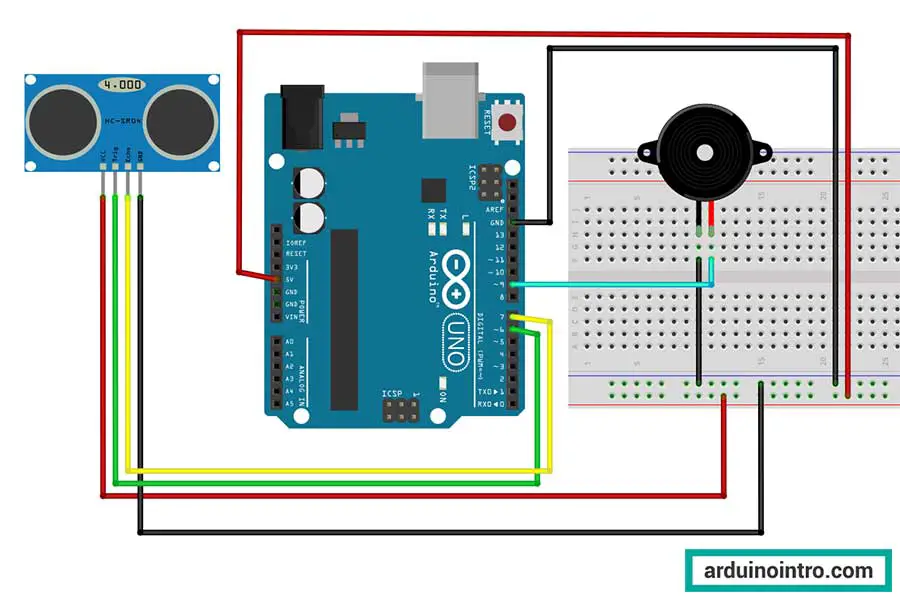
Wiring the Components:
-
Connect the Ultrasonic Sensor:
- VCC to Arduino 5V
- GND to Arduino GND
- Trig to Arduino Pin 6
- Echo to Arduino Pin 7
-
Connect the Piezo Buzzer:
- Positive to Arduino Pin 9
- Negative to Arduino GND
Step-by-Step Implementation
Now that we've covered the basics, let's proceed with the implementation. Below is the Arduino code along with a detailed explanation of each step:
#define PIEZO_PIN 9

const int trigger = 6;
const int echo = 7;
float distance;
float dist_inches;

void setup() {
  Serial.begin(9600);
  // settings for ultrasonic sensor
  pinMode(trigger, OUTPUT);
  pinMode(echo, INPUT);

  pinMode(PIEZO_PIN, OUTPUT);
}

void loop() {
  // Trigger the sensor to start measurement
  // Set up trigger
  digitalWrite(trigger, LOW);
  delayMicroseconds(5);

  // Start Measurement
  digitalWrite(trigger, HIGH);
  delayMicroseconds(10);
  digitalWrite(trigger, LOW);

  // Acquire and convert to inches
  distance = pulseIn(echo, HIGH);
  distance = distance * 0.0001657;
  dist_inches = distance * 39.37;

  if (dist_inches < 5) {
    tone(PIEZO_PIN, 1500);
    delay(200);
    noTone(PIEZO_PIN);
  }

  Serial.print("Distance: ");
  Serial.print(dist_inches);
  Serial.println(" in");
}
Explanation:
1. Define Pin Constants
#define PIEZO_PIN 9
PIEZO_PINis defined as pin 9 on the Arduino board. This pin will be used to control the piezo buzzer.
const int trigger = 6;
const int echo = 7;
float distance;
float dist_inches;
triggeris set to pin 6, which will send a signal to start the ultrasonic sensor measurement.echois set to pin 7, which will receive the signal that bounces back from the object.distanceis a floating-point variable to store the measured distance in cm.dist_inchesis a floating-point variable to store the distance converted to inches.
2. Setup Function
void setup() {
  Serial.begin(9600);
  // settings for ultrasonic sensor
  pinMode(trigger, OUTPUT);
  pinMode(echo, INPUT);
  pinMode(PIEZO_PIN, OUTPUT);
}
Serial.begin(9600);initializes serial communication at a baud rate of 9600 bits per second for debugging purposes.pinMode(trigger, OUTPUT);sets thetriggerpin as an output.pinMode(echo, INPUT);sets theechopin as an input.pinMode(PIEZO_PIN, OUTPUT);sets thePIEZO_PINas an output for the piezo buzzer.
3. Loop Function
void loop() {
  // Trigger the sensor to start measurement
  // Set up trigger
  digitalWrite(trigger, LOW);
  delayMicroseconds(5);

  // Start Measurement
  digitalWrite(trigger, HIGH);
  delayMicroseconds(10);
  digitalWrite(trigger, LOW);
digitalWrite(trigger, LOW);sets thetriggerpin LOW for 5 microseconds to ensure a clean signal start.digitalWrite(trigger, HIGH);sets thetriggerpin HIGH for 10 microseconds to start the ultrasonic sensor's measurement.digitalWrite(trigger, LOW);sets thetriggerpin LOW again to complete the trigger signal.
  // Acquire and convert to inches
  distance = pulseIn(echo, HIGH);
  distance = distance * 0.0001657;
  dist_inches = distance * 39.37;
distance = pulseIn(echo, HIGH);reads the duration of the echo pulse in microseconds.distance = distance * 0.0001657;converts the duration to distance in centimeters (the conversion factor depends on the speed of sound and sensor specifics).dist_inches = distance * 39.37;converts the distance from centimeters to inches (1 cm = 0.3937 inches).
  if (dist_inches < 5) {
    tone(PIEZO_PIN, 1500);
    delay(200);
    noTone(PIEZO_PIN);
  }
- If the measured distance in inches is less than 5 inches, the piezo buzzer will emit a 1500 Hz tone for 200 milliseconds.
tone(PIEZO_PIN, 1500);generates a tone of 1500 Hz on the piezo buzzer.delay(200);waits for 200 milliseconds while the tone is playing.noTone(PIEZO_PIN);stops the tone after the delay.
  Serial.print("Distance: ");
  Serial.print(dist_inches);
  Serial.println(" in");
}
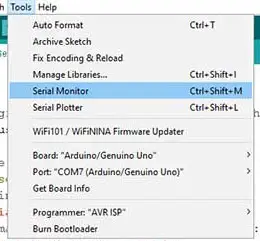
- Prints the measured distance to the serial monitor in inches for debugging and verification purposes. To open the Serial Monitor, go to Tools->Serial Monitor. You may also use the shortcut keys: Ctrl + Shift + M
Practical Applications
1. Smart Parking System
Utilize the ultrasonic sensor and piezo buzzer to detect the presence of vehicles in parking spaces. When a vehicle enters a parking spot, the system measures the distance and provides audible feedback to the driver, indicating whether they are within the designated parking area. This can help optimize parking space utilization and assist drivers in parking accurately.
2. Home Security System
Integrate the distance measurement system into a home security setup. Mount the ultrasonic sensor near entry points such as doors or windows, and configure the Arduino to trigger the piezo buzzer when someone approaches too closely. This can serve as a deterrent to potential intruders and provide homeowners with an added layer of security.
3. Interactive Art Installation
Create an interactive art piece that responds to the proximity of viewers. Install the ultrasonic sensor within the artwork and connect it to the Arduino and piezo buzzer. As viewers approach the installation, the buzzer emits varying tones or melodies based on their distance, creating an engaging and immersive experience.
4. Assistive Device for the Visually Impaired
Develop a portable device to aid visually impaired individuals in navigating their surroundings. Attach the ultrasonic sensor to a wearable device, such as a cane or a pair of glasses, and program the Arduino to emit different tones based on the distance to nearby obstacles. This auditory feedback can help users safely navigate unfamiliar environments and avoid collisions.


