Are you looking to bolster your home security system with advanced technology? Imagine a security camera that automatically turns to face any detected motion, a light that follows an intruder's movements, illuminating their path, or even a gate that opens when it detects authorized personnel.
Incorporating Passive Infrared (PIR) sensors with servo motors can make these scenarios a reality. But how exactly do you go about it? In this comprehensive guide, we'll delve into the intricacies of integrating PIR sensors with servo motors, offering you a step-by-step tutorial to enhance your home security setup.
What is a PIR Sensor?
Before we delve into the technical aspects, let's understand what a PIR sensor is and how it operates. PIR sensors detect infrared radiation emitted by objects within their field of view. These sensors are commonly used in security systems to detect motion.
For a more detailed explanation of the PIR sensor, you may want to read this article: Exploring Home Automation: Integrating Passive Infrared Sensors with Arduino
Understanding Servo Motors
Servo motors are devices that can rotate to a specific angle determined by the input it receives. These motors are widely used in various applications, including robotics and automation.
You can read more about servo motors in this article: Servo Motors Made Simple With Arduino
Why Combine PIR Sensors with Servo Motors?
By integrating PIR sensors with servo motors, you can create a dynamic security system that responds to detected motion. When motion is detected by the PIR sensor, the servo motor can be programmed to move, directing a camera or a light towards the detected motion. Additionally, you can automate gates or doors to open when motion is detected, providing both convenience and security.
Step-by-Step Guide: Integrating PIR Sensors with Servo Motors
1. Gather Your Components
Before you begin, ensure you have all the necessary components:
- PIR sensor
- Servo motor
- Microcontroller (such as Arduino)
- Breadboard
- Jumper wires
2. Wiring the Components
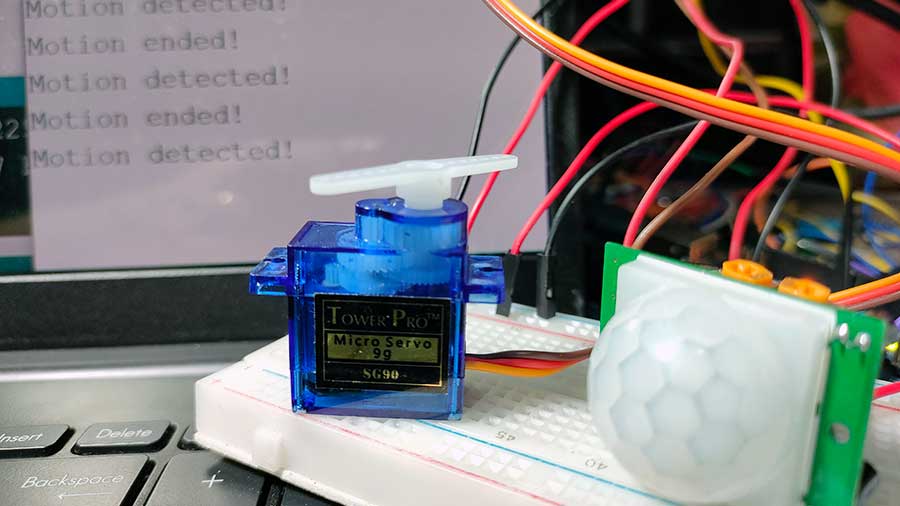
Follow the wiring diagram provided below. Typically, you'll connect the signal pin of the PIR sensor to a digital input pin on the microcontroller and the signal pin of the servo motor to a PWM (Pulse Width Modulation) pin on the microcontroller. In this project, the PIR sensor is connected to digital pin 2 and the servo motor is connected to digital pin 9.

3. Writing the Code
Using the appropriate programming language for your microcontroller (such as Arduino IDE for Arduino boards), write code to:
- Read data from the PIR sensor
- Control the servo motor based on the sensor's output
Here's an example of Arduino code to integrate a PIR sensor with a servo motor. This code will make the servo motor move to a specific position when motion is detected by the PIR sensor.
#include <Servo.h>

// Define the pin numbers
int pirPin = 2; // PIR sensor input pin
int servoPin = 9; // Servo motor control pin

Servo myServo; // Create a Servo object to control the servo motor

int pirState = LOW; // Initial state of the PIR sensor
int val = 0; // Variable to store the PIR sensor status

void setup() {
  myServo.attach(servoPin); // Attach the servo motor to the specified pin
  pinMode(pirPin, INPUT); // Set the PIR sensor pin as an input
  Serial.begin(9600); // Initialize serial communication at 9600 bits per second
}

void loop() {
  val = digitalRead(pirPin); // Read the PIR sensor value

  if (val == HIGH) { // Check if motion is detected
    if (pirState == LOW) {
      Serial.println("Motion detected!"); // Print to the serial monitor
      myServo.write(90); // Move the servo to 90 degrees
      delay(1000); // Wait for 1 second

      pirState = HIGH; // Update the state to HIGH
    }
  } else {
    if (pirState == HIGH) {
      Serial.println("Motion ended!"); // Print to the serial monitor
      myServo.write(0); // Move the servo back to 0 degrees
      delay(1000); // Wait for 1 second

      pirState = LOW; // Update the state to LOW
    }
  }
}
4. Testing the System
Upload the code to your microcontroller and test the system. Verify that the servo motor moves in response to motion detected by the PIR sensor.
5. Fine-Tuning
Adjust the sensitivity of the PIR sensor and the range of motion of the servo motor to optimize the system's performance.
Here's my output:
Explanation of the Code
Include the Servo Library:
#include <Servo.h>
This library allows us to control the servo motor.
Define Pin Numbers:
int pirPin = 2; // PIR sensor input pin
int servoPin = 9; // Servo motor control pin
int pirPin = 2;: This line declares an integer variable namedpirPinand assigns it the value2. This means that the PIR sensor is connected to digital pin 2 on the Arduino board.
int servoPin = 9;: This line declares another integer variable namedservoPinand assigns it the value9. This means that the servo motor is connected to digital pin 9 on the Arduino board.
Create Servo Object:
Servo myServo; // Create a Servo object to control the servo motor
- Servo: This is a class provided by the Arduino Servo library. It allows you to control servo motors connected to the Arduino board.
- myServo: This is the name of the Servo object being created. You can choose any valid identifier as the name.
This line of code creates a Servo object named myServo, which will be used to control the servo motor connected to the Arduino board. After this line, you can use methods and properties of the myServo object to control the servo motor, such as setting its position or attaching it to a specific pin.
Initial PIR Sensor State:
int pirState = LOW; // Initial state of the PIR sensor
int val = 0; // Variable to store the PIR sensor status
These lines of code declare two integer variables: pirState and val. pirState is initialized to LOW, indicating the initial state of the PIR sensor, while val is initialized to 0, serving as a placeholder for the status of the PIR sensor. These variables will be used to track the state and status of the PIR sensor in the Arduino sketch.
Setup Function:
void setup() {
  myServo.attach(servoPin); // Attach the servo motor to the specified pin
  pinMode(pirPin, INPUT); // Set the PIR sensor pin as an input
  Serial.begin(9600); // Initialize serial communication at 9600 bits per second
}
-
myServo.attach(servoPin): This line of code attaches the servo motor to a specific pin on the Arduino board. The
attach()function is a method of theServoclass, and it prepares the specified pin for controlling the servo motor. TheservoPinvariable contains the pin number to which the servo motor is connected.
-
pinMode(pirPin, INPUT): This line of code configures a pin on the Arduino board to be an input pin. The
pirPinvariable represents the pin connected to the PIR (Passive Infrared) sensor. Setting it as an input pin allows the Arduino to read the digital signal from the sensor.
-
Serial.begin(9600): This line of code initializes serial communication between the Arduino board and a connected device, such as a computer. The
begin()function is a method of theSerialclass, and it sets the baud rate (data transfer rate) for serial communication. In this case, it sets the baud rate to 9600 bits per second, which is a common rate used for debugging and communication with the Arduino IDE's serial monitor.
Loop Function:
void loop() {
  val = digitalRead(pirPin); // Read the PIR sensor value
- void loop(): This is the main loop function in an Arduino program. It runs repeatedly after the setup() function.
- val = digitalRead(pirPin);: Reads the current state (HIGH or LOW) of the PIR sensor connected to
pirPinand stores it in the variableval.
if (val == HIGH) { // Check if motion is detected
- if (val == HIGH): Checks if the PIR sensor has detected motion. The sensor outputs HIGH when it detects infrared radiation (motion).
if (pirState == LOW) {
- if (pirState == LOW): Checks if the previous state of the PIR sensor was LOW (i.e., no motion was previously detected). This ensures that the action only triggers when motion is newly detected.
Serial.println("Motion detected!"); // Print to the serial monitor
- Serial.println("Motion detected!");: Sends the string "Motion detected!" to the serial monitor for debugging or logging purposes. You can open the Serial Monitor by going to Tools->Serial Monitor.
myServo.write(90); // Move the servo to 90 degrees
- myServo.write(90);: Commands the servo motor to rotate to 90 degrees, which could be used to point a camera or open a gate.
delay(1000); // Wait for 1 second
- delay(1000);: Pauses the program for 1000 milliseconds (1 second) to allow time for the servo to move and for the motion to stabilize.
pirState = HIGH; // Update the state to HIGH
- pirState = HIGH;: Updates the
pirStatevariable to HIGH, indicating that motion is currently detected. This prevents the above actions from repeating in every loop iteration as long as motion is detected.
    }
  } else {
- } else {: Executes the following block of code if
valis not HIGH, meaning the PIR sensor has not detected any motion.
if (pirState == HIGH) {
- if (pirState == HIGH): Checks if the previous state of the PIR sensor was HIGH (i.e., motion was previously detected). This ensures that the action only triggers when motion has just ended.
Serial.println("Motion ended!"); // Print to the serial monitor
- Serial.println("Motion ended!");: Sends the string "Motion ended!" to the serial monitor for debugging or logging purposes.
myServo.write(0); // Move the servo back to 0 degrees
- myServo.write(0);: Commands the servo motor to rotate back to 0 degrees, which could reset the position of a camera or close a gate.
delay(1000); // Wait for 1 second
- delay(1000);: Pauses the program for 1000 milliseconds (1 second) to allow time for the servo to move back and for the motion to stabilize.
pirState = LOW; // Update the state to LOW
- pirState = LOW;: Updates the
pirStatevariable to LOW, indicating that no motion is currently detected. This prevents the above actions from repeating in every loop iteration as long as no motion is detected.
    }
  }
}
- The closing braces
}close theelseblock, theifblock within it, and the mainloopfunction.
Summary of the Code
This loop() function continuously reads the state of the PIR sensor and controls the servo motor based on whether motion is detected or not. When motion is detected, the servo moves to 90 degrees, and when motion ends, the servo returns to 0 degrees. The serial monitor prints messages for debugging, and the system state is tracked to ensure actions are only taken when there are changes in motion detection.
Practical Applications
1. Security Cameras and Lights
Integrate PIR sensors with servo motors to create security cameras that track motion or lights that follow intruders. This dynamic response can help in better surveillance and deter potential intruders by keeping them illuminated and on camera.
2. Automated Gate Opening
Another practical application is automating gates or doors to open when motion is detected. This is especially useful for authorized personnel entering secured areas without needing to manually open the gate. For instance, a PIR sensor can detect the approach of a vehicle or person, and the servo motor can operate the gate mechanism, allowing seamless and secure entry.
Conclusion
Integrating PIR sensors with servo motors can significantly enhance your home security system by enabling dynamic responses to detected motion. By following this guide, you can create a robust and effective security setup tailored to your specific needs. Implementing this technology will not only bolster your home's security but also provide you with peace of mind knowing that your property is well-protected.
FAQ:
Q: Can I use multiple PIR sensors with a single servo motor? A: Yes, you can use multiple PIR sensors to cover a larger area and program the servo motor to respond to the combined output of these sensors.


