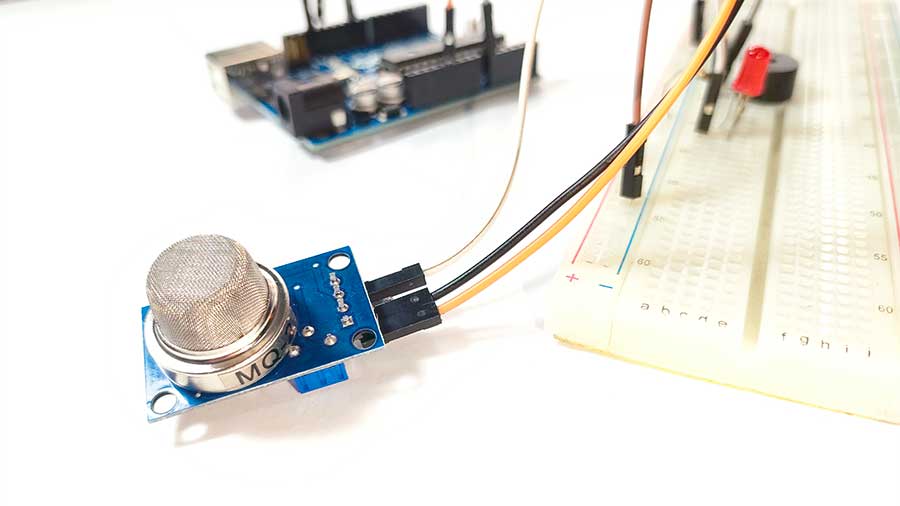
Have you ever wondered if you could make your own gas leak alarm for your home or workshop? If you’re into DIY electronics and just starting out with Arduino, this project is for you! In this tutorial, you’ll learn how to build a simple gas leak detector using the MQ-2 gas sensor, Arduino, a buzzer, and an LED.
We’ll use the analog output of the sensor to detect varying gas levels, and trigger alerts when it detects dangerous concentrations.
What Is the MQ-2 Gas Sensor and How Does It Work?
The MQ-2 gas sensor, also known as the FC-22, is a popular module used to detect gases like:
-
LPG (liquefied petroleum gas)
-
Propane
-
Methane
-
Alcohol
-
Hydrogen
-
Smoke
It works by using a tin dioxide (SnO₂) sensing layer. When combustible gases are present, the sensor's internal resistance changes. This change is converted into an analog voltage, which we can read with Arduino’s analogRead() function.
Sensor Features:
-
Has analog and digital output pins
-
Sensitivity can be adjusted with the potentiometer
-
Requires a 2–3 minute warm-up time
-
Runs on 5V power supply
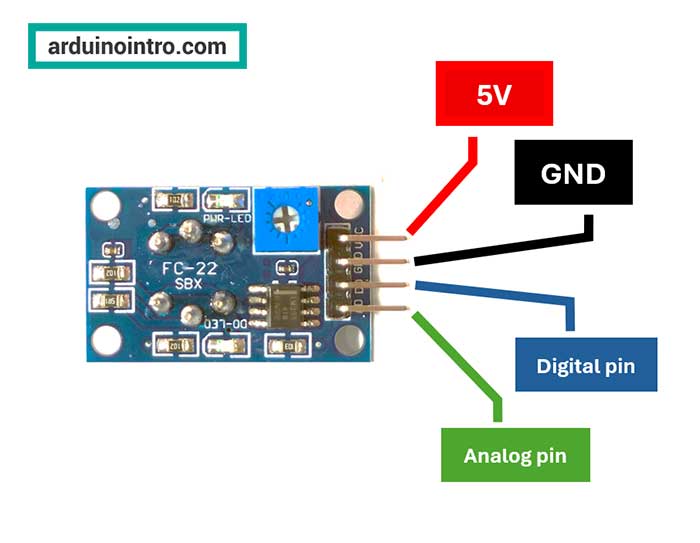
| Label | Description | Arduino Connection |
|---|---|---|
| VCC | Power (5V) | 5V |
| GND | Ground | GND |
| D0 | Digital output (threshold-based) | Any digital pin (e.g. 8) |
| A0 | Analog output (gas level) | Any analog pin (e.g. A0) |
If you're just starting out, use the analog pin (A0) to get a better sense of how the sensor reacts to different levels of gas. Later, you can use the digital pin (D0) for quick ON/OFF triggering once you’ve found a good threshold.
MQ-2 Gas Sensor Warm-Up Time: How Long to Preheat for Accurate Readings
If you're using the MQ-2 gas sensor for the first time, the recommended warm-up time is 24 to 48 hours of continuous power to allow the sensor to stabilize and burn off internal impurities. This process is called the "preheating" phase and is especially important for achieving more consistent and accurate readings over time.
First Use (Initial Burn-In):
-
24 to 48 hours of continuous operation.
-
Done only once after purchase.
Regular Use (After Initial Burn-In):
-
Requires a warm-up of 2–5 minutes each time you power it up.
-
The sensor will reach optimal accuracy during this period.
Why Is Warm-Up Necessary?
The sensor uses a heated tin dioxide layer that reacts to gases. During the initial use, it needs time to:
-
Burn off manufacturing residues.
-
Stabilize its internal resistance.
-
Reach a baseline level for accurate detection.
Important Tip: While you can get readings right away, don't rely on them until after the sensor has completed its warm-up. For critical safety systems, always calibrate and test thoroughly after the burn-in.
Parts of the MQ-2 Gas Sensor Module (FC-22)
To better understand how the MQ-2 works and how to use it effectively, it helps to know the different parts of the module. The FC-22 MQ-2 sensor module is not just the gas sensor itself—it’s a complete breakout board designed for easy integration with microcontrollers like Arduino.

1. MQ-2 Sensor Head (Tin Dioxide Sensor)
-
This is the silver cylindrical can with holes, sitting at the center of the board.
-
Inside is a SnO₂ (tin dioxide) layer and a heater coil.
-
When gases pass through the mesh, the tin dioxide’s resistance changes, which produces a variable voltage.
2. Heater Coil
-
Internally embedded in the sensor head.
-
Heats the sensing element to ~300–400°C for proper gas interaction.
-
Draws noticeable current during operation (up to 150mA), so make sure your power supply is sufficient.
3. Adjustable Potentiometer
-
The blue knob on the board.
-
Allows you to set the gas concentration threshold for the digital output (D0).
-
Has no effect when using the analog output (A0-A5).
- If you're using
analogRead(), you don’t need to touch the potentiometer.
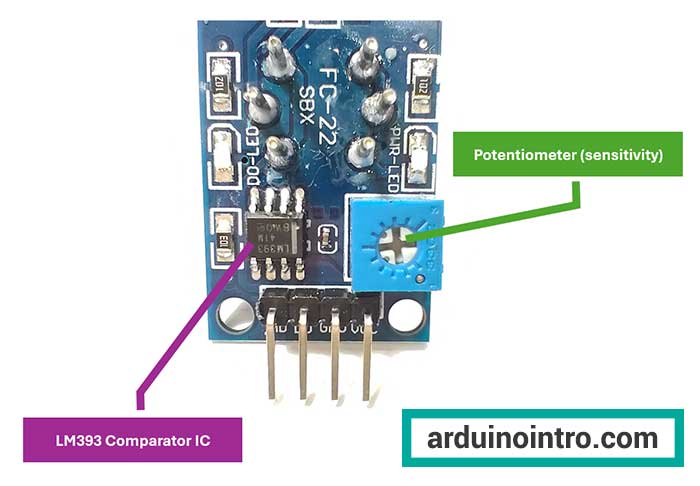
4. LM393 Comparator IC
This tiny black chip is the "brain" of the digital output system. It compares the sensor’s output voltage with the reference voltage set by the potentiometer.
What It Does:
-
It takes two inputs: one from the sensor and one from the potentiometer.
-
If the gas voltage exceeds the set threshold, the digital output (D0) goes HIGH.
-
Otherwise, it stays LOW.
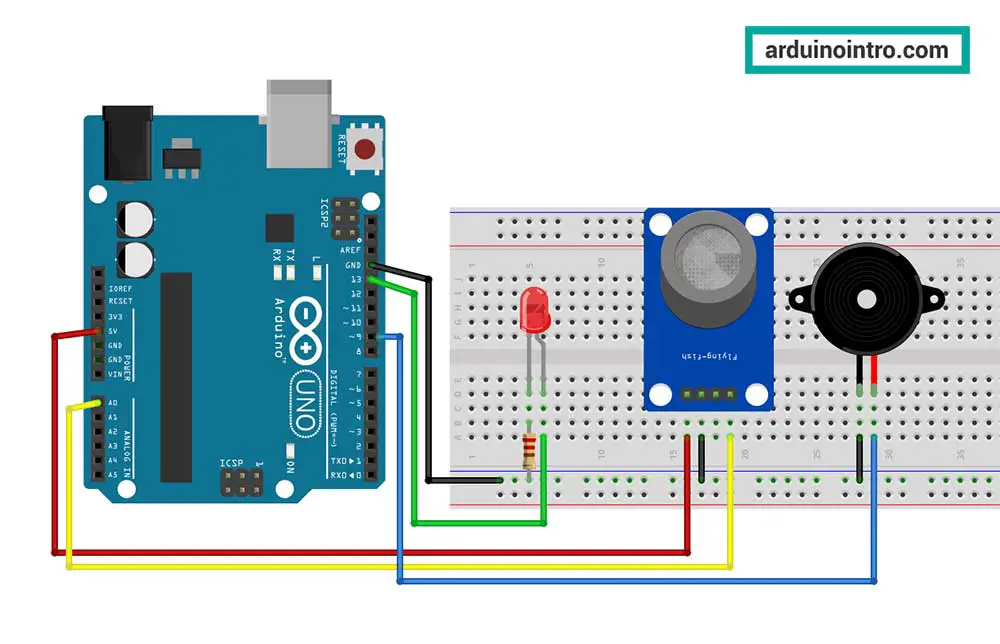
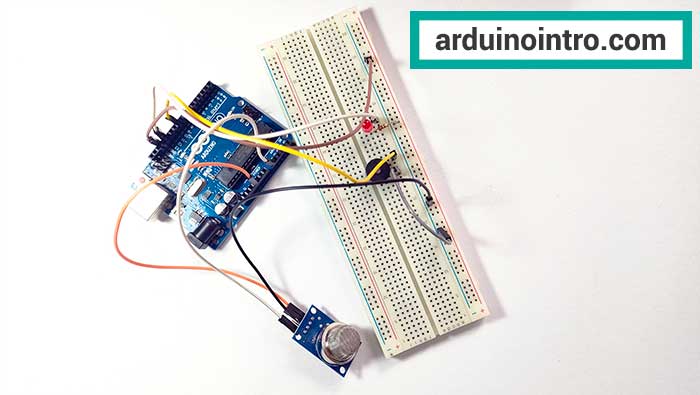
Wiring the MQ-2 Gas Sensor to Arduino (Analog Mode)
Components Needed:
-
Arduino Uno
-
MQ-2 Gas Sensor (FC-22)
-
LED
-
220Ω resistor
-
Piezo buzzer
-
Jumper wires
-
Breadboard
Pin Connections:
| MQ-2 Sensor | Arduino |
|---|---|
| VCC | 5V |
| GND | GND |
| A0 (Analog) | A0 |
Other Connections:
| Component | Arduino Pin |
|---|---|
| Buzzer (+) | 9 |
| LED (+) | 13 |
| Buzzer/LED (-) | GND |
Why Use analogRead with the MQ-2 Gas Sensor?
The MQ-2 sensor offers two outputs:
-
Digital (only tells you if gas level is above a threshold)
-
Analog (gives you a range of values based on gas concentration)
Using analogRead() gives you more control and flexibility, especially when fine-tuning your alert system.
Arduino Code for MQ-2 Gas Sensor (Using analogRead)
// MQ-2 Gas Sensor DIY Alarm using analogRead()
int gasSensorPin = A0;
int ledPin = 13;
int buzzerPin = 9;
int threshold = 400; // Set your gas detection threshold here
void setup() {
pinMode(ledPin, OUTPUT);
pinMode(buzzerPin, OUTPUT);
Serial.begin(9600);
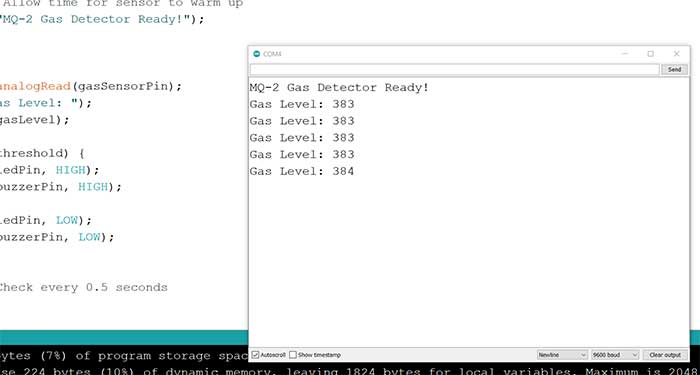
delay(1000); // Allow time for sensor to warm up
Serial.println("MQ-2 Gas Detector Ready!");
}
void loop() {
int gasLevel = analogRead(gasSensorPin);
Serial.print("Gas Level: ");
Serial.println(gasLevel);
if (gasLevel > threshold) {
digitalWrite(ledPin, HIGH);
digitalWrite(buzzerPin, HIGH);
} else {
digitalWrite(ledPin, LOW);
digitalWrite(buzzerPin, LOW);
}
delay(500); // Check every 0.5 seconds
}
Step-by-Step Code Explanation
const int gasSensorPin = A0;Declares the analog pin connected to the MQ-2's A0 output.
threshold = 400;The gas value above which the buzzer and LED will activate. You may adjust this based on test results.
analogRead(gasSensorPin)Reads the analog voltage from the sensor. It returns a value from 0 to 1023 based on gas concentration.
digitalWrite(buzzerPin, HIGH);Turns on the buzzer and LED if gas levels are above the threshold.
Testing, Tuning, and Safety Tips
How to Test the Sensor:
You can use a lighter (without flame) near the sensor to release butane gas for testing.
Calibrating the Threshold:
Monitor the Serial Monitor readings in a clean room. Use that baseline to decide a realistic threshold (e.g., 400–600).
Warm-Up Period:
Let the sensor warm up for at least 2–3 minutes before trusting its readings.
Practical Applications and Project Ideas
This project is a solid foundation for real-life safety and hobby applications, such as:
-
Gas leak alarms in kitchens or garages
-
DIY smoke detector
-
Alcohol detection systems
-
Smart home safety system with IoT (connect to ESP8266/NodeMCU later)
Pro tip: You can expand this by adding a relay module to trigger an exhaust fan or send notifications via a WiFi module.
Advantages and Limitations of the MQ-2 Gas Sensor
Advantages
-
Low cost
-
Easy to use with Arduino
-
Can detect multiple gases
-
Adjustable sensitivity
Limitations
-
Not selective (it reacts to many gases at once)
-
Needs a warm-up time to stabilize
-
Affected by temperature and humidity
-
Not for precise measurement (just presence detection)
Frequently Asked Questions (FAQ)
What gases can the MQ-2 detect?
It can detect methane, butane, LPG, smoke, propane, hydrogen, and alcohol vapors.
How accurate is the MQ-2 gas sensor?
It's great for presence detection, not for accurate measurement of gas concentration.
Can I use it just as a smoke detector?
Yes, it can detect smoke from combustible materials, though it’s not a certified smoke detector.
Final Thoughts: What You’ve Learned and What to Try Next
Now you’ve built your own gas leak detection system using the MQ-2 sensor, analogRead, buzzer, and LED with Arduino. You’ve also learned about how the sensor works, its advantages and limitations, and how to tune your system for better performance.
Want to take it further? Try these next:
-
Add an LCD display to show gas levels
-
Use a NodeMCU or ESP32 to send alerts via Wi-Fi
-
Connect to IFTTT to trigger SMS or email notifications


