Stepper motors play a critical role in precision control applications, making them a favorite among hobbyists and professionals alike. Imagine building your own Arduino-powered automated curtain system, where the 28BYJ-48 stepper motor precisely controls the opening and closing mechanism. This guide will walk you through how to use the 28BYJ-48 stepper motor with the ULN2003 driver and Arduino, even if you’re a complete beginner.
What Is a Stepper Motor?
A stepper motor is an electromechanical device that converts electrical pulses into precise mechanical movements. Unlike regular DC motors, stepper motors move in discrete steps, making them ideal for applications that require accuracy, such as 3D printers, robotic arms, and automated systems.
Why Choose the 28BYJ-48 Stepper Motor?
The 28BYJ-48 is a popular stepper motor among Arduino enthusiasts for several reasons:
-
Affordability: This stepper motor is budget-friendly, making it perfect for DIY projects.
-
Compact Design: Its small size makes it suitable for space-constrained projects.
-
Compatibility: The 28BYJ-48 pairs seamlessly with the ULN2003 driver module and Arduino boards.
-
Versatility: It’s ideal for applications like camera sliders, robotic arms, and motorized curtains.
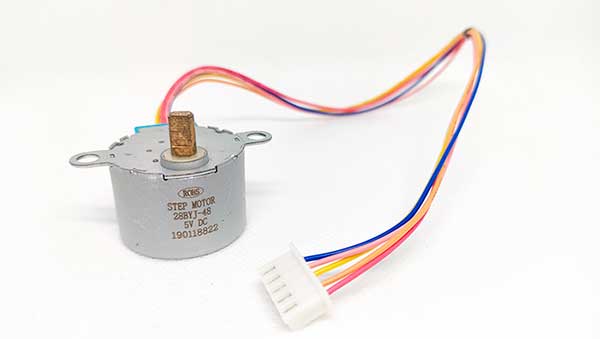
Components You’ll Need
To follow along with this tutorial, gather the following components:
-
28BYJ-48 stepper motor
-
ULN2003 driver module
-
Arduino board (e.g., Arduino Uno)
-
Jumper wires
-
Breadboard power supply module (optional, but recommended for ease of use)
-
Breadboard
-
Power supply or USB cable
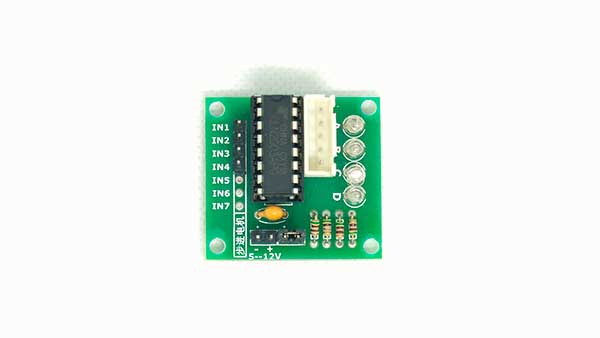
Step-by-Step Guide to Connecting the 28BYJ-48 with Arduino
Step 1: Understand the Connections
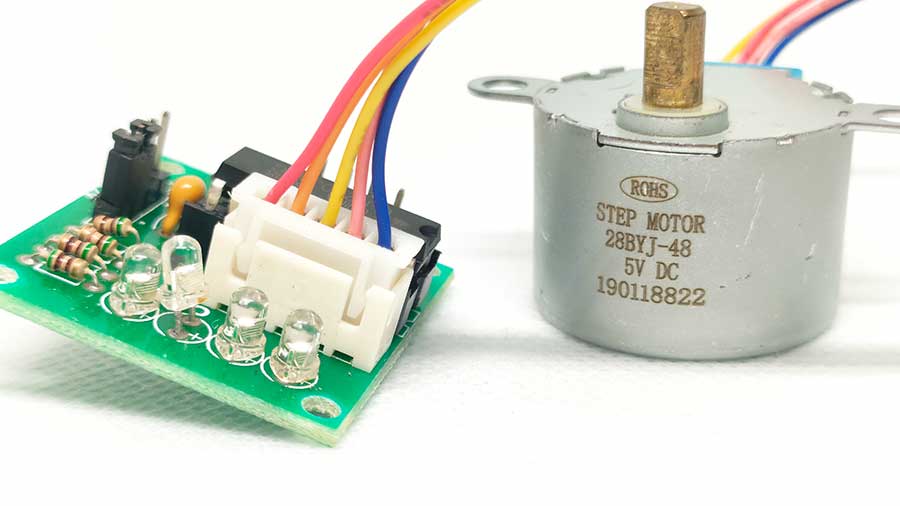
The ULN2003 driver module has four input pins (IN1, IN2, IN3, and IN4) and connectors for the stepper motor. These input pins will be connected to the digital pins on the Arduino to control the motor.
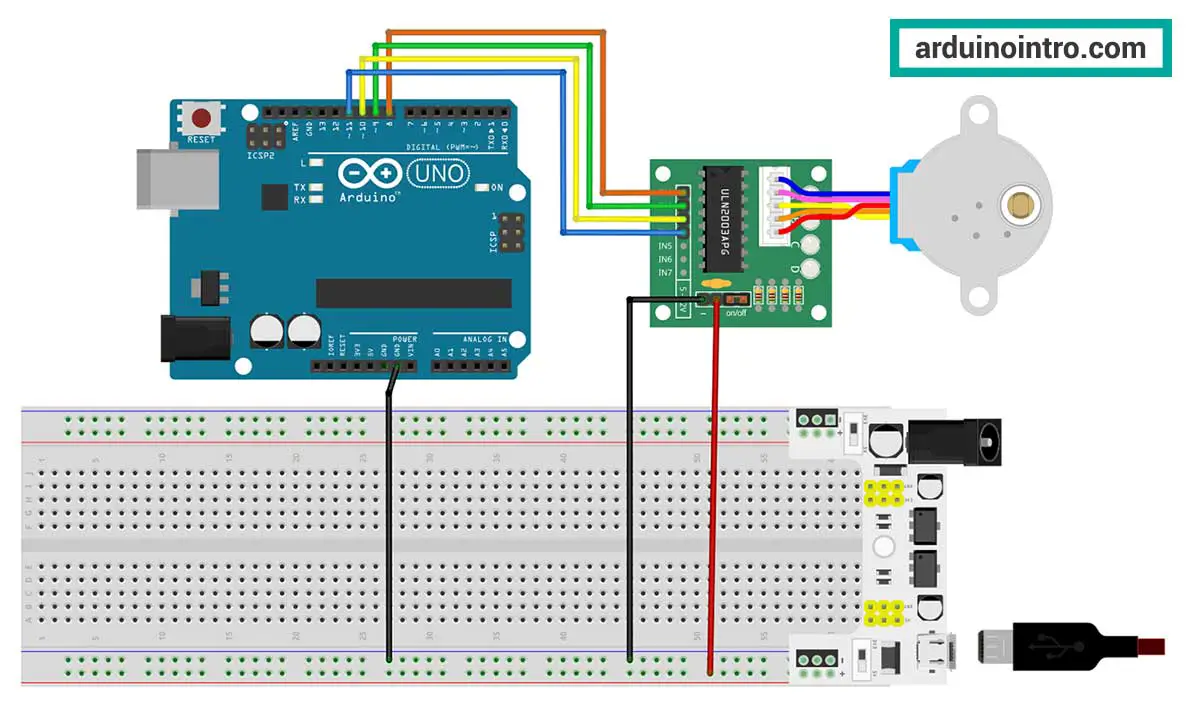
Step 2: Connect the Components
-
Plug the 28BYJ-48 stepper motor into the ULN2003 driver module.
-
Connect the ULN2003’s input pins to the Arduino:
-
IN1 → Digital Pin 8
-
IN2 → Digital Pin 9
-
IN3 → Digital Pin 10
-
IN4 → Digital Pin 11
-
-
Connect the ground (GND) of the ULN2003 to the GND on the Arduino.
-
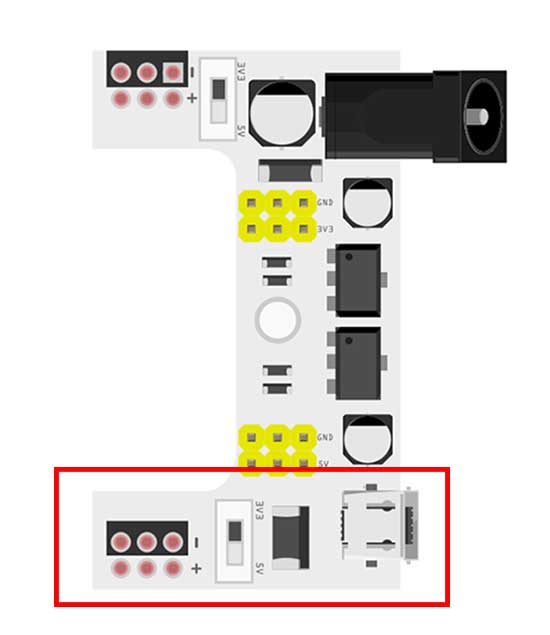
Use a breadboard power supply module to power the ULN2003 module. Insert the power supply module into the breadboard and set the output to 5V. Connect the 5V and GND pins of the power module to the ULN2003’s power input and ground, respectively. Alternatively, you can use the Arduino’s 5V pin, but I really recommend using a separate power supply for the motor as I will explain later in this article.
.
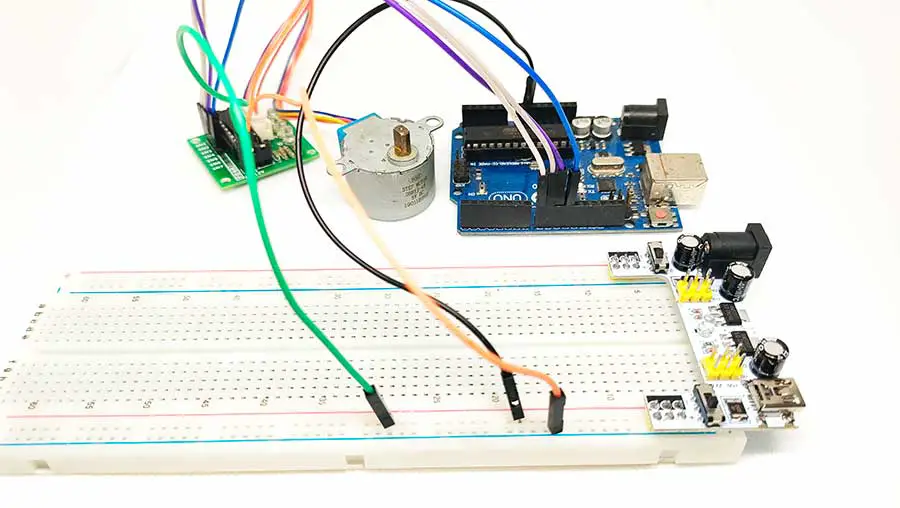
Arduino Code for the 28BYJ-48 Stepper Motor
Here’s a simple Arduino sketch to get the stepper motor running:
#include <Stepper.h>

// Define the number of steps per revolution for the motor
const int stepsPerRevolution = 2048;

// Create a Stepper object
Stepper myStepper(stepsPerRevolution, 8, 10, 9, 11);

void setup() {
  // Set the speed of the motor to 15 RPM
  myStepper.setSpeed(15);
  Serial.begin(9600);
  Serial.println("Stepper Motor Ready");
}

void loop() {
  // Rotate the motor clockwise
  Serial.println("Rotating clockwise");
  myStepper.step(stepsPerRevolution);
  delay(1000);

  // Rotate the motor counterclockwise
  Serial.println("Rotating counterclockwise");
  myStepper.step(-stepsPerRevolution);
  delay(1000);
}
Code Breakdown
1. Include the Stepper Library
#include <Stepper.h>
- Purpose: This library simplifies the control of stepper motors by providing built-in functions to handle step counting, speed adjustments, and direction changes.
- Why it's needed: Without this library, you would have to manually manage the pulse sequences for the stepper motor, which can be complex and error-prone.
2. Define Steps Per Revolution
const int stepsPerRevolution = 2048;
- Purpose: Defines the number of steps the motor needs for a full 360° rotation.
- Why 2048?
- The 28BYJ-48 stepper motor has 32 steps per internal revolution.
- A built-in 64:1 gear ratio multiplies these steps, resulting in
32 * 64 = 2048steps for a complete rotation of the output shaft. In short, it takes 2048 steps to turn the output shaft 360°.
3. Create a Stepper Object
Stepper myStepper(stepsPerRevolution, 8, 10, 9, 11);
Purpose: This initializes a Stepper object called myStepper with:
- Steps Per Revolution:
2048, as defined earlier. - Control Pins: Pins
8,10,9, and11on the Arduino, which correspond to the IN1, IN2, IN3, and IN4 inputs on the ULN2003 driver.
4. Setup Function
void setup() {
  // Set the speed of the motor to 15 RPM
  myStepper.setSpeed(15);
  Serial.begin(9600);
  Serial.println("Stepper Motor Ready");
}
- Set Speed:
-
The speed of the 28BYJ-48 stepper motor can be adjusted using the
setSpeed()function from theStepperlibrary. This function sets the speed in revolutions per minute (RPM). myStepper.setSpeed(15);configures the motor speed to 15 revolutions per minute (RPM).-
RPM Definition: The speed is specified in terms of how many full revolutions the motor will complete in one minute.
-
Internal Calculation: The library calculates the delay between each step based on the given RPM and ensures smooth rotation.
-
Adjusting Speed
To change the speed, modify the value in the setSpeed() function. For example:
-
-
-
myStepper.setSpeed(30);increases the speed to 30 RPM. -
myStepper.setSpeed(5);decreases the speed to 5 RPM.
-
-
Practical Considerations
-
-
-
Low Speed: Useful for precision tasks, such as adjusting a robotic arm.
-
High Speed: Suitable for applications like conveyor belts or rapid movements.
-
Avoid Overload: Setting the speed too high might cause the motor to skip steps if the torque is insufficient.
-
-
- Serial Communication:
Serial.begin(9600);initializes serial communication with a baud rate of 9600 bits per second.Serial.println("Stepper Motor Ready");outputs a message to the Serial Monitor, indicating the motor is ready for operation.
5. Loop Function
Clockwise Rotation:
myStepper.step(stepsPerRevolution);
- Purpose: Moves the motor by
2048steps in the positive direction, completing one full clockwise rotation. - Step Function:
- Positive values move the motor forward (clockwise).
- Negative values move it backward (counterclockwise).
- Serial Feedback: Displays
"Rotating clockwise"in the Serial Monitor.
Pause:
delay(1000);
Waits for 1 second before the next action, allowing the motor to complete the rotation and stabilize.
Counterclockwise Rotation:
myStepper.step(-stepsPerRevolution);
- Moves the motor
2048steps in the negative direction, completing one full counterclockwise rotation. - Serial Feedback: Displays
"Rotating counterclockwise"in the Serial Monitor.
Take a look at my output:
Setting a Specific Rotation (e.g., 180°)
To rotate the motor by a specific angle, calculate the number of steps required using the following formula:
Steps = (Desired Angle / 360) × Steps Per Revolution
For a 180° rotation with the 28BYJ-48, the calculation is:
Steps = (180 / 360) × 2048 = 1024 steps
In the Arduino sketch, use:
myStepper.step(1024); // Rotate 180° clockwise
myStepper.step(-1024); // Rotate 180° counterclockwise
This allows precise control over partial rotations, making it ideal for applications like robotic joints or directional indicators.
Here’s how you can modify the code to rotate the motor by 180 degrees:
Code Snippet for 180° Rotation
#include <Stepper.h>

// Define the number of steps per revolution for the motor
const int stepsPerRevolution = 2048;

// Create a Stepper object
Stepper myStepper(stepsPerRevolution, 8, 10, 9, 11);

void setup() {
  // Set the speed of the motor to 15 RPM
  myStepper.setSpeed(15);
  Serial.begin(9600);
  Serial.println("Stepper Motor Ready");
}

void loop() {
  // Rotate the motor 180 degrees clockwise
  Serial.println("Rotating 180 degrees clockwise");
  myStepper.step(1024);
  delay(1000);

  // Rotate the motor 180 degrees counterclockwise
  Serial.println("Rotating 180 degrees counterclockwise");
  myStepper.step(-1024);
  delay(1000);
}
And here is my stepper motor rotating at 180 degrees:
Why Use an External Power Supply?
While the Arduino’s 5V pin can power the ULN2003 module and stepper motor, an external power supply is recommended for several reasons:
-
Current Requirements: Stepper motors typically draw more current than the Arduino’s 5V pin can supply. Insufficient current may result in erratic or weak motor performance.
-
Voltage Stability: An external power supply ensures consistent voltage, preventing fluctuations that can cause the motor to malfunction.
-
Protection for Arduino: Using an external power source reduces the risk of overloading and potentially damaging the Arduino board.
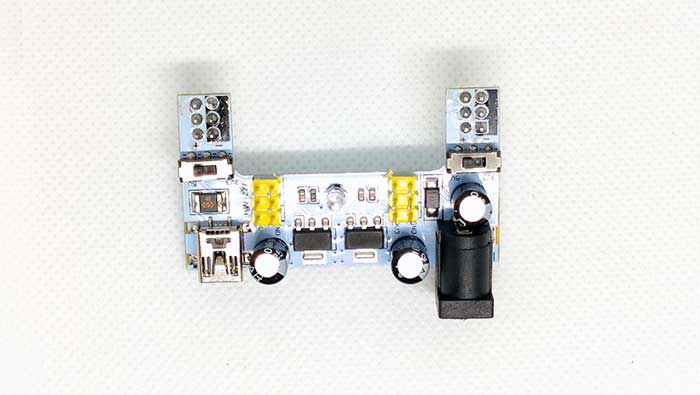
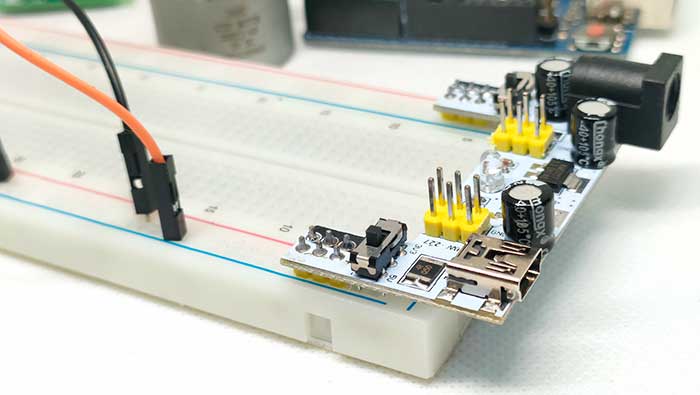
Breadboard Power Supply Module
A breadboard power supply module is a convenient choice for powering the ULN2003 driver. Here’s how to use it:
-
Set the Output Voltage: Ensure the module is set to 5V.
-
Connect to the Breadboard: Place the module on the breadboard and connect it to an external power source (e.g., a 9V battery, USB charger, Powerbank, or DC adapter).
-
Power the ULN2003: Use jumper wires to connect the breadboard’s power rails to the
VCCandGNDpins on the ULN2003 module.
This setup provides a stable and sufficient power supply, ensuring optimal motor performance.
Practical Applications of the 28BYJ-48 Stepper Motor
Automated Curtain System
You can use the 28BYJ-48 in a home automation project to control curtains. Attach the stepper motor to a pulley system, and with a simple Arduino sketch, you can create a smart curtain system that opens and closes based on a timer or light sensor input.
Precision Robotics
This motor is an excellent choice for robotic arms that require precise movements for tasks such as sorting, picking, or assembling.
DIY Camera Slider
With the 28BYJ-48, you can build a motorized camera slider for smooth and controlled camera movements, ideal for time-lapse photography.
Troubleshooting Tips
-
Motor Not Moving: Double-check the connections between the Arduino and the ULN2003 module. Make sure your jumper wires are not broken. Replace the broken jumper wires.
-
Jerky Movement: Ensure the power supply provides adequate current and voltage.
-
Overheating: Reduce the motor speed to prevent overheating during prolonged use.
I've attached a wheel to the stepper motor:
Conclusion
The 28BYJ-48 stepper motor with the ULN2003 driver and Arduino offers a versatile and beginner-friendly setup for countless projects. From automating a curtain system to building a robotic arm, this guide equips you with the knowledge to get started. By understanding the basics, connections, and code, you can confidently use this motor to bring your ideas to life.




Just FYI: The Arduino dev board YB-ESP32-S3-DRV (sold e.g. on eBay and documented on github.com/yellobyte) needs no cabling or external modules and makes controlling two stepper motors like 28BYJ-48 a breeze.
Regards Th