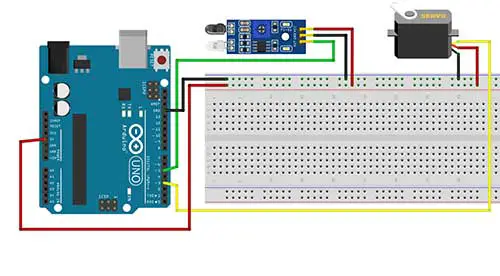
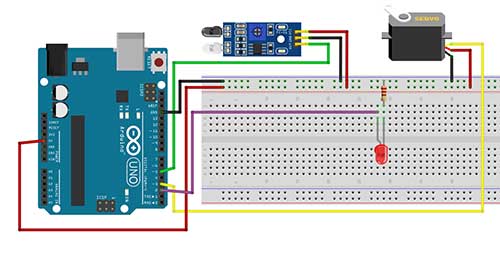
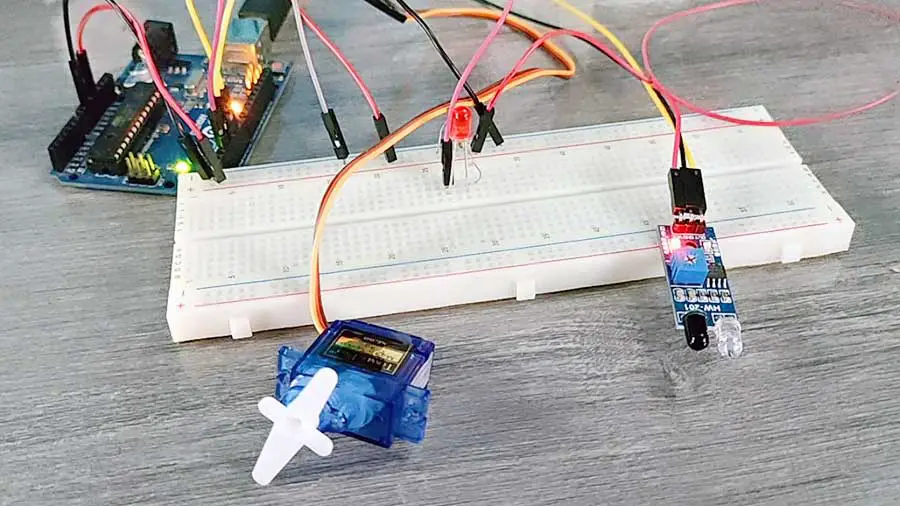
There are three things to consider when making a robotics application:
- It must be able to obtain information from its environment.
- It must exhibit a degree of intelligence, such as decision-making
- It must be able to manipulate objects.
So basically, to make a robotics application, we need a sensor, an actuator, and a brain in the form of a microcontroller.
In this article, we will use all three. For our sensor, we will use the basic HW-201 IR sensor. For the actuator, we will use the Tower Pro SG90 micro servo motor, and of course, for the “brains” of our robot, we will use an Arduino board.
PROJECT 1: Sensory Reaction
In this project, we will try to move the servo shaft if an object is detected.
- If an object is detected, turn the servo motor 10 degrees
- If there is no object detected, turn the servo motor 150 degrees
We will substitute the Sharp IR sensor with the HW-201 IR Sensor. Although, you can use any sensor available at your disposal.
Materials
- 1 Servo Motor
- 1 HW-201 IR Sensor
- 1 Arduino Microcontroller
Breadboard

Arduino Sketch
/*
    1.  If an object is detected, turn the
      servo motor 10 degrees
    2.  If there is no object detected,
      turn the servo motor 150 degrees
  */

  #include <Servo.h>
  Servo Serv;

  int pinIR=5;
  int pinServo=3;
  int val=0;

  void setup(){
		pinMode(pinIR,INPUT);
    Serv.attach(pinServo);
  }

  void loop(){
    val = digitalRead(pinIR);

    if (val ==0){
      Serv.write(150);
      delay(100);
    }
    else
    {
      Serv.write(10);
      delay(100);
    }
  }
So the first step is to use the built-in servo library, by writing:
#include <Servo.h>
Then we named our Servo object as Serv, by typing in
Servo Serv;
val = digitalRead(pinIR);This statement reads the value of our sensor to check if there is an object detected. Since this is a digital sensor, then we can expect a 0 or 1 value. This value will then be saved in the val variable.
    if (val ==0){
      Serv.write(150);
      delay(100);
    }
    else
    {
      Serv.write(10);
      delay(100);
    }
We then use the if-else statement to test if an object is detected. In our example, 0 means that an object is detected. However, you can always change this to 1 depending on what your sensor is giving you.
PROJECT 2: Sensory Double Reaction
We will build on the previous project by adding 1 LED. This is how this project should work:
- If an object is detected, turn the servo motor 10 degrees and turn on the LED
- If there is no object detected, turn the servo motor 150 degrees and turn off the LED
Materials
- 1 Servo Motor
- 1 HW-201 IR Sensor
- 1 Arduino Microcontroller
- 1 LED
- 1 220-ohm resistor
Breadboard

Arduino Sketch
/*
    1.  If an object is detected, turn the
      servo motor 10 degrees and turn on the LED
    2.  If there is no object detected, turn the
      servo motor 150 degrees and turn off the LED
  */

  #include <Servo.h>
  Servo Serv;

  int pinIR=5; //IR sensor digital pin
  int pinServo=3; //servo motor pin
  int pinLED=2;
  int val=0;

  void setup(){
    Serv.attach(pinServo);
    pinMode(pinLED,OUTPUT);
  }

  void loop(){
    val = digitalRead(pinIR);

    if (val ==0) {
      Serv.write(10);
      digitalWrite(pinLED,HIGH);
      delay(100);
    }
    else{
      Serv.write(150);
      digitalWrite(pinLED,LOW);
      delay(100);
    }
  }
The code is basically the same as the previous project except we just added some codes for the LED.


