Using a Liquid Crystal Display or LCD is a great and cheap way to add monitoring capabilities to your Arduino projects. It’s a very handy way to get feedback on what’s happening with your project. Many appliances and gadgets are using LCDs to communicate with the end-users. It is used in many useful applications such as digital thermometers, cash registers, calculators, and so many more.
Liquid Crystal Display (LCD)
LCD (Liquid Crystal Display) is a type of flat panel display which uses liquid crystals to form characters through a set of instructions or code. The liquid crystals in an LCD produce an image using a backlight.
I2C
I2C (IIC) means inter-integrated communication protocol. This is usually used to communicate between one master and multiple slaves. This setup eliminates the need for having to use many digital pins in the Arduino board. I2C is a serial communication protocol, so data is transferred bit by bit along a single wire (the SDA line).
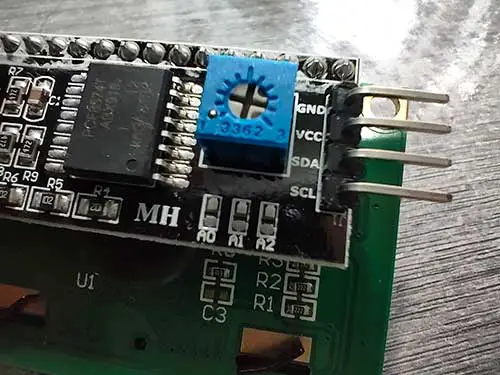
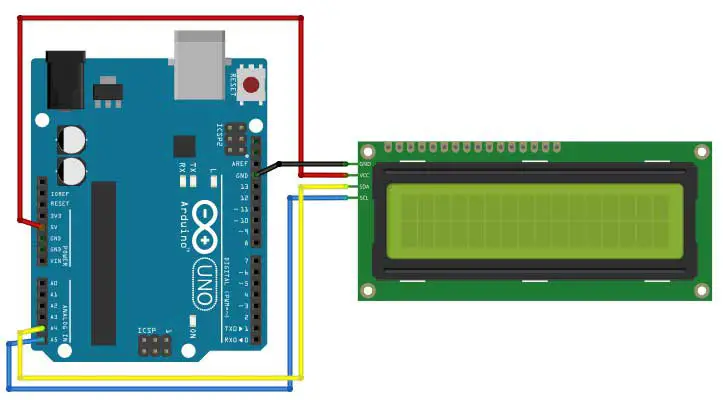
You will know that your LCD has I2C because you will see pins labeled SDA and SCL. These are the connections going to the Arduino board:
| I2C PINS | ARDUINO BOARD |
| GND | GND |
| VCC | 5V |
| SDA | A4 |
| SCL | A5 |
If you use the regular LCD display, the total number of connections is 12. If you use an I2C LCD display, you only need just 4.
Install the Necessary Libraries
Libraries are ready-mode codes that you just need to include in your Arduino sketch in order for your LCD to work. The LCD module I’m using is a generic 16x2 LCD with I2C. I have tried to include several libraries but I keep receiving errors. After many trials, I was able to make it work using 2 libraries, the LiquidCrystal_V1.2.1 library, and the Wire library. You can download these files at the bottom of this page.
Here are the steps to install the libraries.
Step 1. First, download the LiquidCrystal_V1.2.1 and Wire zip files.
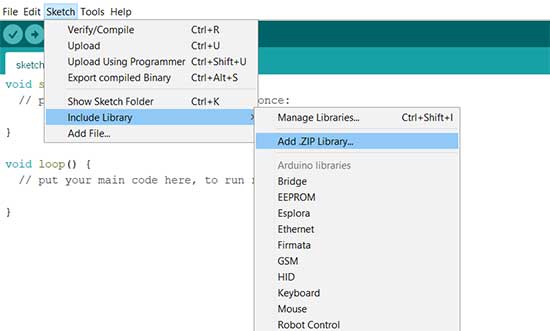
Step 2. Open your Arduino IDE and from the menu bar, go to Sketch->Include Library->Add .ZIP Library..
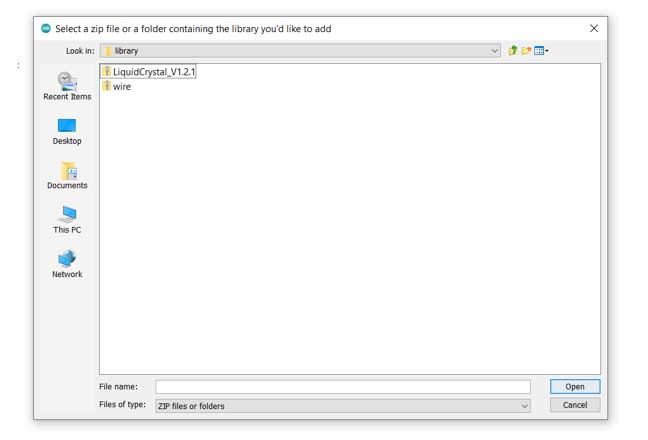
Step 3. Browse to where you saved the zip files and select one file at a time, then click Open. In this case, we select the LiquidCrystal_V1.2.1 zip file first.
After clicking Open, the library is now installed.
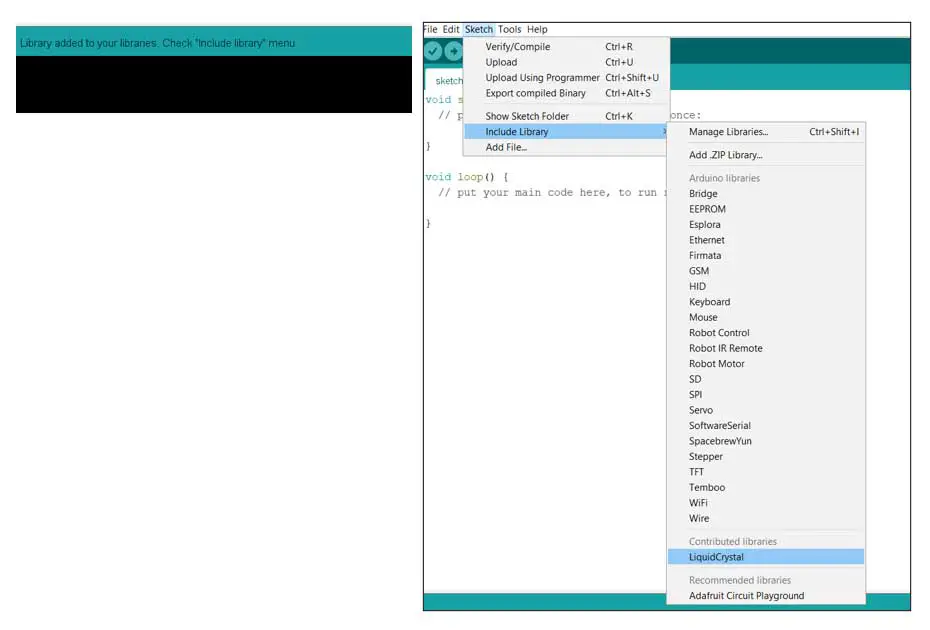
Step 4. Repeat the same process to include the Wire library.
PROJECT: LCD Hello World
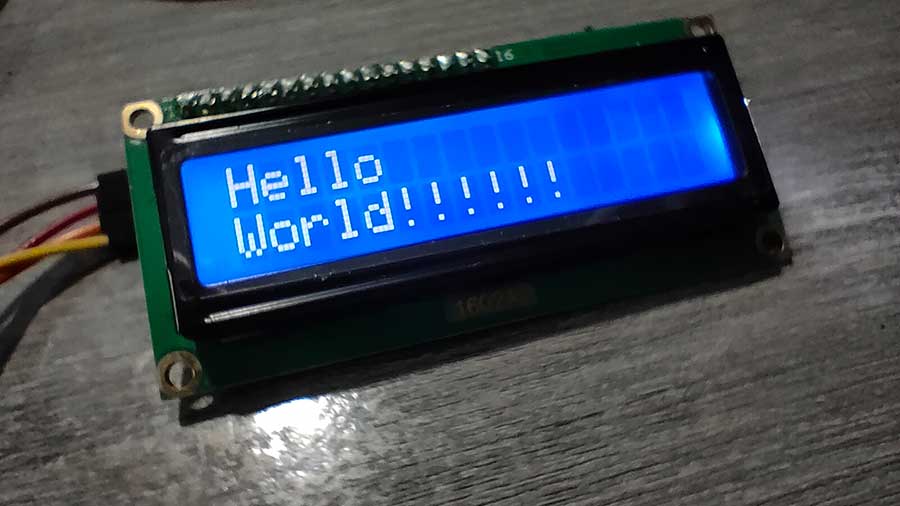
Now that you have installed the libraries, you are now ready to make your first LCD project. For your first project, let’s have the inevitable "Hello World!" project which simply displays the text Hello World! on the LCD.
This is Project 49 of the Arduino Intro app.
Here’s the breadboard circuit:
This is the code:
//SDA-->A4
//SCL-->A5

#include <Wire.h>
#include <LiquidCrystal_I2C.h>

//I2C pins declaration
LiquidCrystal_I2C lcd(0x27, 2, 1, 0, 4, 5, 6, 7, 3, POSITIVE);

void setup()
{
  lcd.begin(16,2);//Defining 16 columns and 2 rows of lcd display
  lcd.backlight();//To Power ON the back light
}

void loop()
{

  lcd.clear();//Clean the screen
  lcd.setCursor(0,0); //Defining positon to write from first column,first row .
  lcd.print("Hello"); //You can write 16 Characters per line .
  delay(1000);//Delay used to give a dynamic effect
  lcd.setCursor(0,1);  //Defining positon to write from first column,second row .
  lcd.print("World!!!!!!");
  delay(2000);
}
Here are the important parts of the sketch:
LiquidCrystal_I2C lcd(0x27, 2, 1, 0, 4, 5, 6, 7, 3, POSITIVE);The LiquidCrystal_I2C() function sets the pins the Arduino uses to connect to the LCD. You can use any of Arduino’s digital pins to control the LCD. Also, in this function, you need to specify the name of your LCD module, in this case, the name is lcd.
lcd.begin(16,2);This function sets the dimensions of the LCD. It needs to be placed before any other LiquidCrystal function in the void setup() section of the program.
The number of rows and columns is specified as:
lcd.begin(columns, rows)
For a 16x2 LCD, you would use lcd.begin(16,2)
lcd.backlight();This function is used to turn on the LCD backlight.
lcd.clear();This function clears any text or data already displayed on the LCD.
If you use lcd.clear() with lcd.print() and the delay() function in the void loop() section, you can make a simple blinking text program.
lcd.setCursor(0,0);This function places the cursor (and any printed text) at any position on the screen. It can be used in the void setup() or void loop() section of your program. In this case, the cursor is placed at the first column, first row. Remember that the column is written first before the row. 0 means the first column and the second 0 means the first row.
lcd.print("Hello");This function is used to print text to the LCD. It can be used in the void setup() sections or the void loop() section of the program. The text enclosed inside the double quotes is exactly what will be displayed.
delay(1000);This simply waits for 1 second before the next set of text is displayed. The delay here also produces a nice fading effect. This is completely optional.
lcd.setCursor(0,1);
Now the cursor is placed on the first column, second row. It is where the "World!" text will be displayed.
That’s it for the Hello World! LCD project. It is very easy to do, yet, it is a very nice addition to your projects.




I have problem with programming of my Arduino UNO and weitgh scale modul trough HX711.
I can set words in LCD so connection with LCD is OK. Also I can make calibration of load cell as well.
But I´m not able to make function weight scale with LCD to show up any data.
Can you advice the correct way how to program the Arduino?
Many thanks for your help in advance.
Regards
Petr
Hi Petr,
It's difficult to troubleshoot without looking at the code. But it could be an issue with the lcd.clear() function. Make sure there is a delay before writing the clear() function so that whatever was printed on the LCD will not be erased immediately. Or you may have the LCD coordinates wrong. There could be many factors affecting this project.
You can try removing the clear() function inside the loop() to check if something is printed on the LCD.