How to Make a Clap Switch Using Arduino (DIY LED Project)
Imagine walking into your room and turning the light on or off—without flipping a switch. Just clap your hands. Sounds cool, right?
In this beginner-friendly tutorial, we’ll show you exactly how to create a clap-controlled light using Arduino, a sound sensor, and an LED. This project is a great starting point for DIYers who are new to Arduino and want to explore the world of interactive electronics.
You might want to build a smart room setup, create a fun automation project, or simply learn something new and practical. This guide will walk you through every step—from wiring the components to writing the code that detects claps and controls the LED.
What is an Arduino Sound Sensor and How It Works
A sound sensor is a module that detects vibrations in the air—like a clap or a loud tap. When it senses a sharp sound, it sends a digital signal (HIGH) to the Arduino, which can then respond by turning something on or off.
Most sound sensors like the KY-038 or LM393 have:
-
A small microphone
-
A potentiometer to adjust sensitivity
-
A digital output (D0) and analog output (A0)
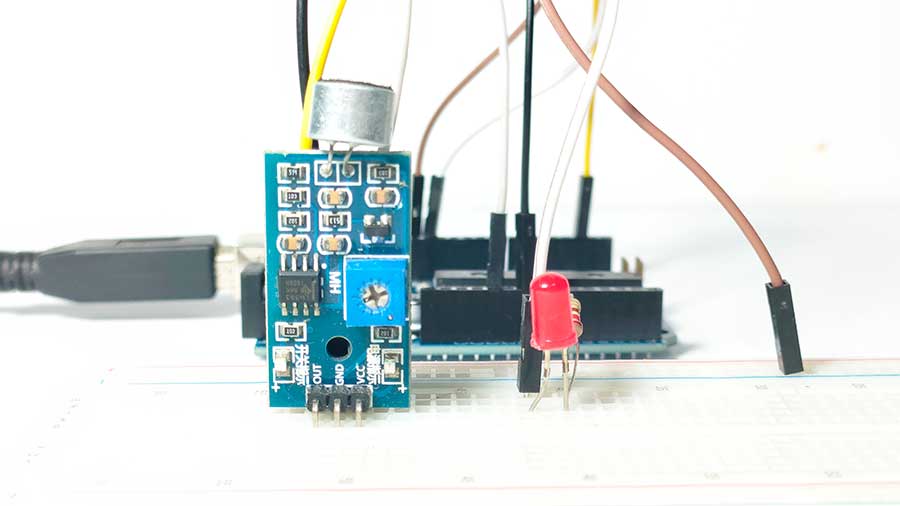
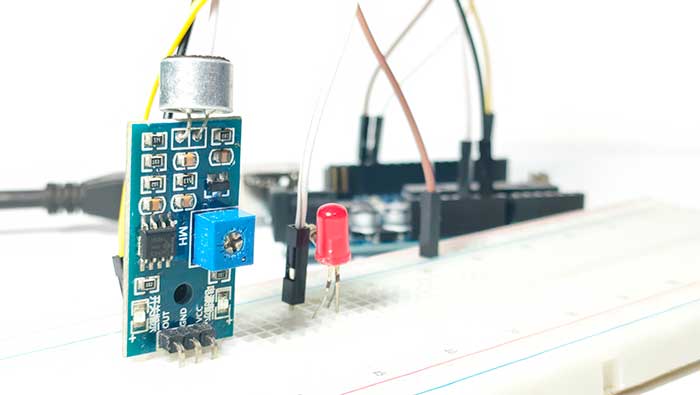
In this project, we’ll use the digital output to detect the clap event. We're also gonna be using the MH LM393 sound sensor module.
Parts List for Arduino Clap Switch with Sound Sensor
Here’s what you’ll need for this project:
-
1x Arduino Uno (or any compatible board)
-
1x Sound sensor module (KY-038 or LM393)
-
1x LED
-
1x 220-ohm resistor
-
Jumper wires
-
Breadboard
-
USB cable to connect Arduino
If you want to control high-voltage appliances, such as a 220-volt light bulb, I suggest you read my article on using relays. You can read it here: How to Safely Control High-Voltage Appliances with Arduino and Relay Module. The connections are fairly easy to follow.
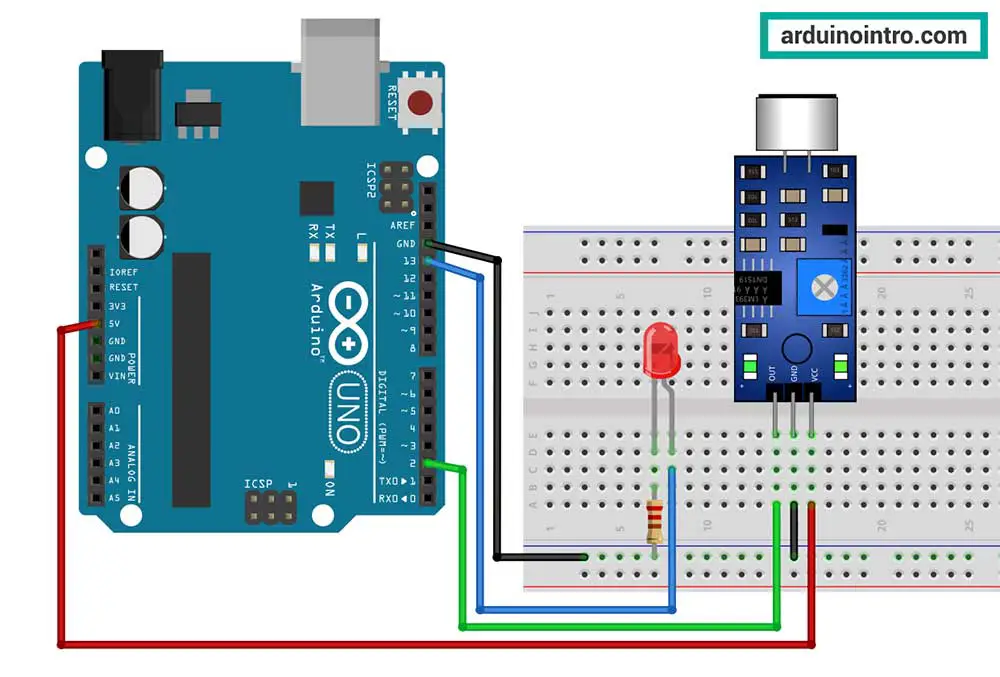
Arduino Clap Switch Wiring: Sound Sensor and LED
Follow this wiring guide to connect everything properly:
| Component | Connects To |
|---|---|
| Sound Sensor VCC | 5V on Arduino |
| Sound Sensor GND | GND on Arduino |
| Sound Sensor D0 | Digital Pin 2 on Arduino |
| LED (Anode) | Digital Pin 13 via resistor |
| LED (Cathode) | GND via resistor |
Note: You can adjust the sensor’s sensitivity using the tiny screw on the sensor.
How Clap Detection Works with Arduino and Sound Sensor
Here’s the simple idea:
-
You clap once → Arduino detects one sound pulse → LED turns on
-
You clap again quickly → Arduino detects a second pulse → LED turns off
We use timing logic to distinguish a single clap from a double clap.
Arduino Code for Clap Switch (1 Clap = ON, 2 Claps = OFF)
const int soundSensorPin = 2; // Sound sensor OUT pin
const int ledPin = 13; // LED pin
int clapCount = 0;
unsigned long firstClapTime = 0;
const unsigned int clapInterval = 500; // Max time between two claps (in ms)
void setup() {
pinMode(soundSensorPin, INPUT);
pinMode(ledPin, OUTPUT);
Serial.begin(9600);
}
void loop() {
int sensorValue = digitalRead(soundSensorPin);
if (sensorValue == LOW) { //sound detected
unsigned long currentTime = millis();
if (clapCount == 0) {
clapCount = 1;
firstClapTime = currentTime;
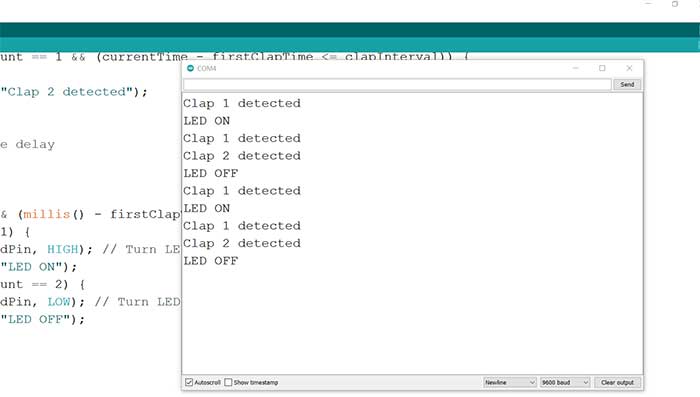
Serial.println("Clap 1 detected");
} else if (clapCount == 1 && (currentTime - firstClapTime <= clapInterval)) {
clapCount = 2;
Serial.println("Clap 2 detected");
}
// Simple debounce delay
delay(200);
}
if (clapCount > 0 && (millis() - firstClapTime > clapInterval)) {
if (clapCount == 1) {
digitalWrite(ledPin, HIGH); // Turn LED ON
Serial.println("LED ON");
} else if (clapCount == 2) {
digitalWrite(ledPin, LOW); // Turn LED OFF
Serial.println("LED OFF");
}
clapCount = 0;
}
}
Step-by-Step Explanation of Arduino Clap Detection Code
const int soundSensorPin = 2;We’re using digital pin 2 for the sound sensor’s output.
int clapCount = 0;This variable keeps track of how many claps were detected.
unsigned long lastClapTime = 0;Used to measure the time between claps using millis().
Inside loop():
-
We read the sound sensor’s digital output.
-
If the pin goes LOW (a clap), we compare the time to the last clap. Check the value of the sound sensor using the Serial Monitor; in my case, a clap registers a LOW value. Adjust the code if necessary.
-
If it's within
clapDelaymilliseconds, we count it as a second clap. -
First clap → LED turns on.
-
Second clap → LED turns off.
The delay(100) helps prevent the same clap from being counted multiple times due to sensor bouncing.
Here is my clap switch in action!
Understanding the millis() Function in Arduino
If you’re new to Arduino, you’ve probably seen the millis() function in the code and wondered, “What does this do?”
The millis() function in Arduino returns the number of milliseconds that have passed since the board was powered on or reset. It’s super useful for timing events without blocking the program—which is exactly what we need when detecting claps.
In our clap switch project, millis() helps us measure the time between two sound pulses to determine whether it’s a single clap or a double clap. Here's the key part of the code that uses it:
else if (clapCount == 1 && (currentTime - firstClapTime <= clapInterval)) {
      clapCount = 2;
      Serial.println("Clap 2 detected");
Why Not Just Use delay()?
The delay() function stops everything for a set amount of time. During that pause, Arduino can't check the sound sensor or do anything else. That's why millis() is better—because it lets your program keep running while checking the clock in the background.
When you use delay(1000);, it's like standing at a red light and doing nothing else for 1 second.
Arduino just sits there, waiting—it can’t check sensors, read inputs, or react to anything during that time.
This is why we avoid delay() for tasks like clap detection. You might miss the second clap entirely because the board is busy “waiting.”
Real-Life Example in This Project
Let’s say you clap once. Arduino stores the current time using lastClapTime = millis();. If you clap again within the clapDelay window (e.g., 400 milliseconds), it knows it's a double clap. If you wait too long, it treats the next clap as a new single clap.
This time-checking trick helps Arduino distinguish between one clap (turn on LED) and two claps (turn off LED).
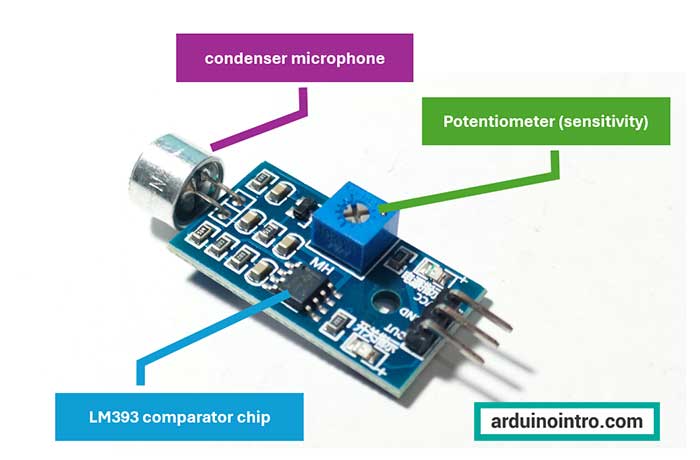
Major Parts of the LM393 Sound Sensor Explained
If you're new to working with the LM393 sound sensor module, understanding its parts is essential. This simple yet powerful module is commonly used in Arduino projects that respond to sound detection, such as a clap switch.
Here’s a breakdown of the key components on the LM393 sound sensor board:
1. Microphone
The small silver can on the board is the electret condenser microphone. This is the component that actually picks up sound waves from the environment. It converts sound into a small electrical signal that the rest of the circuit can process.
2. LM393 Comparator IC
The heart of the module is the LM393 dual comparator chip. It compares the incoming signal from the microphone against a reference voltage set by the onboard potentiometer. When the sound level crosses this threshold, the sensor triggers a HIGH or LOW signal on the digital output (D0) pin.
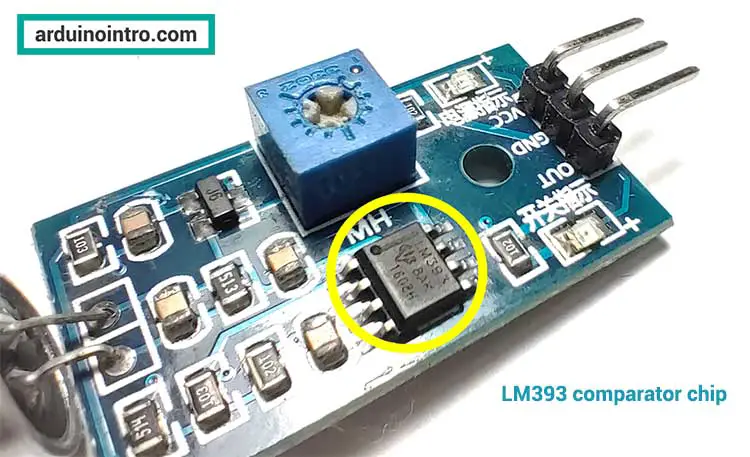
3. Potentiometer (Sensitivity Adjuster)
You’ll find a small blue knob or screw on the board—that’s the potentiometer. It lets you adjust the sensitivity of the sound sensor. Turn it clockwise to make the sensor more sensitive to softer sounds like snaps or low-volume claps. Turn it counterclockwise to reduce sensitivity and filter out background noise.
4. Onboard LEDs
Most LM393 sound sensors include two small indicator LEDs:
-
Power LED (usually red) – shows that the module is receiving power from the Arduino.
-
Output LED (usually green or blue) – lights up whenever the sensor detects sound above the threshold.
This visual feedback is great for beginners because it helps you know if the sensor is responding to your claps or voice in real time.
Troubleshooting Arduino Clap Switch (Common Issues)
LED doesn't turn on?
-
Check your wiring.
-
Make sure the resistor is in series with the LED.
Nothing happens when you clap?
-
Adjust the sound sensor’s sensitivity.
-
Try clapping louder or closer to the mic.
-
Use the Serial Monitor to see if claps are being detected.
Clap detection is unreliable?
-
Tune the
clapDelayvalue. -
Add noise filtering if needed (advanced users).
Final Thoughts: Make Your Own Arduino Sound Sensor LED Switch
Building a clap-controlled LED with Arduino is a fun and educational way to explore sound detection, digital inputs, and basic logic. It’s one of those beginner projects that teaches you real-world automation in a super hands-on way.
You now have everything you need: the components list, the wiring guide, the code, and even an explanation of how it all works.
So grab your Arduino and start clapping—your smart light is just a project away!
FAQ: Common Arduino Clap Switch Questions
FAQ: How do I make a clap switch using Arduino?
Use a sound sensor module to detect claps, and write Arduino code to toggle an LED based on the number of detected sound pulses.
FAQ: What Arduino sensor detects claps or sound?
You can use a sound sensor like the KY-038 or LM393, which detects sharp noises like claps through a built-in microphone.
FAQ: Why is my sound sensor not detecting claps?
Try adjusting the sensor's sensitivity screw. Also, ensure you're using the digital output (D0) and that your claps are loud and sharp.


