Made by: Shandale Gulfan
If you want a simple light source with a rustic, floral touch, this DIY Arduino project is definitely for you! This garden lantern is what you need to keep your room lit at night or just one of those days where you wish to see the sunset from your own room. With simple, accessible materials at home, you can make your very own garden sunset lantern!
Materials
1 whole illustration board
Glue gun
Stick glue
Box cutter/Scissors
Fake rocks and flowers
Tape
Clear plastic book cover
Gold metallic paint
Electronics:
Breadboard
Arduino Microcontroller
8 LEDs (4 yellow, 4 red)
Jumper wires
Push button
220-ohm resistor
10k ohm resistor
Procedure
STEP 1:
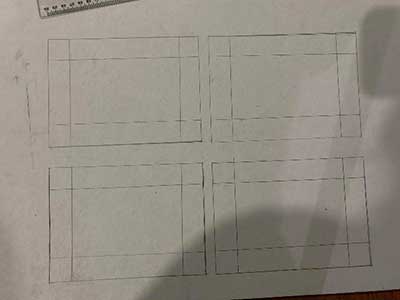
Draw and cut four 7” x 5” squares with 1-inch borders from the illustration board. Be careful if you opt in using the box cutter!
STEP 2:
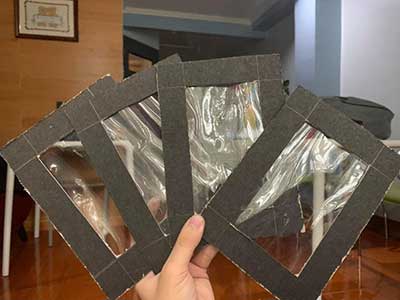
Cut four squares from the plastic book cover. Make sure that it’s a bit smaller than the illustration board squares. Tape the plastic on the white side of the illustration board. The black side will be facing out.
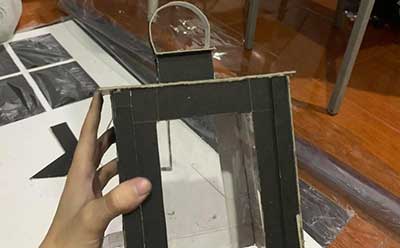
STEP 3:
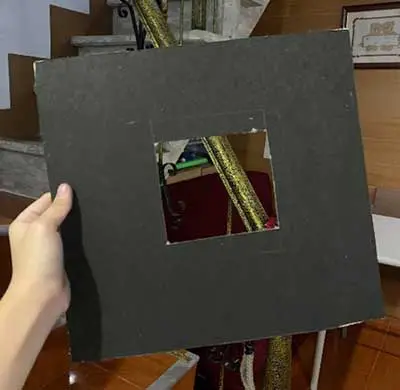
Hot glue the squares together. Then, cut an 8” x 5” rectangle and stick it on top of the four squares that are now glued together. Put together a little 3D rectangle with a handle on top and glue it on top of the lantern.
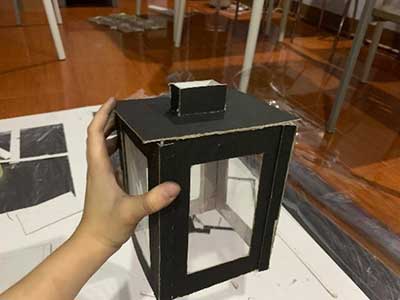
By now, it should look like this.
STEP 4:
Put together a 12” x 12” box with a height of 3”. This will be our base. Hollow out the middle and stick the lantern on top.
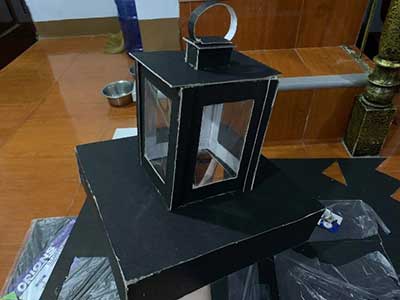
STEP 5:
Paint the lantern and its base with gold paint and wait for it to dry.

STEP 6:
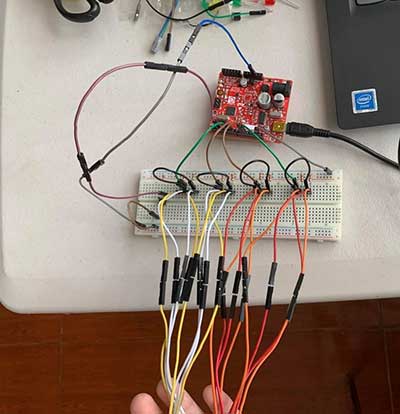
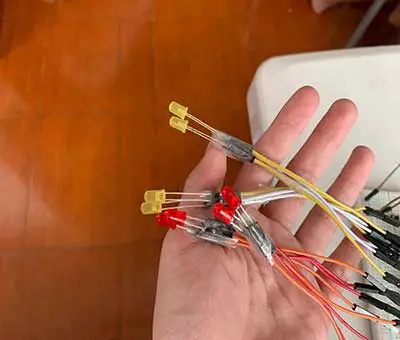
As the paint dries, the next thing to do is to connect the LEDs to the breadboard. I used 8 LEDs and utilized 4 pins. Using the female jumper wires, I extended the reach of the LEDs and taped the LEDs to prevent them from falling from the jumper wires. I also used one pushbutton to toggle the LEDs. This is what my breadboard looks like:
This is the code I used in Arduino:
int PinButton1 = 2;
int PinButton2 = 3;
int y1 = 5, y2 = 6, r1 = 9, r2 = 10;
int val =0;
int ledstate=LOW; //initial value

 void setup()
{
pinMode(PinButton1, INPUT);
pinMode(y1, OUTPUT);
pinMode(y2, OUTPUT);
pinMode(r1, OUTPUT);
pinMode(r2, OUTPUT);
}
void loop()
{
val=digitalRead(PinButton1);
if(val == HIGH)
{
ledstate=!ledstate;
digitalWrite(y1, ledstate);
digitalWrite(y2, ledstate);
delay(1000);
for (int fadeValue = 0 ; fadeValue <= 255; fadeValue = fadeValue+5) {
analogWrite(y1, fadeValue);
analogWrite(y2, fadeValue);
delay(50);
}
for (int fadeValue = 255 ; fadeValue >= 0; fadeValue = fadeValue-5) {
analogWrite(y1, fadeValue);
analogWrite(y2, fadeValue);
delay(50);
}
for (int fadeValue = 0 ; fadeValue <= 255; fadeValue = fadeValue+5) {
analogWrite(r1, fadeValue);
analogWrite(r2, fadeValue);
delay(50);
}

 for (int fadeValue = 255 ; fadeValue >= 0; fadeValue = fadeValue-5) {
analogWrite(r1, fadeValue);
analogWrite(r2, fadeValue);
delay(50);
}
for (int fadeValue = 0 ; fadeValue <= 255; fadeValue = fadeValue+5) {
analogWrite(y1, fadeValue);
analogWrite(y2, fadeValue);
delay(50);
}
for (int fadeValue = 255 ; fadeValue >= 0; fadeValue = fadeValue-5) {
analogWrite(y1, fadeValue);
analogWrite(y2, fadeValue);
delay(50);
}
for (int fadeValue = 0 ; fadeValue <= 255; fadeValue = fadeValue+5) {
analogWrite(r1, fadeValue);
analogWrite(r2, fadeValue);
delay(50);
}
for (int fadeValue = 255 ; fadeValue >= 0; fadeValue = fadeValue-5) {
analogWrite(r1, fadeValue);
analogWrite(r2, fadeValue);
delay(50);
}
for (int fadeValue = 0 ; fadeValue <= 255; fadeValue = fadeValue+5) {
analogWrite(y1, fadeValue);
analogWrite(y2, fadeValue);
delay(50);
}
for (int fadeValue = 255 ; fadeValue >= 0; fadeValue = fadeValue-5) {
analogWrite(y1, fadeValue);
analogWrite(y2, fadeValue);
delay(50);
}
for (int fadeValue = 0 ; fadeValue <= 255; fadeValue = fadeValue+5) {
analogWrite(y1, fadeValue);
analogWrite(y2, fadeValue);
delay(50);
}
for (int fadeValue = 0 ; fadeValue <= 255; fadeValue = fadeValue+5) {
analogWrite(r1, fadeValue);
analogWrite(r2, fadeValue);
delay(50);
}
val=digitalRead(PinButton1);
if(val == HIGH)
{
ledstate=!ledstate;
digitalWrite(y1, ledstate);
digitalWrite(y2, ledstate);
delay(1000);
for (int fadeValue = 0 ; fadeValue <= 255; fadeValue = fadeValue+5) {
analogWrite(y1, fadeValue);
analogWrite(y2, fadeValue);
delay(50);
}
for (int fadeValue = 255 ; fadeValue >= 0; fadeValue = fadeValue-5) {
analogWrite(y1, fadeValue);
analogWrite(y2, fadeValue);
delay(50);
}
for (int fadeValue = 0 ; fadeValue <= 255; fadeValue = fadeValue+5) {
analogWrite(r1, fadeValue);
analogWrite(r2, fadeValue);
delay(50);
}

 for (int fadeValue = 255 ; fadeValue >= 0; fadeValue = fadeValue-5) {
analogWrite(r1, fadeValue);
analogWrite(r2, fadeValue);
delay(50);
}
for (int fadeValue = 0 ; fadeValue <= 255; fadeValue = fadeValue+5) {
analogWrite(y1, fadeValue);
analogWrite(y2, fadeValue);
delay(50);
}
for (int fadeValue = 255 ; fadeValue >= 0; fadeValue = fadeValue-5) {
analogWrite(y1, fadeValue);
analogWrite(y2, fadeValue);
delay(50);
}
}
}
}
STEP 7:
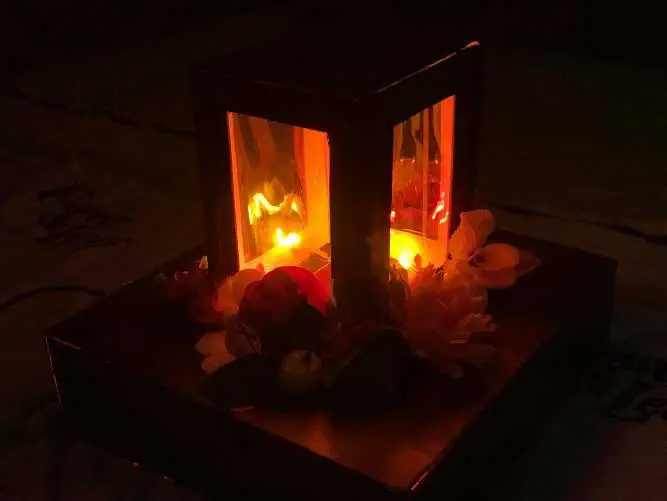
Decorate the base of the lantern with flowers and rocks. The design is completely up to you. Put the breadboard and Arduino under the base so it can’t be seen. Attach the LEDs to the side of the lantern.

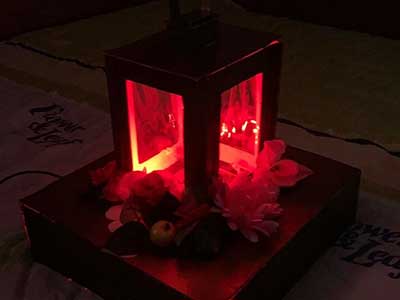
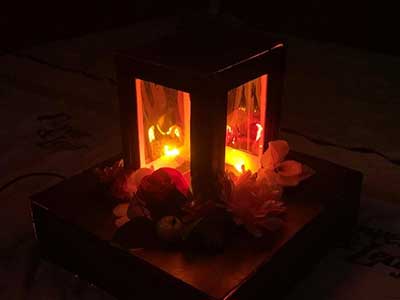
And here's the final product!

Making this lantern was very fulfilling, to say the least. I realized that I can do much more than I expect myself to. Computer is not easy and not everyone is good at it. But you don’t necessarily have to be good at something, you just have to try. Throughout making this product, it was a rollercoaster ride of breakdowns, cheers, and stress, but it’s an experience that I want to go through again. Making a product with simple materials that you can access at home is also one way of upcycling and brainstorming. It brings out your creativity and originality. The process of making this was not easy, it was not something I could do with my eyes closed, it was hard, but it’s worth the experience and worth the try.


