In today's world, security is of utmost importance, and having a reliable alarm system can provide peace of mind. In this tutorial, I will guide you through creating a simple yet effective motion detection alarm system using readily available components like a Passive Infrared (PIR) sensor, an I2C LCD, and a piezo buzzer. This system will trigger an alarm whenever motion is detected, alerting you to potential intruders.
Understanding PIR Sensors, Piezo Buzzers, LCDs, and Arduino
Before diving into the project, let's familiarize ourselves with the key components involved. PIR sensors detect infrared radiation emitted by moving objects, while piezo buzzers produce audible alerts. LCDs serve as visual displays for presenting data, and Arduino acts as the brain, facilitating communication between components.
For complete details about the PIR sensor, you may read this article that I have written previously: Exploring Home Automation: Integrating Passive Infrared Sensors with Arduino
You may also find more details about the I2C LCD in this article: Displaying Characters Using the I2C Liquid Crystal Display (LCD)
You can read more about piezo buzzers here: Exploring Piezo Buzzer Integration with Arduino: A Comprehensive Guide
Step-by-Step Guide: Integrating PIR Sensor with Piezo Buzzer, LCD, and Arduino
Now, let's get our hands dirty and dive into the nitty-gritty details of setting up our project. We'll provide a step-by-step guide, complete with wiring diagrams, Arduino code, and explanations to ensure a smooth and successful implementation.
Components Needed:
Before we begin, make sure you have the following components:
- PIR Sensor
- Arduino Board (e.g., Arduino Uno)
- I2C LCD Display
- Piezo buzzer
- Breadboard and Jumper Wires
Step 1: Wiring Setup
Follow the wiring diagram provided below to connect the components:
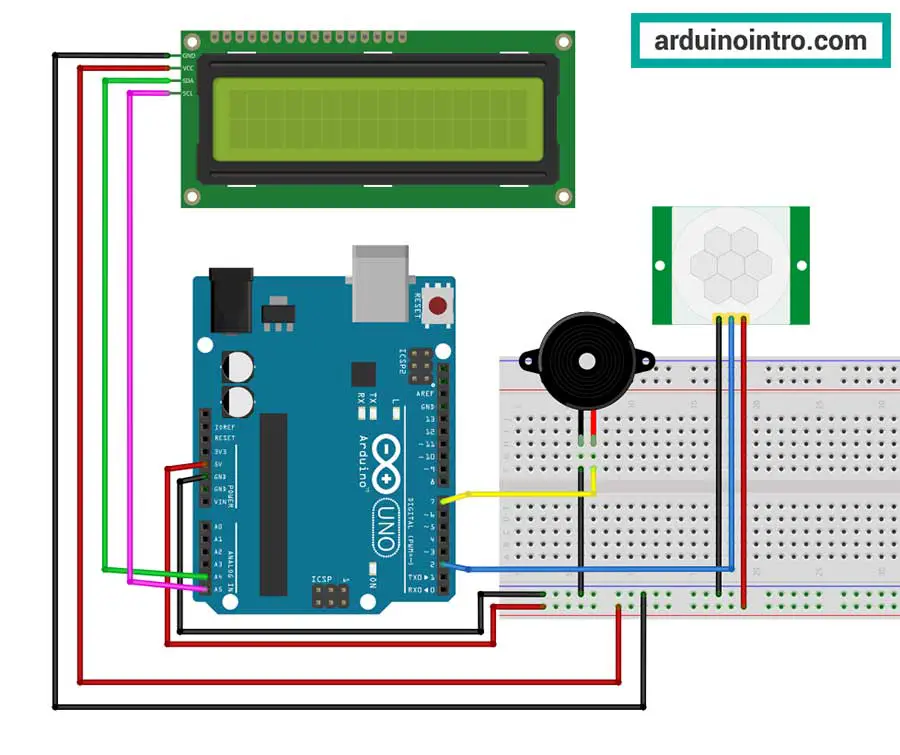
- Connect the VCC pin of the PIR sensor to the 5V pin on the Arduino.
- Connect the GND pin of the PIR sensor to the GND pin on the Arduino.
- Connect the OUT pin of the PIR sensor to digital pin 2 on the Arduino.
- Connect the SDA pin of the I2C LCD to the A4 pin on the Arduino.
- Connect the SCL pin of the I2C LCD to the A5 pin on the Arduino.
- Connect the positive (+) terminal of the piezo buzzer module to digital pin 7 on the Arduino.
- Connect the negative (-) terminal of the piezo buzzer module to the GND pin on the Arduino.
Step 2: Coding the Arduino
Next, let's write the Arduino code to interface with the components. Below is a sample code that detects motion using the PIR sensor and triggers the piezo buzzer while displaying status on the LCD:
#include <Wire.h>
#include <LiquidCrystal_I2C.h>
LiquidCrystal_I2C lcd(0x27, 2, 1, 0, 4, 5, 6, 7, 3, POSITIVE);
int pirPin = 2; // PIR sensor connected to digital pin 2
int buzzerPin = 7; // Piezo buzzer connected to digital pin 7
void setup() {
pinMode(pirPin, INPUT);
pinMode(buzzerPin, OUTPUT);
lcd.begin(16, 2); // Set up the LCD's number of columns and rows
lcd.backlight(); // Turn on the backlight
lcd.setCursor(0, 0);
lcd.print("Motion Detector");
delay(2000);
}
void loop() {
int motion = digitalRead(pirPin);
if (motion == HIGH) {
lcd.clear();
lcd.setCursor(0, 0);
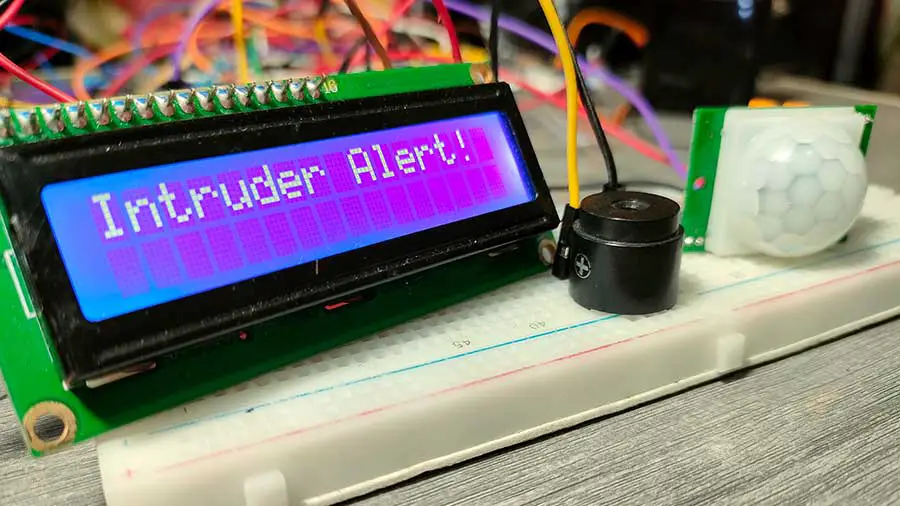
lcd.print("Intruder Alert!");
tone(buzzerPin, 1000); // Emit a 1kHz tone
delay(1000); // Sound the buzzer for 1 second
noTone(buzzerPin); // Stop the buzzer
}
else{
lcd.clear();
lcd.print("Monitoring...");
delay(500);
}
}
Step 3: Uploading the Code
- Connect your Arduino board to your computer using a USB cable.
- Open the Arduino IDE.
- Copy and paste the provided code into the IDE.
- Select the correct board and port from the "Tools" menu.
- Click the "Upload" button to upload the code to your Arduino board.
Step 4: Testing
- Once the code is uploaded, power on your Arduino board.
- Place the PIR sensor in the desired location.
- When motion is detected, the LCD will display "Intruder Alert!" and the piezo buzzer will emit a sound.
Here's a video of my output:
Code Explanation:
Let's break down the provided Arduino code step by step:
Including Libraries:
#include <Wire.h>
#include <LiquidCrystal_I2C.h>
These lines include the necessary libraries for using I2C communication and the LiquidCrystal_I2C library for controlling the LCD. The instructions for downloading and installing the libraries can be found here: Displaying Characters Using the I2C Liquid Crystal Display (LCD)
Initializing LCD Object:
LiquidCrystal_I2C lcd(0x27, 2, 1, 0, 4, 5, 6, 7, 3, POSITIVE); This line creates an object named lcd of type LiquidCrystal_I2C. It specifies the I2C address of the LCD (0x27), along with the pin mapping for RS, E, D4, D5, D6, D7, and the backlight control pin.
Defining Pin Connections:
int pirPin = 2;     // PIR sensor connected to digital pin 2
int buzzerPin = 7;  // Piezo buzzer connected to digital pin 7
These lines define the pin numbers to which the PIR sensor and the piezo buzzer are connected, respectively.
Setup Function:
void setup() {
  pinMode(pirPin, INPUT);
  pinMode(buzzerPin, OUTPUT);
  lcd.begin(16, 2); // Set up the LCD's number of columns and rows
  lcd.backlight(); // Turn on the backlight
  lcd.setCursor(0, 0);
  lcd.print("Motion Detector");
  delay(2000);
}
In the setup() function:
pinMode()sets the specified pins as either inputs or outputs. Here,pirPinis set as an input for reading from the PIR sensor, andbuzzerPinis set as an output for controlling the piezo buzzer.lcd.begin(16, 2)sets up the number of columns and rows of the LCD.lcd.backlight()turns on the backlight of the LCD.lcd.setCursor(0, 0)sets the cursor position to the first column of the first row.lcd.print("Motion Detector")displays the text "Motion Detector" on the LCD.delay(2000)ensures that the text "Motion Detector" stays on the LCD for 2 seconds before being cleared.
Loop Function:
void loop() {
  int motion = digitalRead(pirPin);

  if (motion == HIGH) {
    lcd.clear();
    lcd.setCursor(0, 0);
    lcd.print("Intruder Alert!");
    tone(buzzerPin, 1000); // Emit a 1kHz tone
    delay(1000); // Sound the buzzer for 1 second
    noTone(buzzerPin); // Stop the buzzer
  }
  else{
    lcd.clear();
    lcd.print("Monitoring...");
    delay(500);
  }
}
In the loop() function:
digitalRead(pirPin)reads the state of the PIR sensor connected topirPin. If motion is detected, it returnsHIGH, otherwiseLOW.- If
motionisHIGH(motion is detected), the following actions are performed:lcd.clear()clears all text printed on the LCD.lcd.setCursor(0, 0)sets the cursor position to the first column of the first row.lcd.print("Intruder Alert!")displays the text "Intruder Alert!" on the LCD.tone(buzzerPin, 1000)emits a 1kHz tone through the piezo buzzer connected tobuzzerPin.delay(1000)pauses the program execution for 1 second (1000 milliseconds).noTone(buzzerPin)stops the buzzer after the delay.
- If
motionisLOW(motion is not detected, as denoted by the keywordelse), the following actions are performed:lcd.clear()clears all text printed on the LCD.lcd.print("Monitoring...")displays the text "Monitoring..." on the LCD.delay(500)pauses the program execution for half a second (500 milliseconds).
This loop continues to run indefinitely, repeatedly checking for motion detected by the PIR sensor and triggering the alarm accordingly.
Common Problems and Troubleshooting:
While building your DIY Motion Detection Alarm System, you may encounter a few bumps along the road. Here are some potential issues you might face and how to troubleshoot them:
1. Sensor Placement:
- Problem: The PIR sensor may not detect motion effectively if it's not positioned correctly.
- Solution: Ensure that the PIR sensor is placed in a strategic location with a clear line of sight to the area you want to monitor. Adjust the sensor's angle and height for optimal detection range.
2. False Alarms:
- Problem: The alarm triggers even when there's no motion detected.
- Solution: Adjust the sensitivity and delay settings of the PIR sensor to minimize false alarms. You can usually adjust these settings using onboard potentiometers or through code modifications.
3. LCD Display Issues:
- Problem: The text on the LCD is not visible or garbled.
- Solution: Check the connections between the Arduino, I2C module, and LCD. Adjust the contrast of the LCD if necessary.
4. Buzzer Not Emitting Sound:
- Problem: The piezo buzzer doesn't produce any sound when the alarm is triggered.
- Solution: Double-check the wiring connections between the Arduino and the piezo buzzer. Ensure that the buzzer is connected to the correct digital pin and that the pin is configured as an output in the code. Test the buzzer with a simple tone() function to verify its functionality.
5. Power Supply Issues:
- Problem: The system behaves erratically or resets unexpectedly.
- Solution: Ensure that the Arduino and all components are adequately powered. Use a stable power source and avoid overloading the Arduino's voltage regulator. Check for any loose connections or short circuits that may be causing power fluctuations.
6. Code Errors:
- Problem: The Arduino code doesn't compile or produces unexpected behavior.
- Solution: Review the code carefully for syntax errors, missing semicolons, or incorrect function calls. Make sure all libraries are included and correctly initialized. Refer to the documentation for your components and seek help from online forums or communities if needed.
By addressing these common issues, you can troubleshoot any challenges that arise during the construction and operation of your Motion Detection Alarm System, ensuring a smooth and reliable security solution for your home or workspace.
FAQs:
Q: How can I customize the behavior of the system?
A: The provided Arduino code serves as a foundation that you can modify to suit your preferences. Experiment with different sensor thresholds, buzzer frequencies, and LCDs to tailor the system to your requirements.
Conclusion:
Congratulations! You have successfully created a motion detection alarm system using a PIR sensor, I2C LCD, and a piezo buzzer module. This DIY project provides a basic yet effective solution for enhancing security in your home or workspace. Experiment with different configurations and add more features to customize your alarm system further. Stay safe and secure!


You will need access to the internet for this functionality. One way to do this is to connect a Wi-Fi module, such as an ESP32 or ESP8266, to your Arduino board. I haven't written about this module yet, but I plan to write an article about it soon.