Are you intrigued by the possibilities of integrating a piezo buzzer with Arduino but unsure where to begin? Have you ever wondered how to effectively utilize a piezo buzzer with Arduino to enhance your projects? Look no further! In this article, we'll delve into the exciting world of piezo buzzers and Arduino, providing a step-by-step guide to help you understand and implement this fascinating technology.
Whether you're a beginner or an experienced Arduino enthusiast, this article will serve as your ultimate resource for unlocking the potential of piezo buzzers in your projects. This article will serve as your comprehensive guide to mastering the integration of piezo buzzers with Arduino.
Understanding Piezo Buzzers
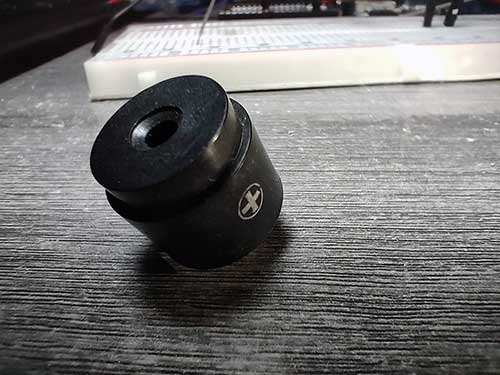
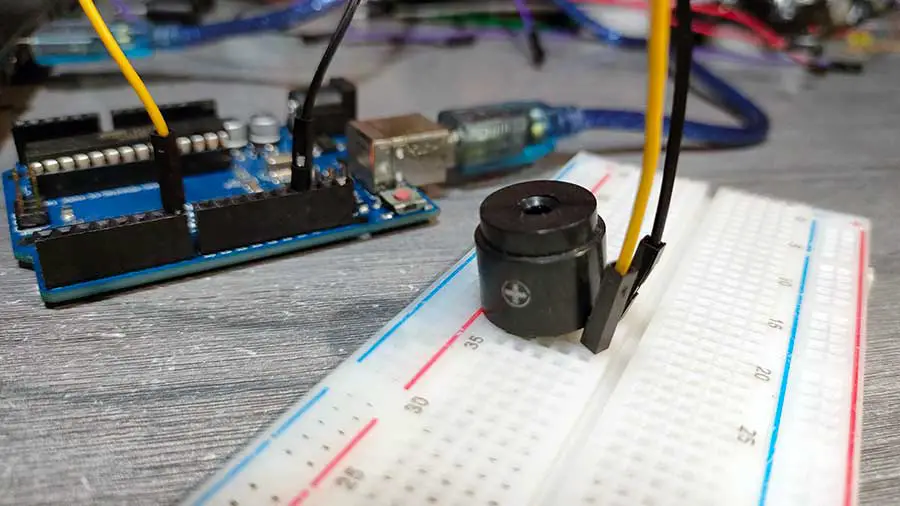
Before we dive into the integration process, let's first understand what piezo buzzers are and how they work. Piezo buzzers are compact electronic devices that produce sound by rapidly vibrating a piezoelectric crystal. Unlike traditional speakers, piezo buzzers operate by converting electrical energy into mechanical vibrations, resulting in audible sound waves. These buzzers are commonly used in various applications, including alarms, electronic toys, and musical instruments, due to their simplicity and reliability.
A piezo buzzer module called MH-FMD can be found here: Adding Sound to Arduino Using the MH-FMD Piezo Buzzer Module
Integration with Arduino
Now that we have a basic understanding of piezo buzzers, let's explore how to integrate them with Arduino. The following steps will guide you through the process:
Step 1: Gather Your Materials
Before you begin, make sure you have the following components:
- Arduino board (e.g., Arduino Uno)
- Piezo buzzer
- Jumper wires
Step 2: Wiring the Piezo Buzzer
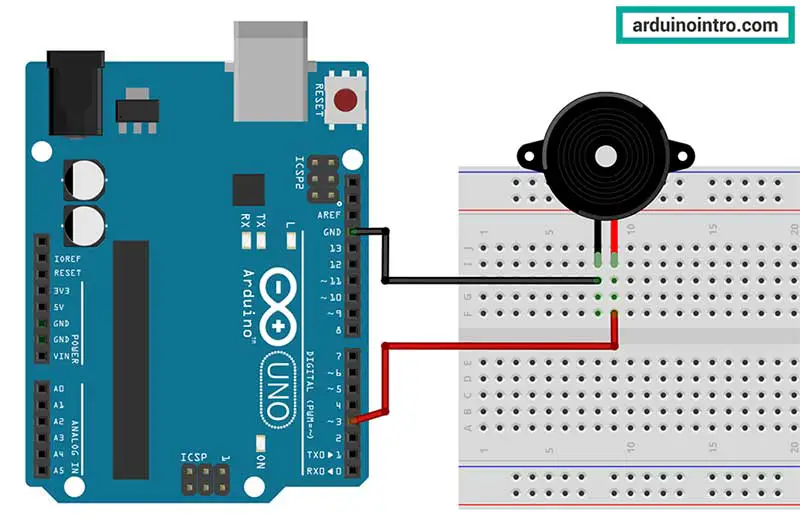
Connect the positive (+) lead of the piezo buzzer to digital pin 3 (it could be any digital pin from 2 to 13) on the Arduino board and the negative (-) lead to ground (GND) using jumper wires.

Step 3: Writing the Arduino Code
Now, let's write a simple Arduino sketch to generate a tone using the piezo buzzer. Open the Arduino IDE and create a new sketch. Copy and paste the following code:
#define PIEZO_PIN 3

void setup() {
  // Set the piezo pin as an output
  pinMode(PIEZO_PIN, OUTPUT);
}

void loop() {
  // Generate a tone of 1000Hz for 1 second
  tone(PIEZO_PIN, 1000);
  delay(1000);
  // Stop the tone
  noTone(PIEZO_PIN);
  delay(1000); // Wait for 1 second before repeating
}
Step 4: Uploading the Code
Connect your Arduino board to your computer using a USB cable and upload the sketch to the board using the Arduino IDE.
Step 5: Testing the Setup
Once the code is uploaded successfully, you should hear a 1000Hz tone emitted from the piezo buzzer. Congratulations! You have successfully integrated a piezo buzzer with Arduino.
Arduino Code Explanation for Piezo Buzzer
Here's a step-by-step explanation of the provided Arduino code:
#define PIEZO_PIN 3
This line defines a constant named PIEZO_PIN with the value 3. This constant represents the digital pin number to which the piezo buzzer is connected. You may use any digital pin except 0 and 1.
pinMode(PIEZO_PIN, OUTPUT);
Within the setup() function, this line configures the pin defined by PIEZO_PIN (pin 3) as an output. This indicates that the pin will be used to send signals (voltage) to the piezo buzzer to generate sound.
tone(PIEZO_PIN, 1000);
Within the loop() function, this line generates a tone of 1000Hz (frequency) on the pin defined by PIEZO_PIN (pin 3). This causes the piezo buzzer to produce a sound at that frequency.
delay(1000);
noTone(PIEZO_PIN);
delay(1000); //
-
delay(1000);: After generating the tone, this line pauses the execution of the code for 1000 milliseconds (1 second). This effectively keeps the tone playing for 1 second. -
noTone(PIEZO_PIN);: This line stops the tone being generated on the pin defined byPIEZO_PIN(pin 3). This stops the sound output from the piezo buzzer. -
delay(1000);: After stopping the tone, this line introduces another delay of 1000 milliseconds (1 second). This delay ensures that there is a pause of 1 second before the loop repeats and the tone generation starts again.
In summary, this code sets up pin 3 as an output pin for controlling the piezo buzzer. It then enters a loop where it generates a 1000Hz tone for 1 second, stops the tone, and waits for another second before repeating the process. This results in a continuous generation of a 1000Hz tone with 1-second intervals.
Bonus Arduino Code: 'Twinkle Twinkle Little Star'
Here's the Arduino code to play the complete "Twinkle Twinkle Little Star" song using a piezo buzzer:
#define PIEZO_PIN 3 // Define the pin connected to the piezo buzzer

// Define the notes and corresponding frequencies for the "Twinkle Twinkle Little Star" tune
#define NOTE_C4  262
#define NOTE_D4  294
#define NOTE_E4  330
#define NOTE_F4  349
#define NOTE_G4  392
#define NOTE_A4  440
#define NOTE_B4  494
#define NOTE_C5  523
#define NOTE_REST 0

// Define the durations of the notes in milliseconds
#define DURATION_QUARTER 250
#define DURATION_HALF 500
#define DURATION_WHOLE 1000

void setup() {
  pinMode(PIEZO_PIN, OUTPUT); // Set the piezo pin as an output
}

void loop() {
  // Play the complete "Twinkle Twinkle Little Star" song
  playNote(NOTE_C4, DURATION_QUARTER);
  playNote(NOTE_C4, DURATION_QUARTER);
  playNote(NOTE_G4, DURATION_QUARTER);
  playNote(NOTE_G4, DURATION_QUARTER);
  playNote(NOTE_A4, DURATION_QUARTER);
  playNote(NOTE_A4, DURATION_QUARTER);
  playNote(NOTE_G4, DURATION_HALF);

  playNote(NOTE_F4, DURATION_QUARTER);
  playNote(NOTE_F4, DURATION_QUARTER);
  playNote(NOTE_E4, DURATION_QUARTER);
  playNote(NOTE_E4, DURATION_QUARTER);
  playNote(NOTE_D4, DURATION_QUARTER);
  playNote(NOTE_D4, DURATION_QUARTER);
  playNote(NOTE_C4, DURATION_HALF);

  playNote(NOTE_G4, DURATION_QUARTER);
  playNote(NOTE_G4, DURATION_QUARTER);
  playNote(NOTE_F4, DURATION_QUARTER);
  playNote(NOTE_F4, DURATION_QUARTER);
  playNote(NOTE_E4, DURATION_QUARTER);
  playNote(NOTE_E4, DURATION_QUARTER);
  playNote(NOTE_D4, DURATION_HALF);

  playNote(NOTE_G4, DURATION_QUARTER);
  playNote(NOTE_G4, DURATION_QUARTER);
  playNote(NOTE_F4, DURATION_QUARTER);
  playNote(NOTE_F4, DURATION_QUARTER);
  playNote(NOTE_E4, DURATION_QUARTER);
  playNote(NOTE_E4, DURATION_QUARTER);
  playNote(NOTE_D4, DURATION_HALF);

  playNote(NOTE_C4, DURATION_QUARTER);
  playNote(NOTE_C4, DURATION_QUARTER);
  playNote(NOTE_G4, DURATION_QUARTER);
  playNote(NOTE_G4, DURATION_QUARTER);
  playNote(NOTE_A4, DURATION_QUARTER);
  playNote(NOTE_A4, DURATION_QUARTER);
  playNote(NOTE_G4, DURATION_HALF);

  playNote(NOTE_F4, DURATION_QUARTER);
  playNote(NOTE_F4, DURATION_QUARTER);
  playNote(NOTE_E4, DURATION_QUARTER);
  playNote(NOTE_E4, DURATION_QUARTER);
  playNote(NOTE_D4, DURATION_QUARTER);
  playNote(NOTE_D4, DURATION_QUARTER);
  playNote(NOTE_C4, DURATION_HALF);

  delay(1000); // Pause between repeats
}

// Function to play a note with a given frequency and duration
void playNote(int frequency, int duration) {
  tone(PIEZO_PIN, frequency, duration); // Generate the tone
  delay(duration + 50); // Add a small delay for note separation
  noTone(PIEZO_PIN); // Stop the tone
}
This code will play the complete "Twinkle Twinkle Little Star" song on the piezo buzzer connected to pin 3 of the Arduino board. Adjust the duration values to change the tempo of the song if needed.
Conclusion
In conclusion, integrating a piezo buzzer with Arduino opens up a world of possibilities for creating interactive and engaging projects. By following the step-by-step guide provided in this article, you can harness the power of piezo buzzers to add auditory feedback to your Arduino projects with ease. Whether you're building a simple alarm system or a sophisticated musical instrument, the combination of piezo buzzers and Arduino offers endless opportunities for creativity and innovation.
So, what are you waiting for? Start experimenting with piezo buzzers and Arduino today and unleash your creativity like never before!


