Are you looking to elevate your Arduino projects to the next level by incorporating precise distance measurement capabilities? Look no further than the powerful combination of an ultrasonic sensor, LCD, and Arduino. Whether you want to build a smart parking assistant to help with tight parking spaces or enhance your robotics project with obstacle detection, this comprehensive guide will delve into the intricacies of utilizing these components to create accurate distance-measuring systems.
Whether you're a seasoned Arduino enthusiast or a newcomer to the world of electronics, this article will serve as your ultimate resource.
Here's my output:
Exploring Ultrasonic Sensors
Ultrasonic sensors utilize sound waves to detect objects and measure distances accurately. By emitting ultrasonic waves and analyzing their reflections, these sensors can determine the distance to nearby objects with remarkable precision. This technology finds applications in various fields, including robotics, automation, and distance measurement systems. In this project, I used the HC-SR04 ultrasonic sensor module.
You may read more about the HC-SR04 sensor here: Using the HC-SR04 Ultrasonic Sensor to Detect Objects
Understanding LCD Displays
LCD (Liquid Crystal Display) screens provide a user-friendly interface for displaying information in Arduino projects. With their ability to convey data clearly and concisely, LCDs are invaluable tools for enhancing the usability and functionality of electronic devices. By integrating an LCD screen into your Arduino setup, you can present real-time measurements and feedback to users with ease. In this project, I used an I2C LCD.
You may read more about the I2C LCD here: Displaying Characters Using the I2C Liquid Crystal Display (LCD)
And also here: Create Custom Characters for the I2C LCD Easily
Integrating Ultrasonic Sensors with Arduino
The Arduino platform serves as the brain behind countless DIY electronics projects, thanks to its versatility and ease of use. By connecting an ultrasonic sensor to an Arduino board and writing a few lines of code, you can create a sophisticated distance-measuring system in no time.
This section will walk you through the process of wiring the components together and writing the necessary code to interface with the ultrasonic sensor. Here are the steps to integrate ultrasonic sensors with Arduino:
Step 1: Setting up the Hardware
First, gather the necessary components:
- Arduino board (Arduino Uno)
- Ultrasonic sensor (HC-SR04)
- I2C LCD (16x2 character LCD)
- Jumper wires
Wire the components as follows:
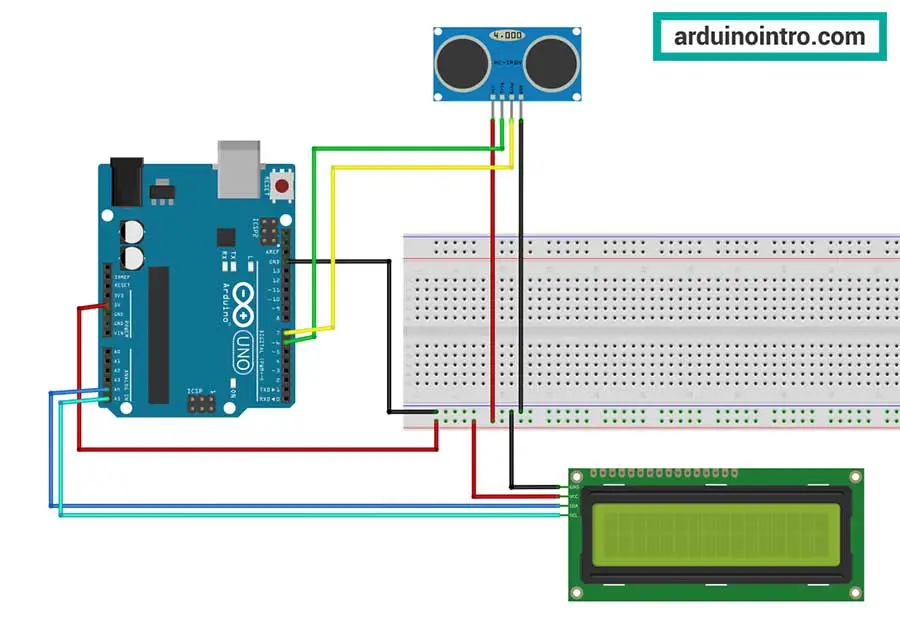
Connections for I2C LCD to Arduino Board
-
VCC (Power Supply):
- Connect the VCC pin of the I2C LCD to the 5V pin on the Arduino.
-
GND (Ground):
- Connect the GND pin of the I2C LCD to the GND pin on the Arduino.
-
SDA (Serial Data):
- Connect the SDA pin of the I2C LCD to the A4 pin on the Arduino Uno (or to the SDA pin on other Arduino boards).
-
SCL (Serial Clock):
- Connect the SCL pin of the I2C LCD to the A5 pin on the Arduino Uno (or to the SCL pin on other Arduino boards).
Connections for HC-SR04 Ultrasonic Sensor to Arduino Board
-
VCC (Power Supply):
- Connect the VCC pin of the HC-SR04 sensor to the 5V pin on the Arduino.
-
GND (Ground):
- Connect the GND pin of the HC-SR04 sensor to the GND pin on the Arduino.
-
TRIG (Trigger):
- Connect the TRIG pin of the HC-SR04 sensor to digital pin 6 on the Arduino. (You may use any digital pin from 2-13)
-
ECHO (Echo):
- Connect the ECHO pin of the HC-SR04 sensor to digital pin 7 on the Arduino. (You may use any digital pin from 2-13)
Summary of Connections
-
I2C LCD:
- VCC -> 5V
- GND -> GND
- SDA -> A4 (on Arduino Uno) or SDA (on other Arduino boards)
- SCL -> A5 (on Arduino Uno) or SCL (on other Arduino boards)
-
HC-SR04 Ultrasonic Sensor:
- VCC -> 5V
- GND -> GND
- TRIG -> Digital pin 6
- ECHO -> Digital pin 7
Step 2: Installing Libraries
Before writing the code, make sure you have the necessary libraries installed. To learn more about the I2C LCD, you can read more about it and download the library here. There is no need to install a library for the HC-SR04 ultrasonic sensor in this project.
Step 3: Writing the Arduino Code
#include <Wire.h>
#include <LiquidCrystal_I2C.h>

LiquidCrystal_I2C lcd(0x27, 2, 1, 0, 4, 5, 6, 7, 3, POSITIVE); //lcd is a user-defined name


const int trigPin = 6; // Define the digital pin for the ultrasonic sensor trigger
const int echoPin = 7; // Define the digital pin for the ultrasonic sensor echo
float distance;
float dist_inches;

void setup() {
  lcd.begin(16, 2); // Initialize the LCD display with 16 columns and 2 rows
  pinMode(trigPin, OUTPUT); // Set the trigger pin as an output
  pinMode(echoPin, INPUT);  // Set the echo pin as an input
  lcd.print("Distance: "); // Print a static label on the LCD
  lcd.setCursor(0,1);
  lcd.print("(inches)");
}

void loop() {

  // Generate microsecond pulses to initiate the ultrasonic sensor
  digitalWrite(trigPin, LOW);
  delayMicroseconds(5);
  digitalWrite(trigPin, HIGH);
  delayMicroseconds(10);
  digitalWrite(trigPin, LOW);

  // Measure the duration of the echo pulse on the echo pin
  distance = pulseIn(echoPin, HIGH);


  //calculate and convert to inches
  distance=distance*0.0001657;
  dist_inches=distance*39.37;


  // Display the distance on the LCD display
  lcd.setCursor(10, 0); // Set the cursor position to print the distance value
  lcd.print("     "); // Clear the previous distance value
  lcd.setCursor(10, 0); // Set the cursor position again
  lcd.print(dist_inches); // Print the calculated distance in centimeters

  delay(500); // Delay for stability

}
Step 4: Understanding the Code
- We begin by including the LiquidCrystal library and the Wire library, which provides functions for interfacing with LCDs.
- In the setup function, we initialize the LCD with the appropriate pin numbers and set the trigger and echo pins of the ultrasonic sensor as output and input, respectively.
- Inside the loop function, we trigger the ultrasonic sensor to send out a pulse and measure the duration of the echo pulse using the pulseIn function.
- Based on the duration of the echo pulse, we calculate the distance to the object in front of the sensor.
- Finally, we display the distance on the LCD by updating the display every loop iteration.
Step 5: Uploading and Testing
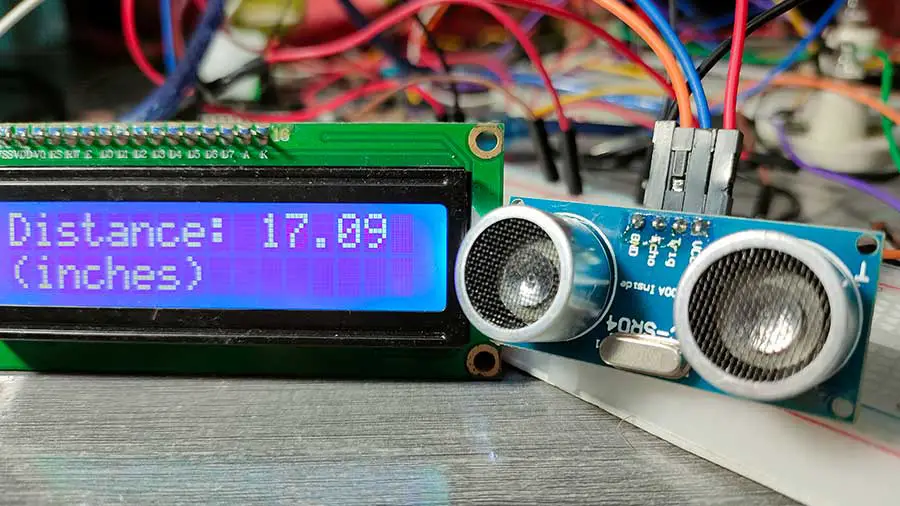
Upload the code to your Arduino board and observe the distance measurements displayed on the LCD. Adjust the position of the ultrasonic sensor and observe how the distance readings change as objects move closer or farther away from the sensor.
With this code and setup, you can create various applications such as distance measurement devices, obstacle detection systems, and more, leveraging the combined power of ultrasonic sensors, LCDs, and Arduino. Understanding each step of the code allows you to customize and extend its functionality to suit your specific project requirements.
That's it you are done!
Watch this on YouTube:
Code Explanation
Now, let’s break down the provided Arduino code step by step:
Library Inclusion
#include <Wire.h>
#include <LiquidCrystal_I2C.h>
Here, we include the necessary libraries. "Wire.h" library is for I2C communication, and "LiquidCrystal_I2C.h" is for controlling the LCD display through I2C interface.
LCD Initialization
LiquidCrystal_I2C lcd(0x27, 2, 1, 0, 4, 5, 6, 7, 3, POSITIVE);
We create an instance of the LiquidCrystal_I2C class called "lcd" and specify the I2C address (0x27), along with the pin mapping for RS, E, D4, D5, D6, D7, and backlight control pin.
Pin Definitions
const int trigPin = 6;
const int echoPin = 7;
We define two constants to represent the trigger pin and echo pin of the ultrasonic sensor.
Variable Declarations
float distance;
float dist_inches;
We declare two floating-point variables to store the distance measured in centimeters and inches, respectively. Variables with a float data type can accept numbers with decimal parts.
Setup Function
void setup() {
  lcd.begin(16, 2);
  pinMode(trigPin, OUTPUT);
  pinMode(echoPin, INPUT);
  lcd.print("Distance: ");
  lcd.setCursor(0,1);
  lcd.print("(inches)");
}
In the setup function:
- We initialize the LCD with 16 columns and 2 rows.
- We set the trigger pin as an output and the echo pin as an input.
- We print a static label "Distance: " on the first row of the LCD.
- We set the cursor to the second row and print "(inches)" to indicate the unit of measurement.
Loop Function
digitalWrite(trigPin, LOW);
- This line sets the trigger pin (
trigPin) of the ultrasonic sensor to a LOW state. This prepares the sensor to receive a pulse.
delayMicroseconds(5);
- This line introduces a short delay of 5 microseconds. This delay ensures that the trigger pin remains LOW for a brief moment before sending a pulse.
digitalWrite(trigPin, HIGH);
- This line sets the trigger pin (
trigPin) of the ultrasonic sensor to a HIGH state. This sends a brief pulse to trigger the sensor.
delayMicroseconds(10);
- This line introduces another short delay of 10 microseconds. This delay controls the duration of the pulse sent to the ultrasonic sensor.
digitalWrite(trigPin, LOW);
- This line sets the trigger pin (
trigPin) of the ultrasonic sensor back to a LOW state. This completes the pulse cycle.
distance = pulseIn(echoPin, HIGH);
- This line measures the duration of the echo pulse received from the ultrasonic sensor. It uses the
pulseIn()function, which waits for the pin to go HIGH (in this case,echoPin) and then returns the length of the pulse in microseconds.
distance = distance * 0.0001657;
- This line converts the duration of the echo pulse to distance in centimeters. It's based on the speed of sound (approximately 343 meters per second) and the formula
distance = distance * speed of sound / 2.
dist_inches = distance * 39.37;
- This line converts the distance from centimeters to inches. It multiplies the distance in centimeters by the conversion factor of 39.37 (since there are approximately 39.37 inches in a meter).
lcd.setCursor(10, 0);
lcd.print("     ");
- These lines clear the previous distance value displayed on the LCD. It sets the cursor to column 10 of row 0 and prints five spaces to ensure any previous content is overwritten.
lcd.setCursor(10, 0);
lcd.print(dist_inches);
- These lines set the cursor to column 10 of row 0 on the LCD and print the calculated distance value in inches (
dist_inches).
delay(500);
- This line introduces a delay of 500 milliseconds before the loop repeats. This delay ensures the program doesn't execute too rapidly and provides stability to the measurement process.
To summarize everything:
In the loop function:
- We trigger the ultrasonic sensor by generating a 10-microsecond pulse on the trigger pin.
- We measure the duration of the echo pulse on the echo pin using the pulseIn function.
- We convert the duration to distance in inches and store it in the variable dist_inches.
- We clear the previous distance value on the LCD and print the new distance value in inches.
- We introduce a delay of 500 milliseconds for stability.
This code continuously measures the distance using the ultrasonic sensor and displays the result in inches on the LCD. With this clear, step-by-step explanation, you should have a thorough understanding of how the code works to measure distance using an ultrasonic sensor and display the results on an LCD screen in an Arduino project.
Conclusion
In conclusion, the integration of ultrasonic sensors with LCDs and Arduino offers a wealth of opportunities for innovation and creativity in electronics projects. Whether you're interested in robotics, automation, or simply exploring the fascinating world of distance measurement, this guide has equipped you with the knowledge and skills to succeed.
By following the steps outlined in this article, you'll be well on your way to building impressive Arduino projects that push the boundaries of what's possible. Start your journey today and unlock the full potential of ultrasonic sensor technology!


