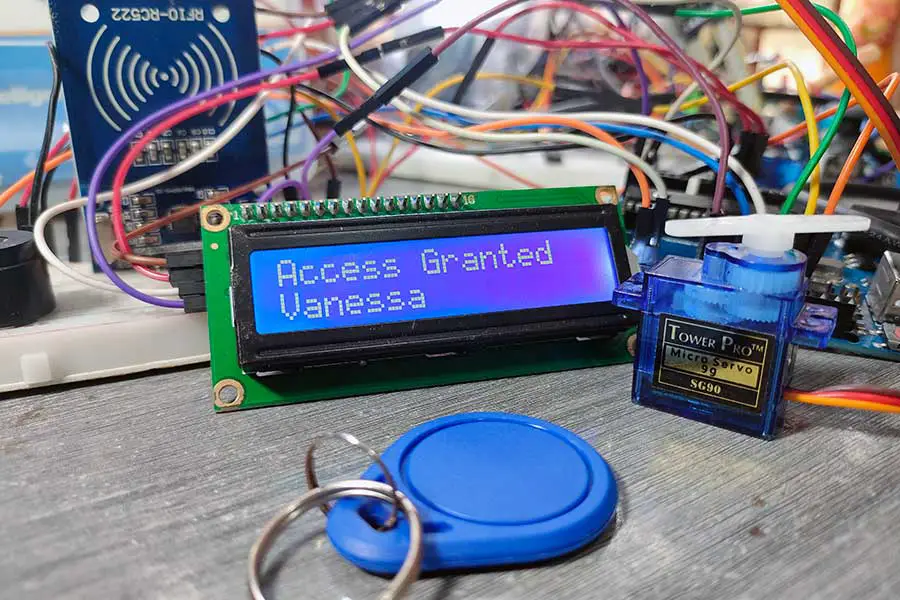
Are you looking for a way to streamline member check-ins at your gym, club, or office? A membership access management system using RFID technology can simplify the process. This guide will help you create a system where members use RFID cards to check in, and an LCD displays the member's name upon scanning. A servo motor opens the door or gate if the member is active. If not, the door remains closed, and a piezo buzzer alerts the user.
Membership management systems are essential for organizations that need to track and manage member access efficiently. By incorporating RFID technology, we can automate the check-in process, reduce manual errors, and enhance security. This system can be used in various applications, such as gyms, schools, hotels, libraries, offices, and clubs.
Components Required
To create this project, you'll need the following components:
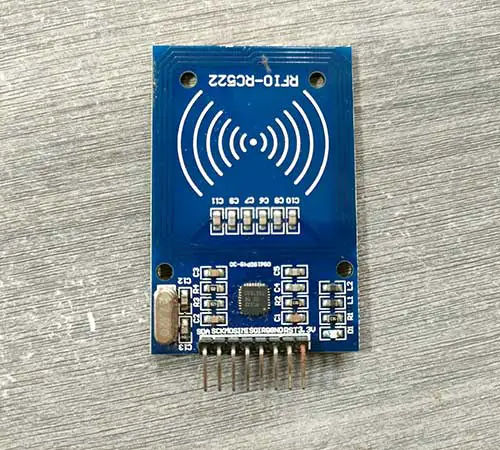
- RFID Card and Reader: RFID cards serve as unique identifiers for individuals, while the RFID reader captures this information. You can read more about the RFID module in this article: How to Use RFID RC522 with Arduino: A Complete Beginner's Guide
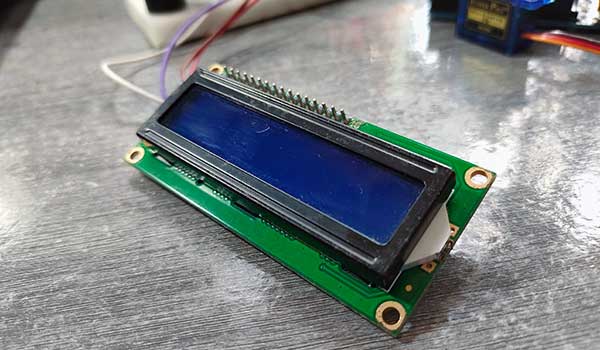
I2C LCD Module - I2C LCD: The LCD (Liquid Crystal Display) provides a user-friendly interface to display information such as the person's name or ID and confirmation messages. You can read more about the I2C LCD in this article: Displaying Characters Using the I2C Liquid Crystal Display (LCD)
- Arduino Microcontroller: Arduino serves as the brain of our system, orchestrating the interaction between the RFID reader, LCD, servo motor, piezo buzzer, and database.
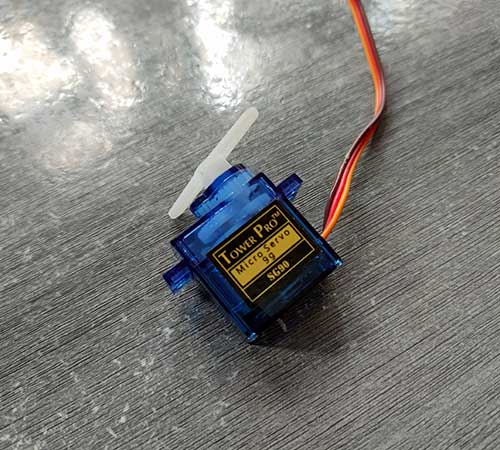
Servo motor - Servo Motor: The servo motor can be used to control physical mechanisms such as doors or gates based on attendance status. You can read more about servo motors in this article: Servo Motors Made Simple With Arduino

Piezo buzzer - Piezo Buzzer: The piezo buzzer can provide audible feedback to confirm successful attendance marking. You can read more about the piezo buzzer in this article: Exploring Piezo Buzzer Integration with Arduino: A Comprehensive Guide
You will also need the following libraries:
I2C LCD
Wire
MFRC522 RFID
Practical Application
Here is a demonstration of my output:
Imagine a gym where members swipe their RFID cards at the entrance. The system reads the card, displays the member's name on an LCD, and opens the door if the member is valid. The door remains closed if the card is invalid, and a buzzer sounds. This setup ensures that only authorized members gain access, providing a seamless and secure check-in experience.
Step-by-Step Guide to Building the System
Now, let's walk through the process of building your RFID Membership Access System:
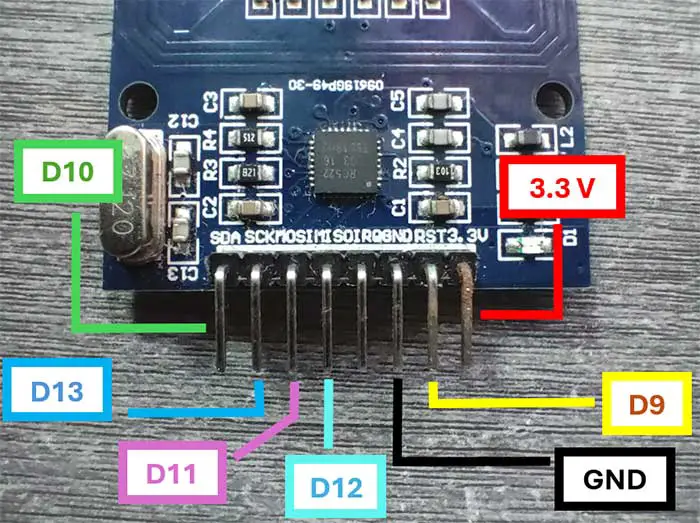
Step 1: Connect the RFID Reader to the Arduino
Begin by wiring the RFID reader to the Arduino microcontroller. The RFID reader typically communicates with the Arduino via serial communication.
- Wiring: Connect the RFID reader to the Arduino as follows:
- SDA to Digital Pin 10
- SCK to Digital Pin 13
- MOSI to Digital Pin 11
- MISO to Digital Pin 12
- IRQ to Not Connected
- GND to GND
- RST to Digital Pin 9
- 3.3V to 3.3V
Step 2: Connect the LCD to the Arduino
Next, wire the LCD to the Arduino according to the manufacturer's specifications. Ensure that you have the necessary libraries installed to interface with the LCD.
- Wiring: Connect the LCD to the Arduino using I2C communication:
- SDA to A4
- SCL to A5
- GND to GND
- VCC to 5V
Step 3: Connect the Servo Motor to the Arduino
Wire the servo motor and piezo buzzer to the Arduino, ensuring proper connections and power supply.
- Wiring: Connect the servo motor to the Arduino:
- Signal Pin to Digital Pin 3
- Power to 5V
- Ground to GND
Step 4: Connect the Piezo Buzzer to the Arduino
- Wiring: Connect the piezo buzzer to the Arduino:
- Positive Pin to Digital Pin 2
- Negative Pin to GND
Step 5. Create a List of Valid RFID Cards
Develop a list containing the unique identifiers of valid RFID cards along with corresponding names or IDs. For simplicity, we will hard-code this information in the Arduino sketch.
Step 6. Implement RFID Card Verification
Write code to capture the RFID card data from the reader and compare it against the list of valid cards. If a match is found, retrieve the corresponding information (e.g., name or ID) from the list. The code is written below.
Step 7. Display Information on the LCD
Once the RFID card is verified, display the person's name or ID along with a confirmation message on the LCD screen. This provides immediate feedback to the user, confirming their membership.
Step 8. Control the Servo Motor and Piezo Buzzer
Depending on your application, you can use the servo motor to control physical mechanisms such as doors or gates to restrict access based on attendance status. The piezo buzzer can provide audible feedback to confirm successful attendance marking.
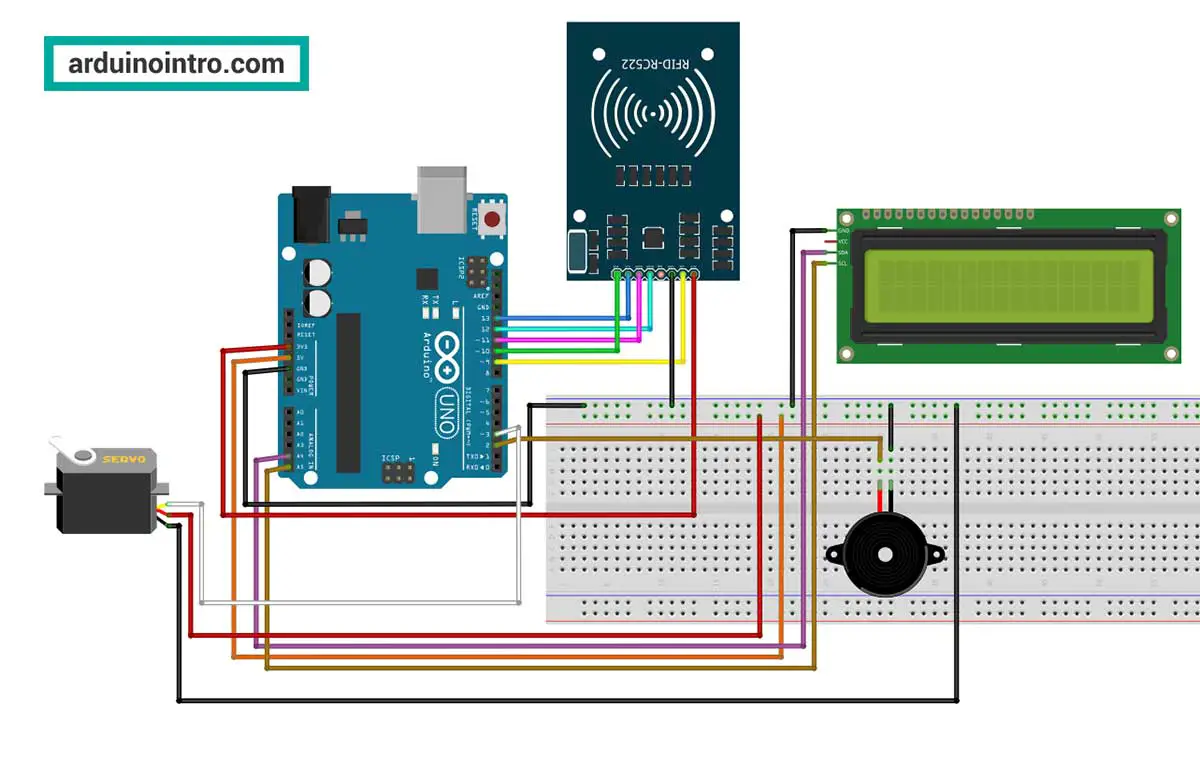
Here is the complete circuit I made:
Program the Arduino
Here's the Arduino code to make the system work. This code checks the RFID card against a list of valid members, displays the member's name on the LCD, and controls the servo motor and buzzer based on the card's validity.
#include <Wire.h>
#include <LiquidCrystal_I2C.h>
#include <MFRC522.h>
#include <SPI.h>
#include <Servo.h>

// Define the pins for the RC522 module
#define SS_PIN 10
#define RST_PIN 9

// Create instances of the MFRC522, Servo and LiquidCrystal_I2C classes
MFRC522 rfid(SS_PIN, RST_PIN);
LiquidCrystal_I2C lcd(0x27, 2, 1, 0, 4, 5, 6, 7, 3, POSITIVE);
Servo myservo;

struct AccessCard {
  byte uid[4];
  const char* name;
};

// Define multiple known UIDs with associated names
AccessCard knownCards[] = {
  {{0x57, 0xBC, 0xC3, 0x17}, "Sherwin"},
  {{0xF9, 0x1A, 0x4A, 0x59}, "Vanessa"},
  {{0x7B, 0xC0, 0xAD, 0x21}, "Eric"}
};

const int numberOfCards = sizeof(knownCards) / sizeof(knownCards[0]);
int servoPin=3;
int buzzerPin=2;

void setup() {
  Serial.begin(9600);
  SPI.begin();
  rfid.PCD_Init();

  myservo.attach(servoPin);
  pinMode(buzzerPin,OUTPUT);

  lcd.begin(16, 2);
  lcd.backlight();

  myservo.write(0);
  lcd.setCursor(0, 0);
  lcd.print("Access Control");
  lcd.setCursor(0, 1);
  lcd.print("System Ready");
  delay(2000);
  lcd.clear();
  lcd.print("Scan your RFID");
}

void loop() {
  if (rfid.PICC_IsNewCardPresent() && rfid.PICC_ReadCardSerial()) {
    Serial.print("UID tag: ");
    for (byte i = 0; i < rfid.uid.size; i++) {
      Serial.print(rfid.uid.uidByte[i] < 0x10 ? " 0" : " ");
      Serial.print(rfid.uid.uidByte[i], HEX);
    }
    Serial.println();

    int cardIndex = checkUID(rfid.uid.uidByte);
    if (cardIndex != -1) {
      lcd.clear();
      tone(buzzerPin, 3500);
      lcd.setCursor(0, 0);
      lcd.print("Access Granted");
      lcd.setCursor(0, 1);
      lcd.print(knownCards[cardIndex].name);
      myservo.write(90);
      delay(200);
      noTone(buzzerPin);
      delay(1000);
      myservo.write(0);
    } else {
      lcd.clear();
      tone(buzzerPin, 1500);
      lcd.setCursor(0, 0);
      lcd.print("Access Denied");
      lcd.setCursor(0, 1);
      lcd.print("Invalid Card");
      delay(200);
      noTone(buzzerPin);
    }
    delay(1500);
    lcd.clear();
    lcd.print("Scan your RFID");

    rfid.PICC_HaltA();
  }
}

int checkUID(byte* uid) {
  for (int i = 0; i < numberOfCards; i++) {
    bool match = true;
    for (byte j = 0; j < 4; j++) {
      if (uid[j] != knownCards[i].uid[j]) {
        match = false;
        break;
      }
    }
    if (match) {
      return i;
    }
  }
  return -1;
}
Quick Explanation of Code
- Initialization: We initialize the RFID reader, LCD, servo motor, and piezo buzzer in the
setupfunction. - Card Detection: In the
loopfunction, we check if a new RFID card is present. - Card Verification: If a card is detected, we read its unique identifier and compare it with the hard-coded list of valid UIDs.
- Display and Feedback: Upon successful verification, we display the person's name on the LCD, control the servo motor to open a door or gate, and activate the piezo buzzer for audible feedback.
Step-by-Step Explanation of the Code
Include Libraries: The necessary libraries for handling RFID, LCD, and servo motor functions are included. You may download the needed libraries at the end of this article.
#include <Wire.h>
#include <LiquidCrystal_I2C.h>
#include <MFRC522.h>
#include <SPI.h>
#include <Servo.h>
Wire.h: Allows communication with I2C devices.LiquidCrystal_I2C.h: For controlling an I2C LCD.MFRC522.h: For interfacing with the MFRC522 RFID module.SPI.h: Enables SPI communication, required for the RFID module.Servo.h: For controlling servo motors.
Define Pins: The pins for the RFID module are defined.
#define SS_PIN 10
#define RST_PIN 9
SS_PIN: The Slave Select pin for the RFID module.RST_PIN: The Reset pin for the RFID module.
Create Instances: Instances of the RFID, LCD, and servo motor classes are created.
MFRC522 rfid(SS_PIN, RST_PIN);
LiquidCrystal_I2C lcd(0x27, 16, 2);
Servo myservo;
rfid: An instance of theMFRC522class using the defined pins.lcd: An instance of theLiquidCrystal_I2Cclass with the specified I2C address and pin mappings for the LCD.myservo: An instance of theServoclass to control a servo motor.
Data Structures
struct AccessCard {
  byte uid[4];
  const char* name;
};
AccessCard: A structure to hold the UID (Unique Identifier) of the RFID card and the associated name.
Define Known Cards: An array of known UIDs and associated names is created.
AccessCard knownCards[] = {
  {{0x57, 0xBC, 0xC3, 0x17}, "Sherwin"},
  {{0xF9, 0x1A, 0x4A, 0x59}, "Vanessa"},
  {{0x7B, 0xC0, 0xAD, 0x21}, "Eric"}
};
knownCards: An array of AccessCard structures containing known UIDs and corresponding names.
- Purpose: The
knownCardsarray holds a list of RFID cards (with their UIDs) and their associated names. This array is used to check if a scanned RFID card is recognized by comparing its UID with the UIDs in this array. - Usage: When an RFID card is scanned, the system will compare its UID against the UIDs in the
knownCardsarray. If a match is found, it retrieves the associated name and grants access; otherwise, access is denied.
Each element in the array is an AccessCard structure. Example:
First element
{{0x57, 0xBC, 0xC3, 0x17}, "Sherwin"}
- UID:
{0x57, 0xBC, 0xC3, 0x17}- This is the UID of the RFID card, represented as an array of 4 bytes.
- Name:
"Sherwin"- This is the name associated with the RFID card.
Change the UID and name according to your needs.
If you don't know how to get the UID, please refer to this article:
How to Use RFID RC522 with Arduino: A Complete Beginner's Guide
This initialization provides a hardcoded list of valid RFID cards and their associated users, which is useful for applications like attendance systems or access control where only authorized individuals are allowed.
Calculate Number of Cards and Define Pins:
const int numberOfCards = sizeof(knownCards) / sizeof(knownCards[0]);
int servoPin = 3;
int buzzerPin = 2;
numberOfCards: Calculates the number of elements in theknownCardsarray.servoPin: The pin connected to the servo motor.buzzerPin: The pin connected to the piezo buzzer.
Setup Function
void setup() {
  Serial.begin(9600);
  SPI.begin();
  rfid.PCD_Init();

  myservo.attach(servoPin);
  pinMode(buzzerPin, OUTPUT);

  lcd.begin(16, 2);
  lcd.backlight();

  myservo.write(0);
  lcd.setCursor(0, 0);
  lcd.print("Access Control");
  lcd.setCursor(0, 1);
  lcd.print("System Ready");
  delay(2000);
  lcd.clear();
  lcd.print("Scan your RFID");
}
- Serial Communication: Begins serial communication at a baud rate of 9600.
- SPI Communication: Initializes SPI communication.
- RFID Module: Initializes the RFID reader.
- Servo Motor: Attaches the servo motor to the specified pin and sets its initial position.
- Buzzer Pin: Sets the buzzer pin as an output.
- LCD Initialization: Sets up the LCD with a 16x2 display and turns on the backlight.
- Initial Messages: Displays initial messages on the LCD and then prompts the user to scan their RFID card.
Main Loop
void loop() {
  if (rfid.PICC_IsNewCardPresent() && rfid.PICC_ReadCardSerial()) {
    Serial.print("UID tag: ");
    for (byte i = 0; i < rfid.uid.size; i++) {
      Serial.print(rfid.uid.uidByte[i] < 0x10 ? " 0" : " ");
      Serial.print(rfid.uid.uidByte[i], HEX);
    }
    Serial.println();

    int cardIndex = checkUID(rfid.uid.uidByte);
    if (cardIndex != -1) {
      lcd.clear();
      tone(buzzerPin, 3500);
      lcd.setCursor(0, 0);
      lcd.print("Access Granted");
      lcd.setCursor(0, 1);
      lcd.print(knownCards[cardIndex].name);
      myservo.write(90);
      delay(200);
      noTone(buzzerPin);
      delay(1000);
      myservo.write(0);
    } else {
      lcd.clear();
      tone(buzzerPin, 1500);
      lcd.setCursor(0, 0);
      lcd.print("Access Denied");
      lcd.setCursor(0, 1);
      lcd.print("Invalid Card");
      delay(200);
      noTone(buzzerPin);
    }
    delay(1500);
    lcd.clear();
    lcd.print("Scan your RFID");

    rfid.PICC_HaltA();
  }
}
- Check for New Card: Checks if a new RFID card is present and reads its UID.
- Print UID: Prints the UID of the scanned card to the Serial Monitor.
- Verify UID: Calls the
checkUIDfunction to see if the scanned UID matches any known UIDs. - Access Granted: If the card is recognized, the LCD displays "Access Granted" along with the associated name. The piezo buzzer sounds, and the servo motor moves to open a door or gate.
- Access Denied: If the card is not recognized, the LCD displays "Access Denied" and "Invalid Card". The piezo buzzer sounds with a different tone.
- Reset LCD: After a delay, clears the LCD and prompts to scan the next RFID card.
- Halt RFID: Stops communication with the current card.
Check UID Function
int checkUID(byte* uid) {
  for (int i = 0; i < numberOfCards; i++) {
    bool match = true;
    for (byte j = 0; j < 4; j++) {
      if (uid[j] != knownCards[i].uid[j]) {
        match = false;
        break;
      }
    }
    if (match) {
      return i;
    }
  }
  return -1;
}
- Loop through Known Cards: Iterates through each card in the
knownCardsarray. - Compare UIDs: Compares the scanned UID with each known UID byte-by-byte.
- Return Index: If a match is found, returns the index of the matched card.
- No Match: If no match is found, returns
-1.
This code efficiently manages access control by verifying RFID cards against a predefined list of authorized users, providing immediate feedback via an LCD display, and controlling a servo motor and piezo buzzer for physical access management and auditory signals.
Conclusion
By following this guide, you can create an efficient and secure membership access management system using Arduino and RFID technology. This system is not only cost-effective but also easy to implement, making it ideal for various applications such as gyms, hotels, schools, clubs, and offices.
For those new to Arduino, this project serves as a practical introduction to working with microcontrollers, RFID, and servo motors. By incorporating the provided code and instructions, you'll have a functional system that enhances your organization's security and efficiency.


