A common output device for Arduino projects is an LED (Light-Emitting Diode). However, there is another device that can enhance your projects. If you want to add simple sound effects, then it’s time for you to use the piezoelectric buzzer.
A piezoelectric buzzer or simply a buzzer is a device that produces sound by adhering a piezo-electric disc to a thin metal plate and then applying electricity. When bending the metal back and forth, noise is created. They are commonly used in alarm clocks and other applications where an audible alarm is needed.
Here are some characteristics of a piezo buzzer:
- The faster you bend the material, the higher the pitch of the noise that’s produced.
- This rate is called frequency.
- The higher the frequency, the higher the pitch of the noise we hear
When using the buzzer, the most important thing to consider is the frequency. The frequency is what enables the piezo buzzer to produce a sound.
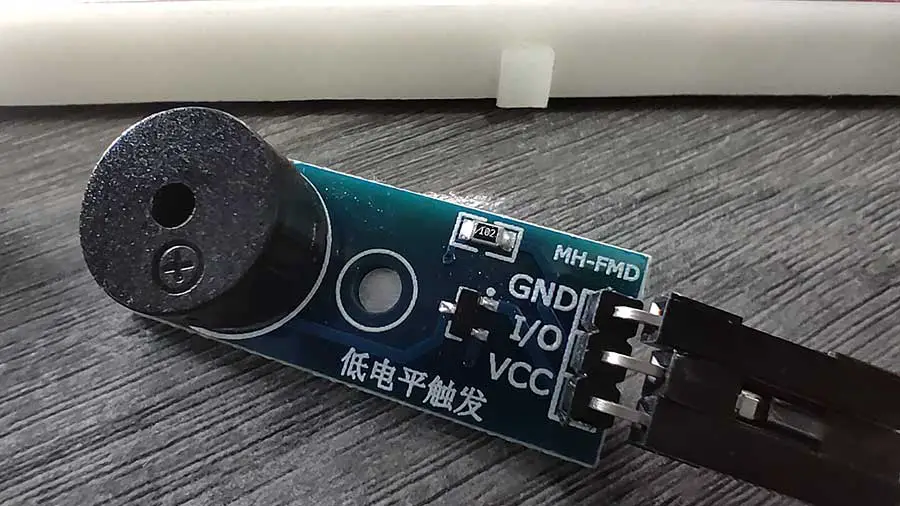
MH-FMD Passive Buzzer Module
Piezo buzzers are available in many forms. In a basic buzzer, we still need to add a resistor and a current-divider circuit before connecting it to the Arduino board. Instead of using a basic buzzer, we will be using a pre-assembled module. In this article, we will be using the MH-FMD passive buzzer module.

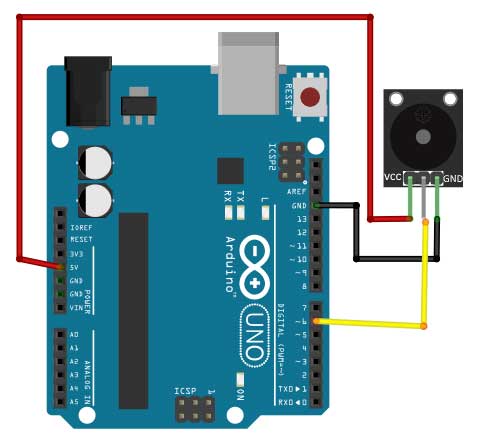
Here is the wiring connection:
|
MH-FMD BUZZER |
ARDUINO BOARD |
|
VCC |
5V |
|
I/O |
any digital pin |
|
GND |
GND |
Just remember to connect the I/O to any digital pin, except 0 and 1.
The tone() Function
The tone() function works with two arguments but can take up to three arguments.
tone( pin number, frequency);- The pin number is the digital pin that you will use on the Arduino.
- The frequency is specified in hertz. Hertz are cycles per second.
- The frequency is an integer and can take a value up to 65,535
This is an example of how to use the tone() function:
void loop() {

   tone(piezoPin, 1000, 500);

  //500 is the 3rd argument which is duration

  //duration is how long the tone plays and it is expressed in milliseconds

}
PROJECT 1: Basic Piezo Buzzer (Beep)
Sample Piezo Buzzer Project
In this project, what we want to do is just to produce a beeping sound when the sketch is uploaded. The buzzer will sound for 500 milliseconds and then followed by another 500 milliseconds of silence. This will go on in a loop. Think of this as a blinking led project, only this time, it’s a beep-on, beep-off effect.
Here is the breadboard diagram.
Here is the code:
int buzzer=6;

void setup() {

   pinMode(buzzer, OUTPUT);

}


void loop() {

     //turn on the buzzer at 1535 frequency for 500 milliseconds

     tone(buzzer,1535,500);

     //add another 500 milliseconds of silence

     delay(1000);

}
First of all, the variable buzzer is declared for the digital pin used by our buzzer module, which is digital pin 6.
In the setup function we just set the pin as an OUTPUT pin.
To produce a sound, we simply write a tone() function.
tone(buzzer,1535,500);The first argument is the pin number where the piezo buzzer is attached, and in this case, it is the buzzer variable. The second argument is the frequency of the sound. Here, I used 1535. You can specify a frequency from 31 to 65535. Each frequency will produce a different pitch. Try to experiment with the frequency to get the right pitch you want. Lastly, the last argument is the duration, which is expressed in milliseconds. In this case, the piezo buzzer will produce a sound for 500 milliseconds.
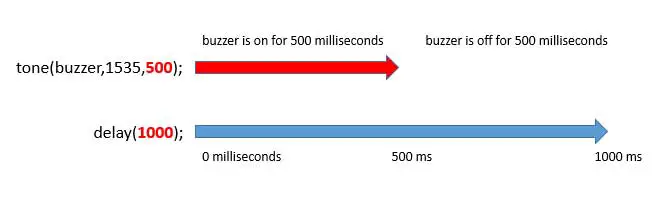
The next thing we want is to produce 500 milliseconds of silence right after the 500 milliseconds of “noise”. To do this, we need to write a delay function for 1000 milliseconds.
delay(1000);You might ask, why 1000 and not 500? Well, that’s because the duration of the buzzer and the delay function starts at the same time. So when the buzzer starts sounding off, the delay also starts. Therefore, when the buzzer stops at the 500-millisecond mark, the delay still has 500 milliseconds to go. In effect, there will be a 500-millisecond “silence” until the delay reaches 1000. After which, it goes back again from the start. The following chart should clarify this further:
PROJECT 2: Buzzer + LED + Sensor
Now that we know how to produce a sound using the piezo buzzer, let’s take it a step further by producing a sound only when a sensor is triggered, and turning on an LED at the same time.
For this project, we will use an infrared sensor, but any sensor will do. I'm using the HW-201 infrared (IR) obstacle sensor module.
Here is the breadboard circuit:
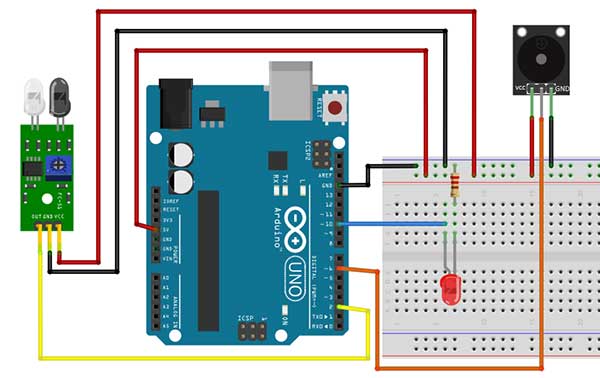
Since there is only one 5V pin on the Arduino board and both the sensor and the piezo buzzer use the 5V, we will connect one jumper wire from the 5V pin of the Arduino to one of the power rails of the breadboard. This way, the entire power rail becomes the 5V.
Now, let’s take a look at the code.
int led = 10; //LED
int ir = 2; //ir sensor
int buzzer=6; //piezo buzzer
int val=0;

void setup() {
  pinMode(led, OUTPUT);
  pinMode(buzzer, OUTPUT);
  pinMode(ir,INPUT);
}

void loop() {

  val=digitalRead(ir);
  if (val==1){ //object is detected
      digitalWrite(led,HIGH);
      tone(buzzer,2000,500); //produce sound for 500 milliseconds
      //add a "quiet" time of 500 milliseconds
      delay(1000);
   }
   else{ //no object detected
      digitalWrite(led,LOW);
  }
}
First, we declared variables for infrared sensor, piezo buzzer, and LED. We also added a variable val to hold the value of our sensor, which is either 1 or 0.
In the setup, the buzzer and LED are set up as OUTPUT while the sensor is an INPUT.
Now we go to the loop function.
First, we read the sensor by writing the digitalRead() function.
val=digitalRead(ir);The result is then saved to the val variable.
After getting the value of the sensor, we now test if it was triggered or not. For this, we need the if-else statement.
 if (val==1){ //object is detected
    digitalWrite(led,HIGH);
    tone(buzzer,2000,500); //produce sound for 500 milliseconds
    //add a "quiet" time of 500 milliseconds
    delay(1000);
 }
This part here assumes that when the sensor is triggered, the result is 1, otherwise, the result is a 0. In some sensors, this could be the other way around, so just adjust the condition if needed.
Limitations of the Piezo Buzzer
Here are some things to consider when using the piezo buzzer:
- You can’t use tone() while also using analogWrite() on pins 3 or 11
- You cannot generate a tone lower than 31 HZ
- The tone() function cannot be used by two separate pins at the same time. If you have two separate piezo speakers, each on a different pin, you can’t have them both play at the same time


