
Are you looking to integrate temperature sensing into your Arduino projects? The LM35 temperature sensor is an ideal choice for both beginners and experienced hobbyists due to its simplicity and accuracy. Whether you're working on a home automation system, a weather station, or any project that requires temperature monitoring, this comprehensive guide will walk you through everything you need to know about using the LM35 sensor with Arduino.
This article aims to be a valuable resource, improving your understanding and helping you achieve precise temperature measurements in your projects.
Understanding the LM35 Temperature Sensor
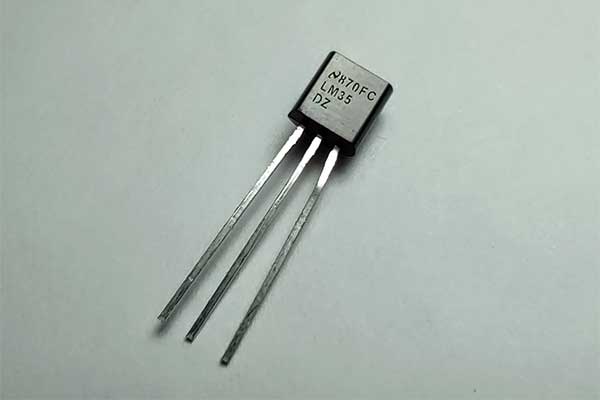
The LM35 temperature sensor is a precision device known for its linear output and ease of use. It measures temperature in Celsius and outputs an analog voltage proportional to the temperature.
Key Features of the LM35:
- Accuracy: High precision with a typical accuracy of ±0.5°C.
- Range: Measures temperatures from -55°C to 150°C.
- Simplicity: Requires no external calibration.
Connecting the LM35 to Arduino
Before we dive into the code, let's discuss the hardware setup. The LM35 has three pins: VCC, Output (Vout), and Ground (GND).
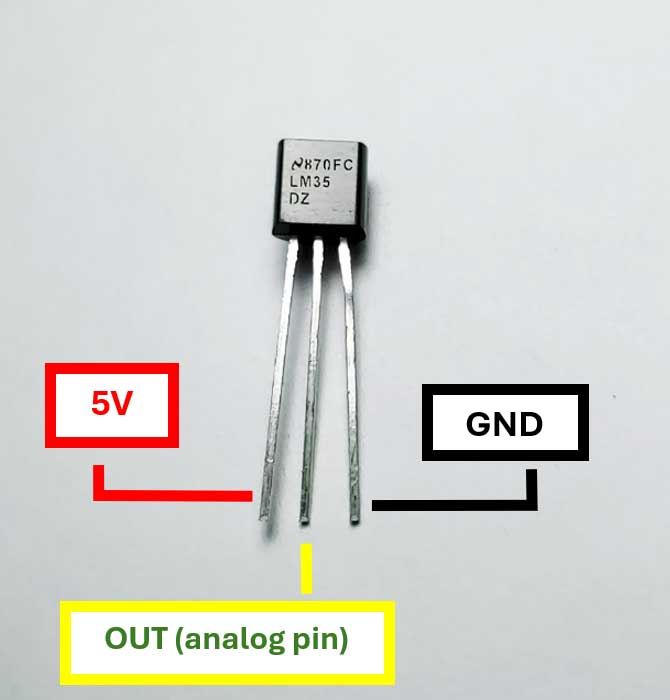
Pin Connections:
- VCC: Connect to the 5V pin on the Arduino.
- Output (Vout): Connect to an analog input pin (e.g., A0) on the Arduino.
- Ground (GND): Connect to the ground (GND) pin on the Arduino.
Here's a simple schematic:
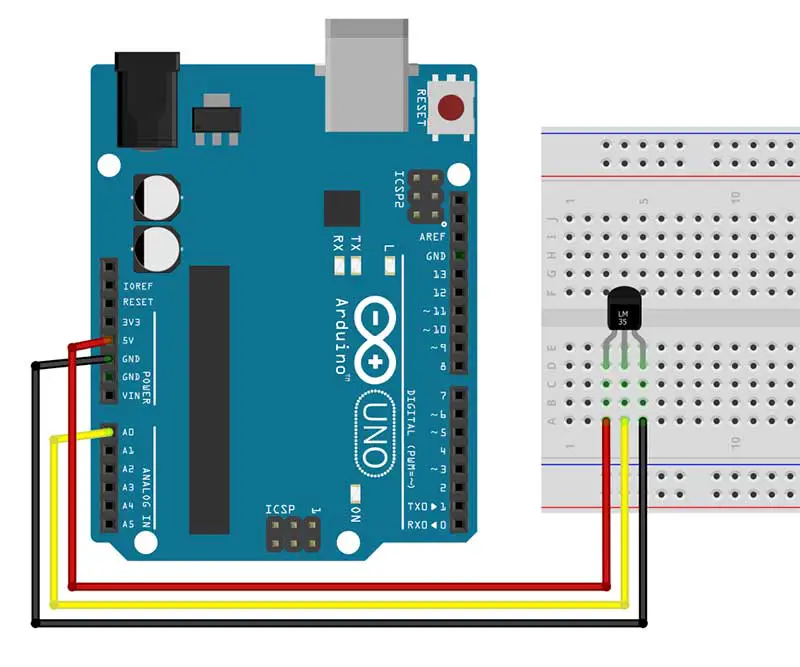
Arduino Code for LM35 Temperature Sensor
Now that we've connected the hardware, let's move on to the software part. The following Arduino code reads the analog output from the LM35 sensor and converts it to a temperature reading in Celsius.
// Arduino code to read temperature from LM35 sensor

int sensorPin = A0; // Analog pin connected to LM35 OUT pin
float temperature; // Variable to store temperature value

void setup() {
  Serial.begin(9600); // Initialize serial communication
}

void loop() {
  int sensorValue = analogRead(sensorPin); // Read analog value from sensor
  temperature = (sensorValue * 5.0) / 1024.0; // Convert analog value to voltage
  temperature = temperature * 100; // Convert voltage to temperature in Celsius
  Serial.print("Temperature: ");
  Serial.print(temperature);
  Serial.println(" °C");
  delay(1000); // Delay for stability
}
Step-by-Step Explanation of the Arduino Code
1. Variable Declaration:
-
-
int sensorPin = A0;- This line declares a variablesensorPinand assigns it to analog pin A0, where the LM35 sensor is connected.float temperature;- This variable will store the calculated temperature value.
-
2. Setup Function:
-
-
void setup() { Serial.begin(9600); }- Initializes serial communication at a baud rate of 9600, allowing you to view the temperature readings on the serial monitor.
-
3. Loop Function:
-
-
int sensorValue = analogRead(sensorPin);- Reads the analog value from the LM35 sensor.temperature = (sensorValue * 5.0) / 1024.0;- Converts the analog value (0-1023) to a corresponding voltage (0-5V).temperature = temperature * 100;- Converts the voltage to a temperature reading in Celsius, based on the LM35's sensitivity of 10mV/°C.Serial.print("Temperature: ");- Prints the label "Temperature: " to the serial monitor.Serial.print(temperature);- Prints the temperature value.Serial.println(" °C");- Prints the unit "°C" and moves to the next line.delay(1000);- Delays the loop by 1 second for stability.
-
Using LM35 with LED Indicator
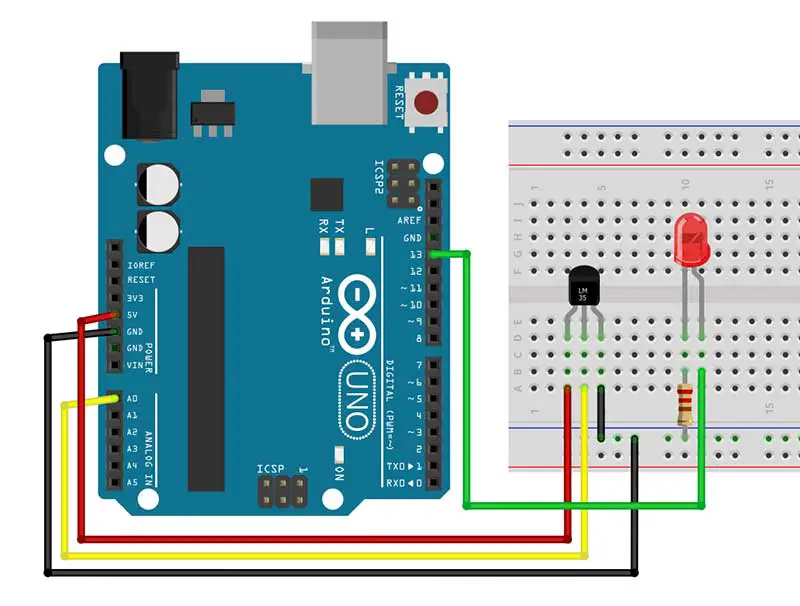
Another interesting project is using the LM35 temperature sensor with an LED indicator to provide a visual alert when the temperature crosses a certain threshold. This can be useful for applications such as warning systems for overheating or temperature-sensitive environments.
Components Needed:
- Arduino board
- LM35 temperature sensor
- LED
- Resistor (220Ω)
- Breadboard and jumper wires
Circuit Diagram:
Arduino Code for LM35 with LED:
// Arduino code to use LM35 sensor with LED indicator

int sensorPin = A0; // Analog pin connected to LM35 OUT pin
int ledPin = 13; // Digital pin connected to LED
float temperature; // Variable to store temperature value
const float threshold = 30.0; // Temperature threshold in Celsius

void setup() {
  pinMode(ledPin, OUTPUT); // Set LED pin as output
  Serial.begin(9600); // Initialize serial communication
}

void loop() {
  int sensorValue = analogRead(sensorPin); // Read analog value from sensor
  temperature = (sensorValue * 5.0) / 1024.0; // Convert analog value to voltage
  temperature = temperature * 100; // Convert voltage to temperature in Celsius

  Serial.print("Temperature: ");
  Serial.print(temperature);
  Serial.println(" °C");

  if (temperature > threshold) {
    digitalWrite(ledPin, HIGH); // Turn on LED if temperature exceeds threshold
  } else {
    digitalWrite(ledPin, LOW); // Turn off LED if temperature is below threshold
  }

  delay(1000); // Delay for stability
}
Explanation of the Code:
-
Variable Declaration:
int sensorPin = A0;- Assigns the analog pin A0 tosensorPin.int ledPin = 13;- Assigns the digital pin 13 toledPin.float temperature;- Stores the calculated temperature value.const float threshold = 30.0;- Defines a temperature threshold at 30°C.
-
Setup Function:
void setup() { pinMode(ledPin, OUTPUT); Serial.begin(9600); }- Sets the LED pin as an output and initializes serial communication.
-
Loop Function:
- Reads the analog value from the LM35 sensor and converts it to temperature.
- Prints the temperature value to the serial monitor.
- Checks if the temperature exceeds the threshold, which is 30.0:
- Turns on the LED if the temperature is above the threshold.
- Turns off the LED if the temperature is below the threshold.
- Delays the loop for 1 second for stability.
Practical Application: Home Automation
One practical application of the LM35 temperature sensor with Arduino is home automation. By integrating the LM35 sensor into your home automation system, you can monitor room temperatures in real-time and adjust heating or cooling systems accordingly. This not only enhances comfort but also improves energy efficiency.
Advanced Projects with LM35 and Arduino
Beyond simple temperature monitoring, you can expand your projects to include data logging, wireless transmission of temperature data, and integrating multiple sensors for a more comprehensive environmental monitoring system.
Examples of Advanced Projects:
- Weather Station: Combine the LM35 with other sensors (e.g., humidity, pressure) to create a fully-functional weather station.
- Remote Temperature Monitoring: Use a Wi-Fi or Bluetooth module to send temperature data to a smartphone or web server.
- Industrial Automation: Implement temperature monitoring in industrial processes to ensure optimal operating conditions and safety.
Conclusion
By following this guide, you've learned how to effectively use the LM35 temperature sensor with Arduino to achieve accurate temperature measurements. From basic setup and code explanation to practical applications and advanced projects, this guide serves as a comprehensive resource for anyone interested in temperature sensing with Arduino. Start experimenting today and unlock the full potential of your Arduino projects with the LM35 sensor!


