Are you tired of simply checking the weather app on your phone to see if it's raining cats and dogs outside? Well, why not dive into the exciting world of DIY weather monitoring with a twist of tech-savvy fun? In this article, we're about to show you how to transform your Arduino into a simple weather wizard, complete with a DHT11 sensor for sniffing out temperature and humidity, and an I2C LCD screen to display the forecast in style.
In the world of Arduino projects, integrating sensors to display real-time data is a common and practical endeavor. One such sensor, the DHT11, is widely used for temperature and humidity sensing. In this article, we'll explore how to connect a DHT11 sensor to an Arduino board and display the temperature and humidity values on an I2C LCD module. By the end of this guide, you'll be able to create a simple yet effective temperature and humidity monitoring system.
Table of Contents
- Understanding the Components
- Wiring the Circuit
- Installing Libraries
- Writing the Arduino Code
- Uploading the Code and Testing
- Troubleshooting Tips
- Ideas for Practical Applications
- Conclusion
1. Understanding the Components
DHT11 Sensor:
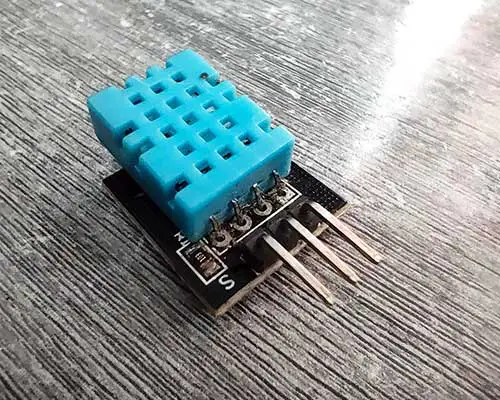
The DHT11 sensor is a digital temperature and humidity sensor widely used in Arduino projects. It provides accurate readings of temperature and humidity levels in the surrounding environment. The sensor operates by measuring changes in electrical resistance in a humidity-sensitive resistor and a thermistor. These changes are then converted into temperature and humidity readings, which can be read by the Arduino board. You can read more about this sensor in this article: Building Smart Environments: Getting Started with the DHT11 Sensor
Arduino Board:
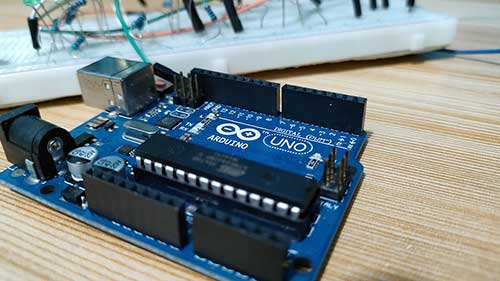
The Arduino board serves as the microcontroller platform for the project. It is the central component that controls the operation of the entire system. Arduino boards are programmable microcontrollers that are widely used in DIY electronics projects due to their simplicity and versatility. They can be programmed using the Arduino Integrated Development Environment (IDE) to interact with various sensors, actuators, and other electronic components. You can read more about the Arduino in this article: All You Need to Know About Arduino
I2C LCD Module:
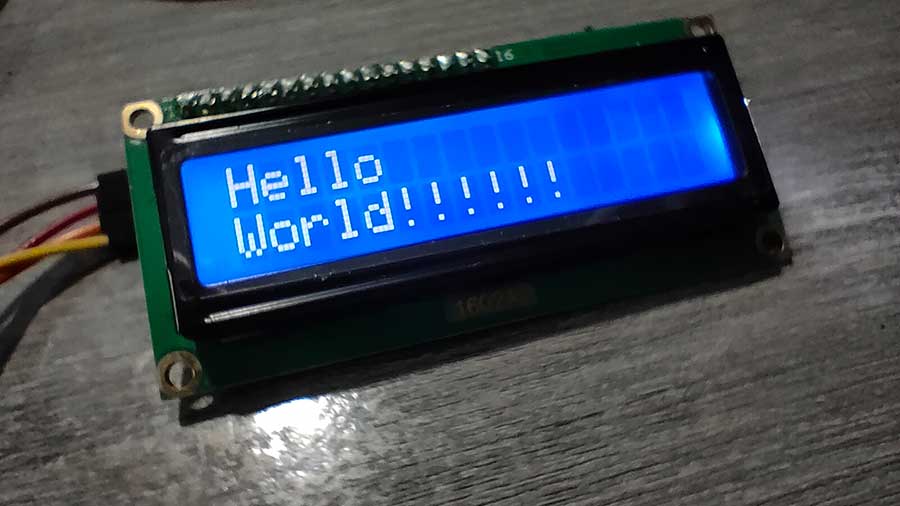
The I2C LCD module is a liquid crystal display that communicates over the Inter-Integrated Circuit (I2C) protocol. It consists of a liquid crystal display panel, a controller chip, and an I2C interface module. The I2C protocol allows for serial communication between the Arduino board and the LCD module using only two wires (SDA and SCL), making it ideal for projects with limited pin availability. The LCD module can display alphanumeric characters, symbols, and graphics, providing a convenient way to visualize data from sensors or display status information in Arduino projects. You can read more about the I2C LCD in this article: Displaying Characters Using the I2C Liquid Crystal Display (LCD)
2. Wiring the Circuit
Connect the components as follows:
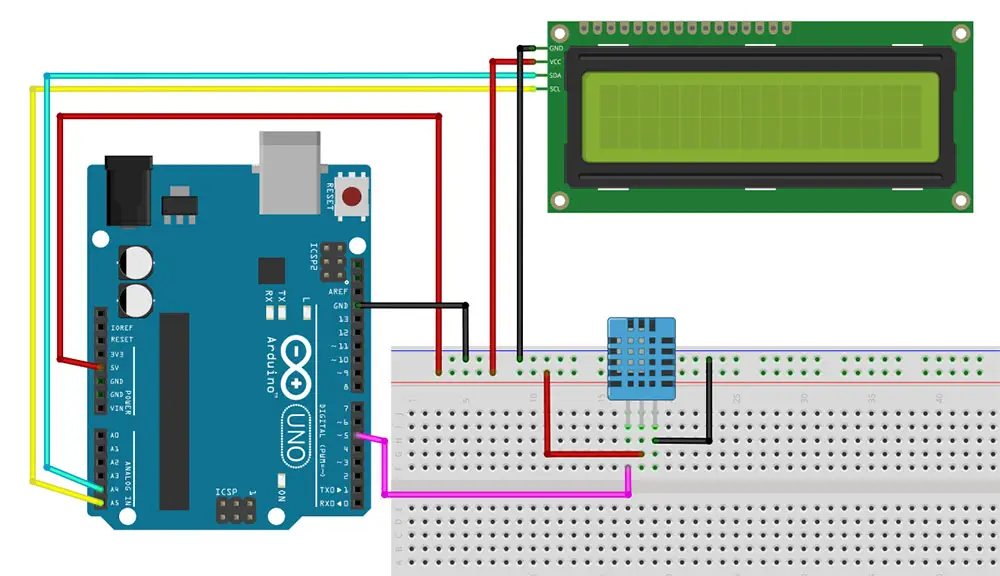
- DHT11 sensor: VCC to Arduino 5V, GND to Arduino GND, and SIGNAL to a digital pin (e.g., pin 5).
- I2C LCD module: Connect SDA to Arduino A4, SCL to Arduino A5, VCC to Arduino 5V, and GND to Arduino GND.
3. Installing Libraries
To interface with the DHT11 sensor and the I2C LCD module, you'll need to install the necessary libraries. Open the Arduino IDE, navigate to Sketch > Include Library > Manage Libraries, and search for "DHT sensor library" and "LiquidCrystal_I2C." Install both libraries.
- You can find a more detailed set of instructions about installing the DHT11 library here: Installing the DHT11 Library
- You can find a more detailed set of instructions about installing the I2C library here: Install the Necessary Libraries for I2C LCD
4. Writing the Arduino Code
Here is the code:
#include <dht.h>
#include <Wire.h>
#include <LiquidCrystal_I2C.h>

LiquidCrystal_I2C lcd(0x27, 2, 1, 0, 4, 5, 6, 7, 3, POSITIVE);

dht DHT11;
#define DHT11_PIN 5 //dht11 signal connected to pin 5

void setup()
{
  lcd.begin(16,2);
  lcd.backlight();
}

void loop()
{
  int chk = DHT11.read11(DHT11_PIN);
  lcd.clear();
  lcd.setCursor(0,0);
  lcd.print(" Temp = ");
  lcd.print(DHT11.temperature);
  lcd.setCursor(0,1);
  lcd.print(" Humidity = ");
  lcd.print(DHT11.humidity);
  delay(2000);
}
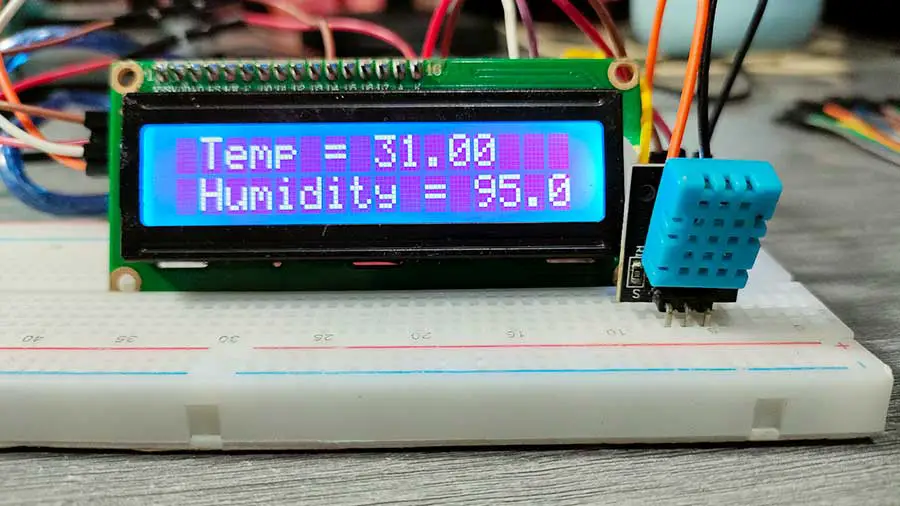
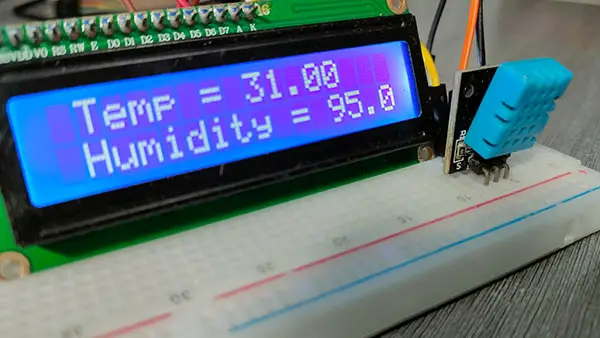
5. Uploading the Code and Testing
Upload the code to your Arduino board and watch the I2C LCD module display the temperature and humidity readings.
For you to test, modify, or upgrade this project, let's break down the provided Arduino code step by step:
#include <dht.h>
#include <Wire.h>
#include <LiquidCrystal_I2C.h>
These lines include the necessary libraries for the project:
- dht.h: Library for the DHT11 sensor.
- Wire.h: Library for I2C communication.
- LiquidCrystal_I2C.h: Library for controlling the I2C LCD module.
LiquidCrystal_I2C lcd(0x27, 2, 1, 0, 4, 5, 6, 7, 3, POSITIVE);
This line initializes the lcd object of type LiquidCrystal_I2C with the I2C address 0x27 and pin mapping for the LCD module.
dht DHT11;
#define DHT11_PIN 5 //dht11 signal connected to pin 5
This section initializes an object DHT11 of type dht to interact with the DHT11 sensor. It also defines the pin to which the DHT11 signal is connected (DHT11_PIN).
void setup()
{
  lcd.begin(16,2);
  lcd.backlight();
}


The setup() function:
- Initializes the LCD module with 16 columns and 2 rows using lcd.begin(16, 2).
- Turns on the backlight of the LCD module using lcd.backlight().
int chk = DHT11.read11(DHT11_PIN);
Reads the temperature and humidity values from the DHT11 sensor using DHT11.read11(DHT11_PIN).
lcd.clear();
Clears the LCD screen using lcd.clear().
lcd.setCursor(0,0);
lcd.print(" Temp = ");
lcd.print(DHT11.temperature);
Sets the cursor position to the first row (0,0) and prints the actual temperature reading after the text " Temp = ".
lcd.setCursor(0,1);
lcd.print(" Humidity = ");
lcd.print(DHT11.humidity);
Sets the cursor position to the second row (0,1) and prints the actual humidity reading after the text " Humidity = ".
delay(2000);
Adds a delay of 2000 milliseconds (2 seconds) before the next reading.
6. Troubleshooting Tips
Including Libraries:
Ensure that the necessary libraries (dht.h, Wire.h, LiquidCrystal_I2C.h) are properly included at the beginning of the code. If any library is missing, you'll encounter compilation errors.
Defining Constants:
Double-check the pin number (DHT11_PIN) to which the DHT11 sensor is connected and ensure it matches the actual pin connection on your Arduino board.
Setup Function:
Make sure the lcd.begin() and lcd.backlight() functions are called within the setup() function to properly initialize and turn on the backlight of the LCD module.
LCD Display:
Ensure that the LCD display is properly connected to the Arduino and powered on. If the display remains blank or shows garbled characters, check the wiring connections and the contrast adjustment of the LCD.
Communication Issues:
If the LCD does not display any data, check the I2C communication between the Arduino and the LCD module. Ensure that the SDA and SCL pins are connected correctly and that there are no address conflicts with other I2C devices.
Serial Monitor Debugging:
Use the Serial Monitor to print debug messages and sensor readings. This can help identify any issues with the sensor or LCD display and provide insights into potential troubleshooting steps.
By following these troubleshooting tips, you can diagnose and resolve common issues that may arise when using the DHT11 sensor with an I2C LCD module with Arduino. Remember to systematically check each component and connection to ensure everything is functioning as expected.
7. Ideas for Practical Applications
Here are some practical applications of the Arduino project that involves displaying DHT11 sensor data on an I2C LCD module:
- Home Weather Station:
Build a compact weather station to monitor temperature and humidity levels indoors. This can be particularly useful for optimizing heating, ventilation, and air conditioning (HVAC) systems for comfort and energy efficiency.
- Greenhouse Monitoring:
Create an automated greenhouse system that tracks environmental conditions such as temperature and humidity. This system can help growers maintain optimal growing conditions for plants, improving crop yield and quality.
- Data Logging for Research:
Set up the Arduino project for long-term data logging of temperature and humidity readings. Researchers or hobbyists can use this data to analyze trends over time, study environmental changes, or conduct experiments in controlled environments.
- Food Storage Monitoring:
Use the sensor system to monitor temperature and humidity levels in food storage areas such as refrigerators or pantries. This helps ensure food safety by alerting users to conditions that could lead to spoilage or mold growth.
- Art Preservation:
Implement the sensor system in museums or art galleries to monitor temperature and humidity levels in display areas. Maintaining stable environmental conditions is crucial for preserving sensitive artifacts and artworks.
- Laboratory Experiments:
Integrate the Arduino project into laboratory setups for scientific experiments or educational demonstrations. Students and researchers can learn about environmental monitoring and data collection in a hands-on way.
- Personal Weather Station:
Build a personal weather station for hobbyists or enthusiasts to track local weather conditions. This can involve expanding the system to include additional sensors for measuring parameters like air pressure, wind speed, or rainfall.
These practical applications demonstrate the versatility and usefulness of the Arduino project involving the DHT11 sensor and I2C LCD module. Whether for home automation, environmental monitoring, or educational purposes, this project offers numerous opportunities for innovation and exploration.
8. Conclusion
In this tutorial, we've learned how to use the DHT11 sensor to measure temperature and humidity and display the values on an I2C LCD module using Arduino. This project opens up possibilities for creating various environmental monitoring systems and home automation projects. Feel free to expand upon this project by adding features like data logging or remote monitoring capabilities.
By following these steps, you've successfully created a simple yet effective temperature and humidity monitoring system using Arduino and the DHT11 sensor. Happy experimenting!


S= Pin he did
- = GND
+ = VCC
Yes, as long as (-) is connected to GND, (+) to 5V, and signal to a digital pin, then it will work properly. You may be referring to the DHT11 model found in this article: https://www.arduinointro.com/articles/projects/building-smart-environments-getting-started-with-the-dht11-sensor
There is a comparison of both models there.