Arduino is an open-source electronics platform based on easy-to-use hardware and software. Arduino boards are able to read inputs, such as light on a sensor, a finger on a button, or a text message - and turn it into an output, like activating a motor, turning on an LED, or display characters on a Liquid Crystal Display. You can tell your Arduino board what to do by sending a set of instructions to the microcontroller on the board. To do so, you need to use the Arduino programming language, and the Arduino Software (IDE).
According to the official Arduino website, using Arduino has many advantages:
- It is inexpensive
Arduino boards are relatively inexpensive compared to other microcontroller platforms. The least expensive version of the Arduino module can be assembled by hand.
- It is cross-platform
The Arduino Software (IDE) runs on Windows, Macintosh OSX, and Linux operating systems. Most microcontroller systems are limited to Windows.
- It has a simple, clear programming environment
The Arduino Software (IDE) is easy-to-use for beginners, yet flexible enough for advanced users to take advantage of as well
- The software is open-source
The Arduino software is published as open-source tools, available for extension by experienced programmers. The language can be expanded through C++ libraries, and people wanting to understand the technical details can make the leap from Arduino to the AVR C programming language on which it's based.
- The hardware is open source
The plans of the Arduino boards are published under a Creative Commons license, so experienced circuit designers can make their own version of the module, extending it and improving it. Even relatively inexperienced users can build the breadboard version of the module in order to understand how it works and save money.
Being open-source means that the code, schematics, and design can be taken freely by anyone to do what they like with them. Hence, there are many clone boards and other Arduino-based boards available to purchase or to make from a schematic.
Arduino is composed of two major parts:
- The Arduino board, which is the piece of hardware you work on when you build your objects; and the
- Arduino Integrated Development Environment, or IDE, is the piece of software you run on your computer. You use the IDE to create a sketch or a little computer program, that you upload to the Arduino board. The sketch tells the board what to do.
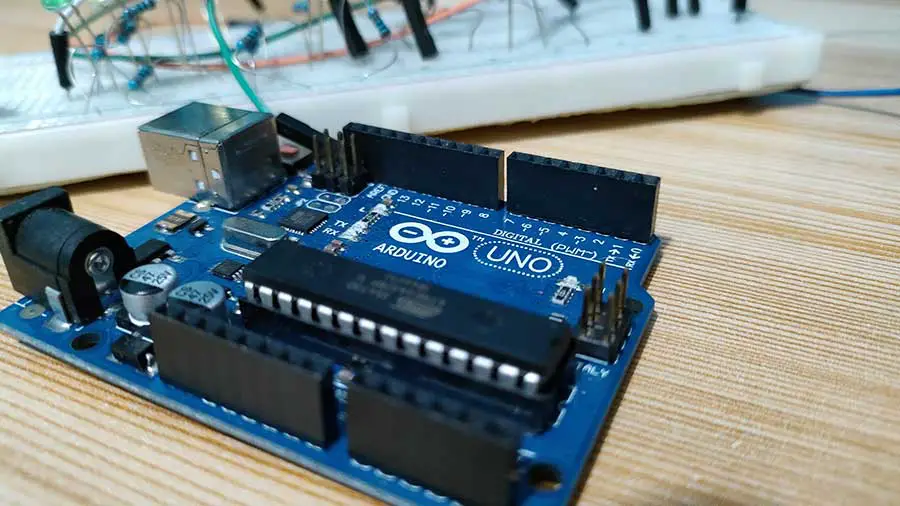
Parts of an Arduino Board
Looking closely at the Arduino board, you will see that the Arduino has a row of strips at the top and the bottom with lots of labels. These strips are the connectors, which are used to attach to sensors and actuators. An actuator is the opposite of a sensor: a sensor senses something in the physical world and converts it to a signal a computer can understand, while an actuator converts a signal from a computer into an action in the physical world.
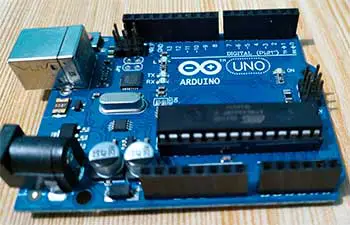
There are many different variants of the Arduino. The most popular variant is probably the Arduino Uno.
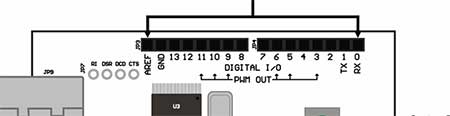
The Arduino Uno has 14 Digital Input/Output pins (pins 0-13).
These pins can be either inputs or outputs. Inputs are used to read information from sensors, while outputs are used to control actuators. You will specify the direction (in or out) in the sketch you create in the IDE. Digital inputs can only read one of two values, and digital outputs can only output one of two values (HIGH and LOW)."
The Arduino Uno also has 6 Analog Input pins (pins 0-5).

The analog input pins are used for reading voltage measurements from analog sensors. In contrast to digital inputs, which can distinguish between only two different levels (HIGH and LOW), analog inputs can measure 1,024 different levels of voltage.
There are also 6 Analogue Output pins or PWM pins. PWM stands for Pulse Width Modulation (pins 3, 5, 6. 9, 10, and 11).
These are actually six of the digital pins that can perform a third function: they can provide analog output. As with the digital I/0 pins, you specify what the pin should do in your sketch.
The board can be powered from your computer's USB port. Most USB chargers or a 9-volt, center-positive, AC adapter with a 2.1 mm barrel tip is recommended.
Whenever power is provided at the power socket, Arduino will use that and if there is no power at the power socket, Arduino will use power from the USB socket. It's safe to have power at both the power socket and the USB socket.
Things to Know About the Arduino IDE
Now, let’s go to the Arduino software.
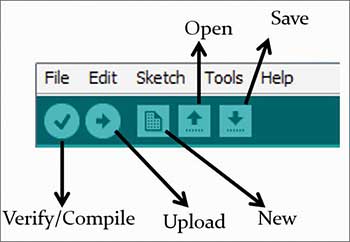
The Arduino Integrated Development Environment - or IDE - contains a text editor for writing code, a message area, a text console, a toolbar with buttons for common functions, and a series of menus. It connects to the Arduino hardware to upload programs and communicate with them.
Programs written using Arduino Software (IDE) are called sketches. These sketches are written in the text editor and are saved with the file extension .ino. The editor has features for cutting/pasting and for searching/replacing text. The message area gives feedback while saving and exporting and also displays errors. The console displays text output by the Arduino Software (IDE), including complete error messages and other information. The bottom right-hand corner of the window displays the configured board and serial port. The toolbar buttons allow you to verify and upload programs, create, open, and save sketches, and open the serial monitor.
The buttons you would probably use more often are the Verify and Upload buttons. The Verify button checks your code for errors compiling it. While the Upload button compiles your code and uploads it to the configured board.
How to Install the Arduino IDE
You have 2 options for using the Arduino IDE
- If you have a reliable Internet connection, you should use the online IDE (Arduino Web Editor). It will allow you to save your sketches in the cloud, having them available from any device and backed up. You will always have the most up-to-date version of the IDE without the need to install updates or community-generated libraries.
- If you would rather work offline, you should use the latest version of the desktop IDE.
To Install the Arduino Software (IDE) on Windows PCs, first, you must get the latest version from the download page on www.arduino.cc website. You can choose between the Installer (.exe) and the Zip packages. The Arduino website suggests that you use the first one that installs directly everything you need to use the Arduino Software (IDE), including the drivers. With the Zip package, you need to install the drivers manually. The Zip file is also useful if you want to create a portable installation.
When the download finishes, proceed with the installation, and please allow the driver installation process when you get a warning from the operating system.
Next, you should choose the components to install. Normally, you should just check all the components. After that, choose the installation directory (I suggest keeping the default one)
That’s it. The process will extract and install all the required files to execute properly the Arduino Software (IDE)

After writing your sketch in the Arduino IDE, it’s time to upload it to the Arduino board. Before uploading your sketch, you need to select the correct items from the Tools > Board and Tools > Port menus. On the Mac, the serial port is probably something like /dev/tty.usbmodem241 (for an Uno or Mega2560 or Leonardo) or /dev/tty.usbserial-1B1 (for a Duemilanove or earlier USB board. On Windows, it’s probably COM4, COM5, COM7, or higher (for a USB board) - to find out, you look for USB serial device in the Ports section of the Windows Device Manager.
Make sure to select the correct Arduino board in the Tools->Board menu. Don’t forget to connect your Arduino board to your computer using a USB cable. Once you've selected the correct serial port and board, press the Upload button in the toolbar or select the Upload item from the Sketch menu. On most boards, you'll see the RX and TX LEDs blink as the sketch is uploaded. The Arduino Software (IDE) will display a message when the upload is complete, or show an error.
Arduino has come a long way since it was used as an easy tool for fast prototyping, aimed at students without a background in electronics and programming. Now with a much wider community, we can see many projects created for various needs and challenges.


