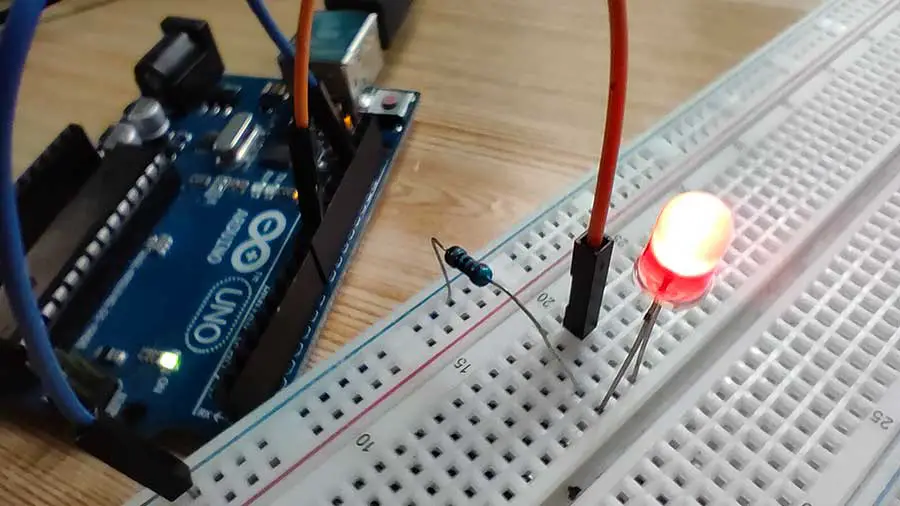
“Why do I need to randomize the brightness of an LED”, you may ask? Well, you may come across an idea to make a flameless campfire effect. Or you may want to make an artificial fireplace project made out of LEDs which you can place on a wall of your room. By varying the brightness of LEDs in rapid succession, you will be able to generate a flame effect.
To achieve this effect, you will need two Arduino functions: random () and randomSeed(). Random numbers are very useful if you need your LEDs or any project to behave differently each time it is run, instead of a definite set of behavior.
There are 2 sample projects about random values later on in this article.
The random() Function
The random() function generates a pseudo-random number between min and max - 1. If min is not specified, the lower bound is 0.
Example:
int random_number = random(0,256); //returns a number between 0 and 255
int random_number = random(501); //returns a number between 0 and 500
The randomSeed() Function
Although Arduino generates random numbers using the random() function, the sequence of the numbers will eventually become predictable. This is because Arduino uses a “default” random seed. This seed will be used again when the program restarts so the resulting random numbers will essentially be the same. If you really like to have a truly random number generator, you should start with a random seed every time the program is run.
This seed should then be written inside the setup() function. To get a random seed, you can use an analog pin that is currently not connected to anything. The pin, in this way, will have a floating value when the program starts. This floating value is what you will use as the seed.
Example:
randomSeed(analogRead(A5)); //randomize using the floating value from analog pin 5.
Let’s use everything we’ve learned so far. This project will randomize the brightness level of an LED every 100 milliseconds.
PROJECT 1: Random Brightness of 1 LED
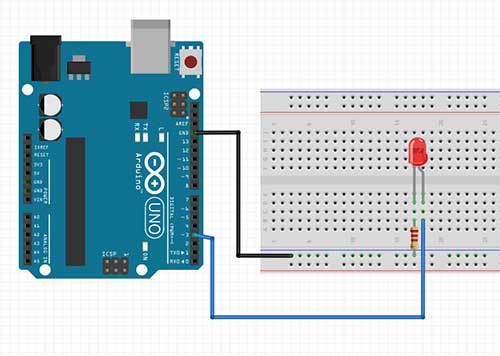
As the title of this project implies, we will set the brightness of an LED with a random value every 100 milliseconds.
Breadboard Circuit:

Code:
int random_led_val;
int ledpin=3;

void setup() {
  // put your setup code here, to run once:
  pinMode(ledpin,OUTPUT);
  randomSeed(analogRead(A0));
}

void loop() {
  // put your main code here, to run repeatedly:
random_led_val=random(0,256); //generate random value from 0 to 255
analogWrite(ledpin,random_led_val);
delay(100);
}
Code Explanation:
int random_led_val;
int ledpin=3;
The random_led_val variable will hold the random brightness value of the LED. The ledpin variable is the digital pin to which the LED is connected. In this case, the positive side of the LED is connected to digital pin 3. For the random brightness project to work, the LED must be connected to a PWM pin. The PWM pins in an Arduino board are digital pins 3, 5, 6, 9, 10, and 11.
You can read more about PWM pins in this article: Become a Master of the Fade In Fade Out Effect (Arduino Style)
randomSeed(analogRead(A0));Remember the predictability of the generated random numbers? Well, this is the part where we need to create a random seed value every time the program starts so that the generated random numbers cannot be predicted. In this example, we are taking a reading from analog pin 0 which is not connected to anything. If nothing is connected to a pin, it generates a “noise” value or a floating value which is just a bunch of random values. You may use other analog pins for your random seed value.
random_led_val=random(0,256); //generate random value from 0 to 255In this line, we generated a random integer value between 0 and 255. The reason why the maximum number should be 255 is that we will be using the PWM feature of the Arduino board. For PWM pins, we can write values from 0 to 255 using the analogWrite function. Notice that the upper limit for our random function is 256. This is because the upper limit is determined by the maximum number – 1. The resulting number will then be saved into the random_led_val variable, which we will be using in the following line.
analogWrite(ledpin,random_led_val);This is the part where we will now send a value to digital pin 3, which is in this case, the variable ledpin. The value will be taken from the random_led_val variable. The analogWrite() function writes an analog value (PWM wave) to a pin. The analog value can then be used to light a LED at varying brightness or drive a motor at various speeds.
The analogWrite() function was also used in the LED Fade Effect project found in this article: Become a Master of the Fade In Fade Out Effect (Arduino Style)
delay(100);This delay will determine the next time your project will generate a random number and thus, change the brightness of the LED again.
You can also make the time of the delay random so that it doesn’t have to change every 100 milliseconds. The next code will randomize the delay from 50 to 500 milliseconds.
int random_led_val;
int random_time;
int ledpin=3;

void setup() {
  // put your setup code here, to run once:
  pinMode(ledpin,OUTPUT);
  randomSeed(analogRead(A0));
}

void loop() {
  // put your main code here, to run repeatedly:
random_led_val=random(0,256); //generate random value from 0 to 255
random_time=random(50,501);
analogWrite(ledpin,random_led_val);
delay(random_time);
}
PROJECT 2: Random Brightness of 3 LEDs
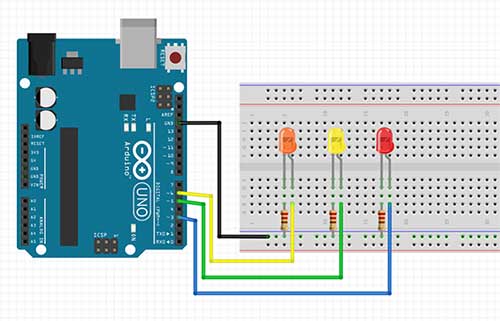
This project can randomize the brightness values of three LEDs. By choosing the LED colors carefully, you can achieve very creative visual effects. You may even want to add more LEDs later.
Breadboard Circuit:

Code:
int random_led_val_1;
int random_led_val_2;
int random_led_val_3;
int ledpin_1=3;
int ledpin_2=5;
int ledpin_3=6;

void setup() {
  // put your setup code here, to run once:
  pinMode(ledpin_1,OUTPUT);
  pinMode(ledpin_2,OUTPUT);
  pinMode(ledpin_3,OUTPUT);
  randomSeed(analogRead(A0)); //make sure not to connect anything to this pin *floating value
}

void loop() {
  // put your main code here, to run repeatedly:
  random_led_val_1=random(0,256); //generate random value from 0 to 255
  random_led_val_2=random(0,256); //generate random value from 0 to 255
  random_led_val_3=random(0,256); //generate random value from 0 to 255
  analogWrite(ledpin_1,random_led_val_1);
  analogWrite(ledpin_2,random_led_val_2);
  analogWrite(ledpin_3,random_led_val_3);
  delay(100);
}
Code Explanation
int random_led_val_1;
int random_led_val_2;
int random_led_val_3;
In this project, we assigned a different random variable for the brightness value for each of the three LEDs.
int ledpin_1=3;
int ledpin_2=5;
int ledpin_3=6;
The LEDs are also connected to different pins. We make sure that the pins we use are PWM pins.
random_led_val_1=random(0,256); //generate random value from 0 to 255
random_led_val_2=random(0,256); //generate random value from 0 to 255
random_led_val_3=random(0,256); //generate random value from 0 to 255
We generate separate random values for each of the LEDs. We can also just generate one random value for all LEDs but having separate values is way cooler.
  analogWrite(ledpin_1, random_led_val_1);
  analogWrite(ledpin_2, random_led_val_2);
  analogWrite(ledpin_3, random_led_val_3);
This is the part where we now write the generated random values to each of the PWM pins.
You may also randomize the delay just like in the previous project.


The random numbers generated by the random() function can be predicted over time. However, if the randomness of the numbers is not so critical to your project, you can omit the randomSeed() function, your code will still run.