Combining pushbuttons with LCDs can go a long way when making Arduino projects. Take a vending machine for example. A vending machine works by making a payment to receive the appropriate product. Usually, it is self-service and you only need to interact with buttons and an LCD for instructions and feedback. Another device that uses LCD and buttons to work properly and efficiently is the printer. You can set options by pressing the appropriate buttons with instructions displayed on the LCD.
Here are some basic Arduino projects with buttons and LCDs to help you get started.
PROJECT 1: LCD Switch Modes
This is Project 51 of the Arduino Intro app. This is an example of how to select modes or settings using a pushbutton and displaying the choice entered by the user on the LCD.
Here is a demonstration:
You will need:
I2C LCD x 1
Pushbutton x 1
10 Kohm resistor (brown-black-orange) x 1
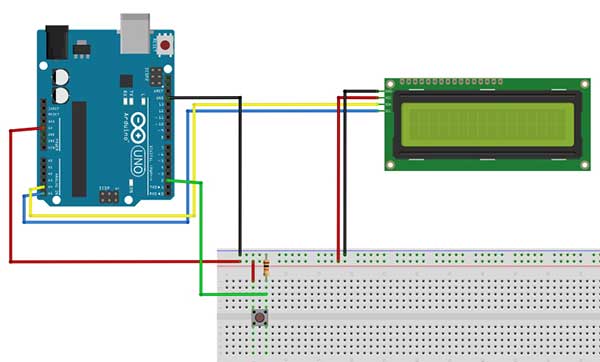
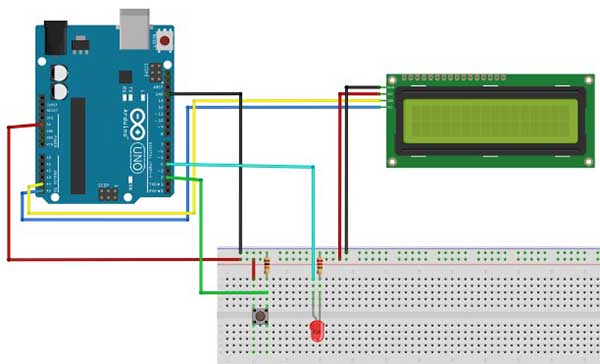
Breadboard Circuit
This is the code.
#include <Wire.h>
#include <LiquidCrystal_I2C.h>

LiquidCrystal_I2C lcd(0x27, 2, 1, 0, 4, 5, 6, 7, 3, POSITIVE);

int x=2; //button is connected to digital pin 2
int val=0,led_num=0;

void setup()
{
  lcd.begin(16,2);
  lcd.backlight();
  pinMode(x,INPUT);

}

void loop()
{
  //read the value of the button when pressed
  val=digitalRead(x);

  if(val==1){ //button is pressed
    led_num=led_num+1; //add 1 to the led_num variable
  }

  if (led_num==1){
    lcd.clear();
    lcd.setCursor(0,0);
    lcd.print(" Mode 1 ");
  }
  else if (led_num==2){
    lcd.clear();
    lcd.setCursor(0,0);
    lcd.print(" Mode 2 ");
  }
  else if (led_num==3){
    lcd.clear();
    lcd.setCursor(0,0);
    lcd.print(" Mode 3 ");

    //reset the led_num variable to 0
    led_num=0;

  }
  //wait 300 ms for the next reading
  delay(300);
}
This project uses the I2C LCD. For more details on how to use this LCD, you may read this article: Displaying Characters Using the I2C Liquid Crystal Display (LCD)
int val=0,led_num=0;We will be using the variable val to store the current value of the pushbutton. Every time the button is pressed, its value becomes 1, otherwise, its value is 0. However, in some cases, this might be reversed. When the button is pressed, its value becomes 0, otherwise, it is 1. You may change this later on in the code. You can use the serial monitor to check the value or you may use a simple trial and error. The led_num keeps track of how many times the button is pressed and this corresponds to the current mode selected.
if(val==1){ //button is pressed
    led_num=led_num+1; //add 1 to the led_num variable
  }
Each time the button is pressed, we add 1 to the current value of the led_num variable. We can think of it like this: Let the new value of led_num be equal to the current value of led_num plus 1.
  else if (led_num==3){
    lcd.clear();
    lcd.setCursor(0,0);
    lcd.print(" Mode 3 ");
    //reset the led_num variable to 0
    led_num=0;
  }
When the value of the led_num variable reaches 3, we then reset it back to zero, so that the mode will cycle from 1 to 3.
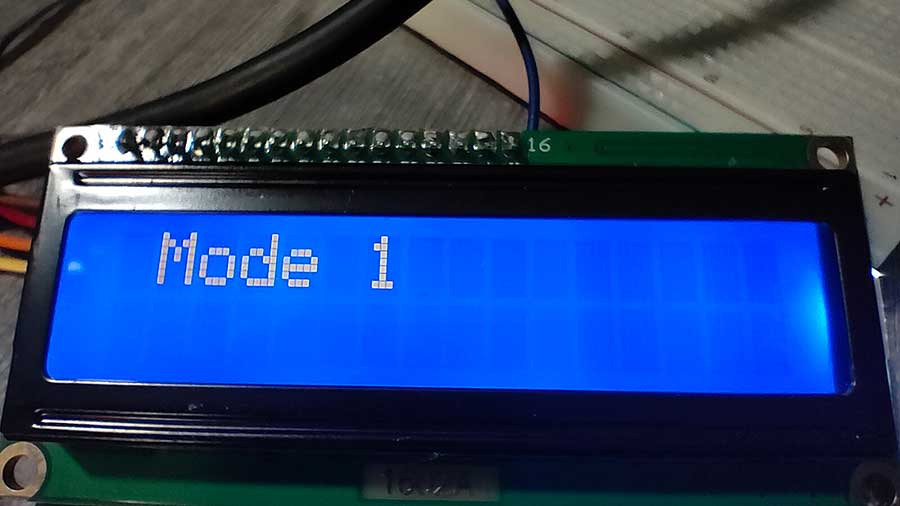
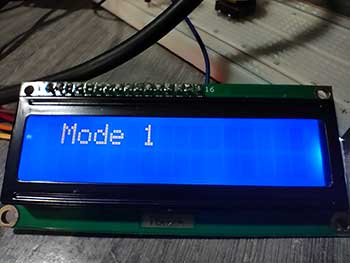
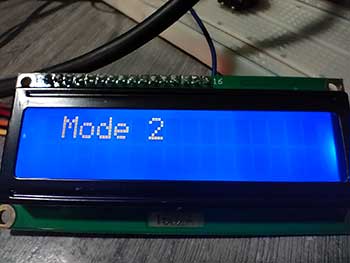
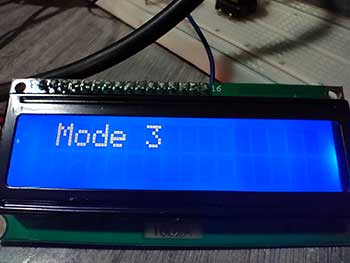
This is the output each time the button is pressed:
Watch the YouTube video of this project:
PROJECT 2: LCD LED Status
This is Project 52 of the Arduino Intro app. It displays the status of the LED, whether it is turned on or off. A single pushbutton will turn on/off the LED.

Here's a demonstration of this project:
You will need:
I2C LCD x 1
Pushbutton x 1
10 Kohm resistor (brown-black-orange) x 1
LED x 1
220-ohm resistor (red-red-brown) x 1
Breadboard circuit
This is the code.
#include <Wire.h> //enables us to use i2c communication
#include <LiquidCrystal_I2C.h> //enables us to use the lcd functions

LiquidCrystal_I2C lcd(0x27, 2, 1, 0, 4, 5, 6, 7, 3, POSITIVE);

int led=4;
int b = 2;
int val=0;
int ledstate=LOW; //initial value
void setup()
{
pinMode(led,OUTPUT);
pinMode(b, INPUT);
lcd.begin(16,2);
lcd.backlight();
}

void loop(){
  //read the value of the button when pressed
  val=digitalRead(b);

  //in this example, the value of the button when pressed is 1
  if(val==1){
    //reverse the current state of the ledstate variable
    ledstate=!ledstate;
    //the ledstate variable controls the HIGH or LOW state
    digitalWrite(led,ledstate);
    if (ledstate==HIGH){
      lcd.clear(); //erase all text on the lcd
      lcd.setCursor(0,0);
      lcd.print("LED is ON");}
    else{
      lcd.clear();
      lcd.setCursor(0,0);
      lcd.print("LED is OFF");}
    //wait .5 second before the next reading
    delay(500);
  }
}
This sketch uses the "Sticky" pushbutton effect. What happens here is that when the button is pressed, the LED turns ON and it STAYS ON even when you release the button. The next time you press it, the LED turns OFF and it STAYS OFF until the next press of the button. This is explained further in this article: Using Simple Pushbutton Switches to Light Up LEDs
In this project, the status of the button, whether it is ON or OFF, is displayed on the LCD.
Here is the output:
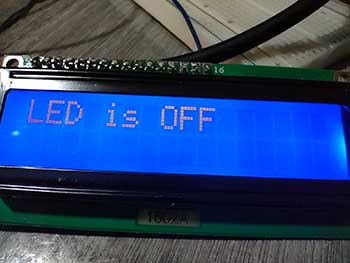
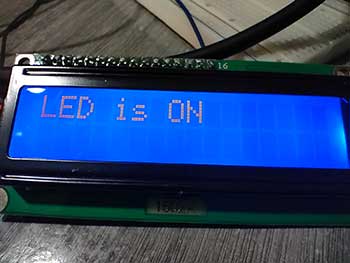
When the button is pressed, the LED turns ON, and the status is displayed on the LCD.


