0:00
Ever wished you could control real world stuff with your phone
0:06
In this video I'll show you how to light up an LED using Bluetooth and Arduino with
0:11
just a tap on your screen. No internet required, just a simple Bluetooth connection and a few lines of code
0:17
Here's what you need. One Arduino Uno, one HC05 Bluetooth module, one LED, one 220 ohm resistor, one 5k ohm
0:25
resistor 110k ohm resistor, a few jumper wires and a breadboard, and the free Android app called
0:30
Connectino. Let's wire it up. Connect the LED's long leg to pin 5 on the Arduino. The short leg
0:36
goes to GND with a resistor. The HC05 Bluetooth module communicates using 3.3 volt logic, meaning
0:43
it expects the data it receives on its RX pin to be no higher than 3.3 volts. However, the Arduino
0:49
Uno uses 5 V logic, so it sends out 5 volt signals from its TX or transmit pin. Sending
0:55
5 volt signals directly to the HC05's RX pin can damage the module over time since it's
1:02
not designed to handle more than 3.3 volts on that pin. To protect the HC05, we use a
1:07
voltage divider on the Arduino TX to HC05 RX line. Here's how it works. Connect Arduino
1:14
TX to one end of the 5-kilohm resistor. Connect the other end of the 5-kilohm resistor to one end
1:20
of the 10-kilohm resistor. Connect the other end of the 10-kilohm resistor to GND. This converts the
1:25
5-volt signal to a safe 3.3 volts protecting the module. You can use other resistor values as long
1:31
as the ratio is 1 is to 2. For example, 1-kilohm and 2-kilohms would work the same way. The voltage
1:37
output depends on the ratio between the two resistors, not their absolute values. Connect
1:42
Connect the HC05 TX pin to the Arduino's RX pin, which is pin 0
1:46
HC05 VCC to 5V and GND to GND Now let take a look at the code This sketch listens for commands from your phone and turns the LED on or off We start by defining the LED pin then begin serial communication at 9600 baud rate which is the standard for the HC05
2:04
In the loop, the Arduino waits for data from your phone. If it sees switch one underscore on, it powers the LED
2:10
If it sees switch one underscore off, it shuts it down. Simple. Disconnect both the TX and RX wires before uploading
2:17
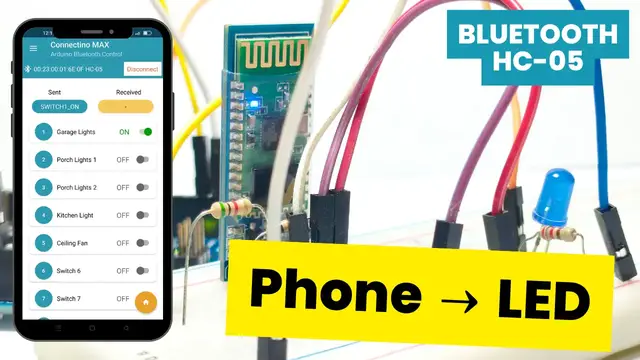
You can reconnect them once uploading is complete. Now pair your phone to the HC-05 Bluetooth module
2:33
The default pin is usually 1234 or 0000. You'll notice the HC-05 blinks quickly at first
2:45
That means it's waiting to pair. Once it connects to your phone, the blinking slows down
2:57
Connect your HC05 module to Connectino by pressing the Connect button. In the Connectino app dashboard, go to switches
3:07
Tap the switch 1 toggle switch to send switch 1 underscore on and tap it again to send switch
3:12
1 underscore off. Here's the magic. Your phone sends a text command via Bluetooth
3:18
HC05 receives it and passes it to the Arduino. Arduino reads the string and switches the pin high or low
3:25
That's wireless control with just a few components. Once you've got this working, try expanding it
3:30
Control multiple LEDs, add sensors, or trigger a buzzer. This is the foundation of a full-blown smart system
3:36
If this video helped you, give it a thumbs up and don't forget to subscribe for more easy Arduino tutorials
3:41
the full code and wiring diagram, head to arduinointro.com