
Imagine if your lights slowly increase in brightness when you turn them on, and slowly decrease in brightness when you turn them off. This kind of effect can easily be done with Arduino. With the fading LED effect, you can have thousands of creative uses, whether you want to light up your car, truck, boat, house, appliances, or furniture.
In this article, we will do Project 7 of the Arduino Intro app which is the Fade In Fade Out project.

You will need 1 LED and 1 220-ohm resistor. I will also explain how to use the for loop in Arduino. Let’s get started.
PROJECT: Fade Effect
What are PWM Pins?
First, let’s take a look at the breadboard diagram.
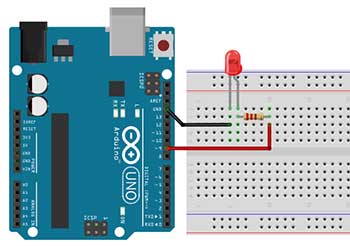
From here you will see that it is basically the same with our blinking led circuit. However, there’s one very important thing to consider here. If we want to be able to vary the brightness level of our LED, then we need to connect the LED to a PWM pin. PWM stands for Pulse Width Modulation. PWM is a technique for getting an analog-like behavior from a digital output by switching it off and on very fast and with different ratios between on and off time. With this technique, we can control the brightness of an LED or the speed of a motor.
In the Arduino Uno, not all digital pins have PWM capability. Only digital pins 3, 5, 6,9,10, and 11 are capable of PWM.

If you connect your LED to any of these pins, then you can make a fade effect. In some boards, these pins are labeled as such.
Writing Analog Values for Digital Pins Using analogWrite
Now for the code, what we want to do here is just for the LED to start fading in as soon as the board is powered up. And when it has reached its maximum brightness it will start to fade out. And again this will go in a loop (fade-in, fade-out, fade-in, fade-out…) This will be our first attempt to make a fade effect:
int ledPin = 9;    // LED connected to digital pin 9

void setup() {
  pinMode(ledPin, OUTPUT);
}

void loop() {

    analogWrite(ledPin, 125); //LED is at half-brightness


}
To start, we’ll declare a variable named ledpin for digital pin 9. Next, inside the setup function, we simply set that pin as an OUTPUT pin.
What’s different this time is in the loop function. The first thing we need to know is the analogWrite function. The analogWrite() writes an analog value or PWM wave to a digital pin. The value can be anywhere from 0 to 255. analogWrite() can be used to light an LED at varying brightness or drive a motor at various speeds. After a call to analogWrite(), the pin will generate a steady rectangular wave of the specified duty cycle until the next call to analogWrite() function.
In fading an LED, the analog value of 0 effectively means that the LED is off or the pin is always off. While the analog value of 255 sets the pin as always on with 5 volts thus giving the LED its maximum brightness. If we write an analog value of about 125, then we can say that the LED will have half of its maximum brightness. The pin is cycling from ON half of the time to OFF the other half, thus, giving the illusion of half brightness.
Now that we know how to control the brightness of an LED, let’s study the concept behind the fade-in effect. What we want to happen first is to set the brightness of the LED to zero. We can achieve this by writing analogWrite(ledpin, 0), assuming our variable is ledpin. Then gradually, after a set amount of time, we slowly increase the brightness. For example, after 30 milliseconds we write analogWrite(ledpin , 5). It doesn’t have to be 5, you decide on how much brightness you want to add. Then after another 30 milliseconds, you write again analogWrite(ledpin, 10). This goes on until you reach the maximum PWM value of 255. We can see it from our modified code below:
int ledPin = 9;    // LED connected to digital pin 9

void setup() {
  pinMode(ledPin, OUTPUT);
}

void loop() {

//start of fade-in effect

    analogWrite(ledPin, 5);
    delay(30);
    analogWrite(ledPin, 15);
    delay(30);
    analogWrite(ledPin, 25);
    delay(30);
    analogWrite(ledPin, 35);
    delay(30);
    analogWrite(ledPin, 45);
    delay(30);
    analogWrite(ledPin, 55);
    delay(30);
    analogWrite(ledPin, 65);
    delay(30);
    analogWrite(ledPin, 75);
    delay(30);
    analogWrite(ledPin, 85);
    delay(30);
    analogWrite(ledPin, 95);
    delay(30);
    analogWrite(ledPin, 105);
    delay(30);
    analogWrite(ledPin, 115);
    delay(30);
    analogWrite(ledPin, 125);
    delay(30);
    analogWrite(ledPin, 135);
    delay(30);
    analogWrite(ledPin, 145);
    delay(30);
    analogWrite(ledPin, 155);
    delay(30);
    analogWrite(ledPin, 165);
    delay(30);
    analogWrite(ledPin, 175);
    delay(30);
    analogWrite(ledPin, 185);
    delay(30);
    analogWrite(ledPin, 195);
    delay(30);
    analogWrite(ledPin, 205);
    delay(30);
    analogWrite(ledPin, 215);
    delay(30);
    analogWrite(ledPin, 225);
    delay(30);
    analogWrite(ledPin, 235);
    delay(30);
    analogWrite(ledPin, 245);
    delay(30);
    analogWrite(ledPin, 255);
    delay(30);


//start of fade-out effect

    analogWrite(ledPin, 255);
    delay(30);
    analogWrite(ledPin, 245);
    delay(30);
    analogWrite(ledPin, 235);
    delay(30);
    analogWrite(ledPin, 225);
    delay(30);
    analogWrite(ledPin, 215);
    delay(30);
    analogWrite(ledPin, 205);
    delay(30);
    analogWrite(ledPin, 195);
    delay(30);
    analogWrite(ledPin, 185);
    delay(30);
    analogWrite(ledPin, 175);
    delay(30);
    analogWrite(ledPin, 165);
    delay(30);
    analogWrite(ledPin, 155);
    delay(30);
    analogWrite(ledPin, 145);
    delay(30);
    analogWrite(ledPin, 135);
    delay(30);
    analogWrite(ledPin, 125);
    delay(30);
    analogWrite(ledPin, 115);
    delay(30);
    analogWrite(ledPin, 105);
    delay(30);
    analogWrite(ledPin, 95);
    delay(30);
    analogWrite(ledPin, 85);
    delay(30);
    analogWrite(ledPin, 75);
    delay(30);
    analogWrite(ledPin, 65);
    delay(30);
    analogWrite(ledPin, 55);
    delay(30);
    analogWrite(ledPin, 45);
    delay(30);
    analogWrite(ledPin, 35);
    delay(30);
    analogWrite(ledPin, 25);
    delay(30);
    analogWrite(ledPin, 15);
    delay(30);
    analogWrite(ledPin, 5);
    delay(30);

}
To create a fadeout effect we just do the opposite. We start first at full brightness, so we write analogwrite(ledpin, 255). Then after 30 milliseconds, we reduce the PWM value by 5, thus, we type analogWrite(ledpin, 250). We write analogWrite again and again until the PWM value is zero.
PROJECT: Fade Effect (for loop)
Shortening the Code Using the For Loop
Now obviously, writing this code takes so much time and energy. But notice, that there are some parts that are just repeated. In fact, every time we write the analogWrite function, we just need to change the PWM value. This is a perfect situation to use a loop. By using a for loop, we can actually shorten our code.
Loops can execute a block of code a number of times. Loops are handy, if you want to run the same code over and over again, each time with a different value. There are many types of loops in Arduino but for this code, we will use the for loop.
The for loop has the following syntax:
for (statement 1; statement 2; statement 3) {
// code block to be executed
}
Statement 1 is executed once before the execution of the code block. Statement 2 defines the condition for executing the code block. Statement 3 is executed after the code block has been executed. However, the condition in statement 2 has to be true in order for statement 3 to be executed. The loop will stop only when the condition becomes false. In this case, the program proceeds to the next statement after the for loop.
Now let’s take a look at our revised code, this time using the for loop:
	//fade in, fade out
	//LED should be connected to PWM pins (3,5,6,9,10,11)

	int ledPin = 9;    // LED connected to digital pin 9

	void setup() {
  		// initialize the digital pin as an output.
		pinMode(ledPin, OUTPUT);
	}

	void loop() {

		// fade in from min to max in increments of 5 points:
		for (int fadeValue = 0 ; fadeValue <= 255; fadeValue = fadeValue+5) {
			// sets the value (range from 0 to 255):
			analogWrite(ledPin, fadeValue);
			// wait for 30 milliseconds to see the dimming effect
			delay(30);
		}

		// fade out from max to min in increments of 5 points:
		for (int fadeValue = 255 ; fadeValue >= 0; fadeValue = fadeValue-5) {
			// sets the value (range from 0 to 255):
			analogWrite(ledPin, fadeValue);
			// wait for 30 milliseconds to see the dimming effect
			delay(30);
		}
	}
The first statement inside the main loop function is actually a for loop.
for (int fadeValue = 0 ; fadeValue <= 255; fadeValue = fadeValue+5) {
Statement 1 inside the for loop parenthesis says int fadeValue=0. Normally you will use Statement 1 to initialize the variable used in the loop. In this case, we initialize the fadeValue variable to zero. There are other ways to do this, in fact, statement 1 is optional, but it’s good to start with the basics. Statement 2 is used to evaluate the condition of the initial variable. It has to be written in such a way that it returns a true or false answer. Think of it as a question, for example, is fadeValue less than or equal to 255? If Statement 2 returns true, the loop will start, meaning the statements inside the for loop will be executed, if it returns false, the loop will end.
Often statement 3 increments the value of the initial variable. This is not always the case. Statement 3 can do anything like increase or decrease the value of the initial variable by a certain number, or anything else. In this case, we add 5 to the current value of the fadeValue variable. So we write fadevalue=fadevalue + 5. Another way of saying this is that the new value of the fadeValue variable is equal to the current value of the fadeVariable plus 5.
What Happens Inside the For Loop?
The first statement inside the for loop, which is written after the open brace is analogWrite(ledPin, fadeValue).
for (int fadeValue = 0 ; fadeValue <= 255; fadeValue = fadeValue+5) {
	// sets the value (range from 0 to 255):
	analogWrite(ledPin, fadeValue);
	// wait for 30 milliseconds to see the dimming effect
	delay(30);
}
Note that we did not type in a number as our analog value. Instead, we used the variable fadeValue. Why is this so? Well, when this code will be executed, Arduino will simply replace fadeValue with the actual value of the fadeValue variable. Remember that everytime the for loop is executed, we add 5 to the current value of the fadeValue variable. So if in the previous run, the value of fadeValue is 10, then in the next run, the value of fadeValue becomes 15. With this technique, we will only write the analogWrite function only once inside the for loop. A delay is written just before the for loop ends, this is to provide a transition time for the LED to change its brightness. It also affects how smooth the fade in effect will happen. You can experiment with this value to see which one works for your project.
After the last statement inside the for loop which is delay(30), the loop goes back again from the beginning. But just before the first statement is once again executed, it checks first if the answer to Statement 2, which is our condition statement is true. If it is, then the loop proceeds, if it is false, then the loop stops and the next statement inside the main loop function is executed. This is after the close brace of the for loop. In this case if the value of the fadeValue variable is greater than 255, then Statement 2 becomes false and this loop will end.
The next statement after the first for loop is another for loop. But this time it is the opposite. This for loop creates a fade-out effect. The fadeValue starts at 255, meaning the LED is at full brightness, then as the loop runs, its value decreases until it becomes a negative value. When this happens, Statement 2 becomes false, thus ending the loop. However, the main loop function will still run.
Learning how to use the for loop can be confusing at first but once you get the idea, then everything becomes clear. You should use loops whenever possible to save on time and energy. The best way to understand the for loop is to try it. So go ahead and try this project if you haven’t done so already.