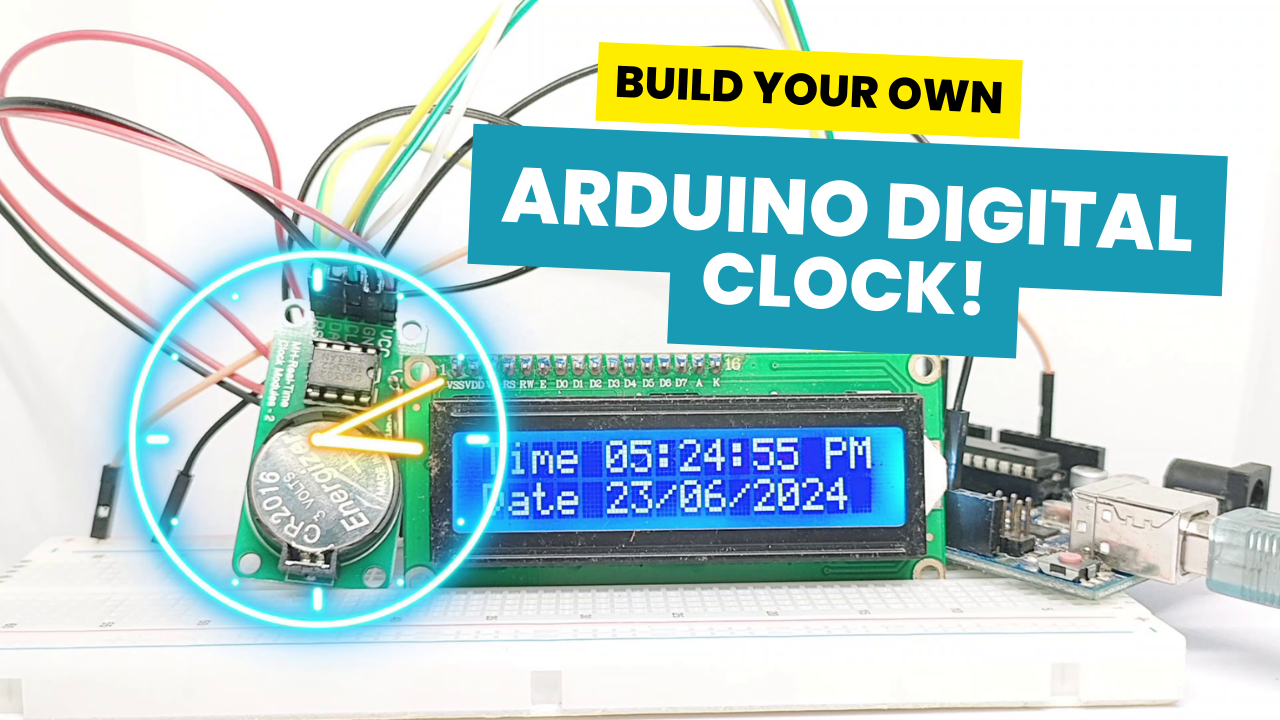
Build Your OWN Arduino Clock with DS1302 RTC and I2C LCD Dis...
24K views · Dec 28, 2024 arduinointro.com
Learn how to build a functional Arduino clock using the DS1302 RTC and I2C LCD display module. In this tutorial, we'll take you through a step-by-step guide on how to set up and program your Arduino board to display the current time and date using the DS1302 real-time clock module and an I2C LCD display. This project is perfect for beginners and hobbyists who want to explore the world of Arduino and IoT projects. By the end of this video, you'll have a working Arduino clock that you can use to keep track of time and even customize to fit your needs. So, let's get started and build our Arduino clock now! ************************************************* Link to code and libraries: https://www.arduinointro.com/articles/projects/creating-an-arduino-clock-with-ds1302-rtc-module-and-i2c-lcd-display
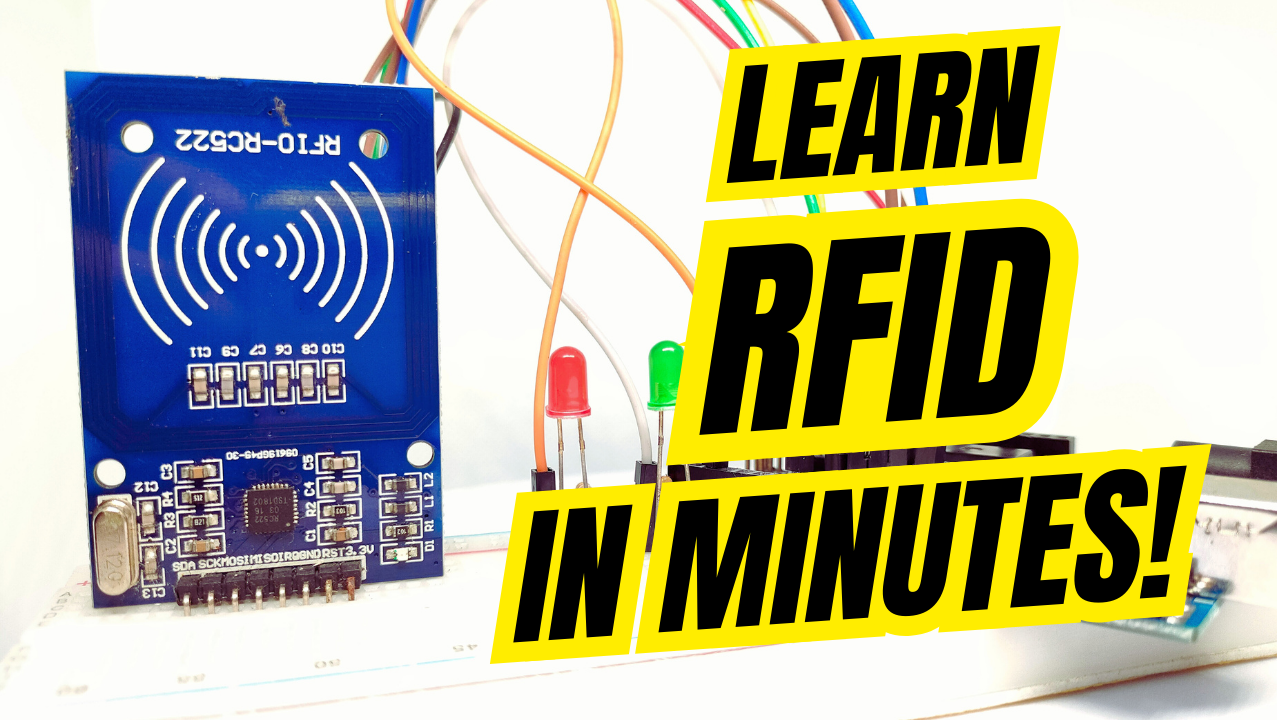
How to Use an RFID Module with Arduino for Beginners
62K views · Dec 1, 2024 arduinointro.com
Welcome to our beginner-friendly tutorial on how to use an RFID module with Arduino! In this video, we will guide you step-by-step through the process of connecting an RFID module to your Arduino board, programming it, and reading RFID tags. Whether you're a complete novice or looking to expand your Arduino projects, this tutorial is perfect for you. Key topics covered in this video: - What is RFID technology? - Components needed for the project. - Wiring the RFID module to the Arduino. - Uploading and understanding the code. - Testing the RFID setup with tags. By the end of this video, you'll have a solid understanding of how RFID modules work and how to incorporate them into your own projects. Make sure to like, subscribe, and hit the notification bell for more Arduino tutorials and projects! =========================== Here's the link to the Arduino code and the MFRC522 library: https://www.arduinointro.com/articles/projects/how-to-use-rfid-rc522-with-arduino-a-complete-beginners-guide #Arduino #RFID #ArduinoTutorial #ElectronicsProjects #BeginnersGuide

Light Up Your Creativity in 24 Hours with 11 Arduino LED Pro...
7K views · Nov 9, 2024 arduinointro.com
Get ready to light up your day with these 11 amazing Arduino LED creations from Arduino Intro that will take your DIY skills to the next level! From mesmerizing LED displays to interactive art installations, we'll show you how to bring your ideas to life using Arduino and LED lights. In just 24 hours, we'll take you on a thrilling ride of creativity and innovation, pushing the limits of what's possible with Arduino and LED technology. Whether you're a seasoned maker or just starting out, this video is packed with inspiration and ideas to get you started on your next project. So, sit back, relax, and get ready to be amazed by these incredible Arduino LED creations!
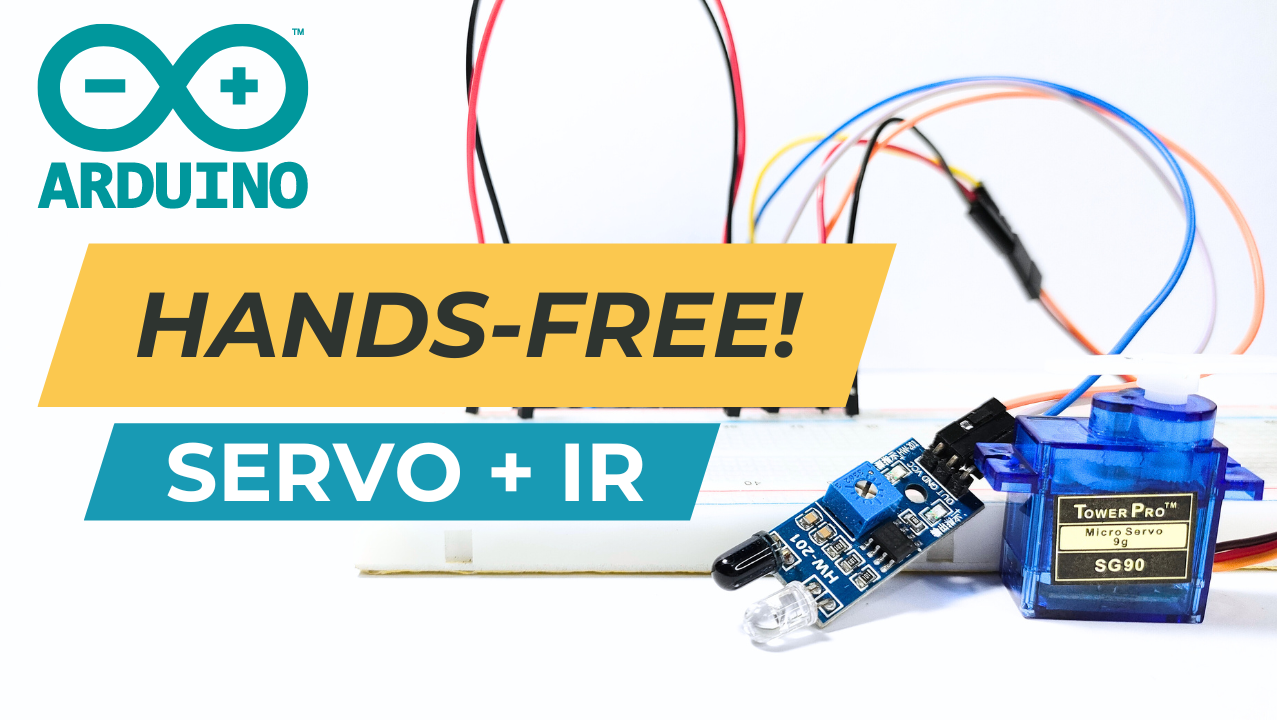
Arduino Tutorial: Control Servo Motors with HW-201 IR Obstac...
108K views · Aug 24, 2024 arduinointro.com
Learn how to make servo motors react to an HW-201 IR obstacle sensor using Arduino in this step-by-step tutorial! In this project, we guide you through wiring and coding to create a simple yet powerful system where a servo motor responds to objects detected by an infrared sensor. Perfect for beginners and Arduino enthusiasts, this video covers everything you need to know, from understanding servo motors and IR sensors to writing and uploading the Arduino code. Video Overview: 1. Introduction to servo motors and their use in precise control systems 2. Explanation of the HW-201 IR obstacle sensor and how it detects objects 3. Wiring instructions for connecting the servo motor and IR sensor to the Arduino 4. Detailed walkthrough of the Arduino code to control the servo motor based on sensor input 5. Demonstration of the project in action 6. Tips for expanding the project and applying it to other robotic systems Whether you're just starting out with Arduino or looking to add more complexity to your projects, this video has something for you.
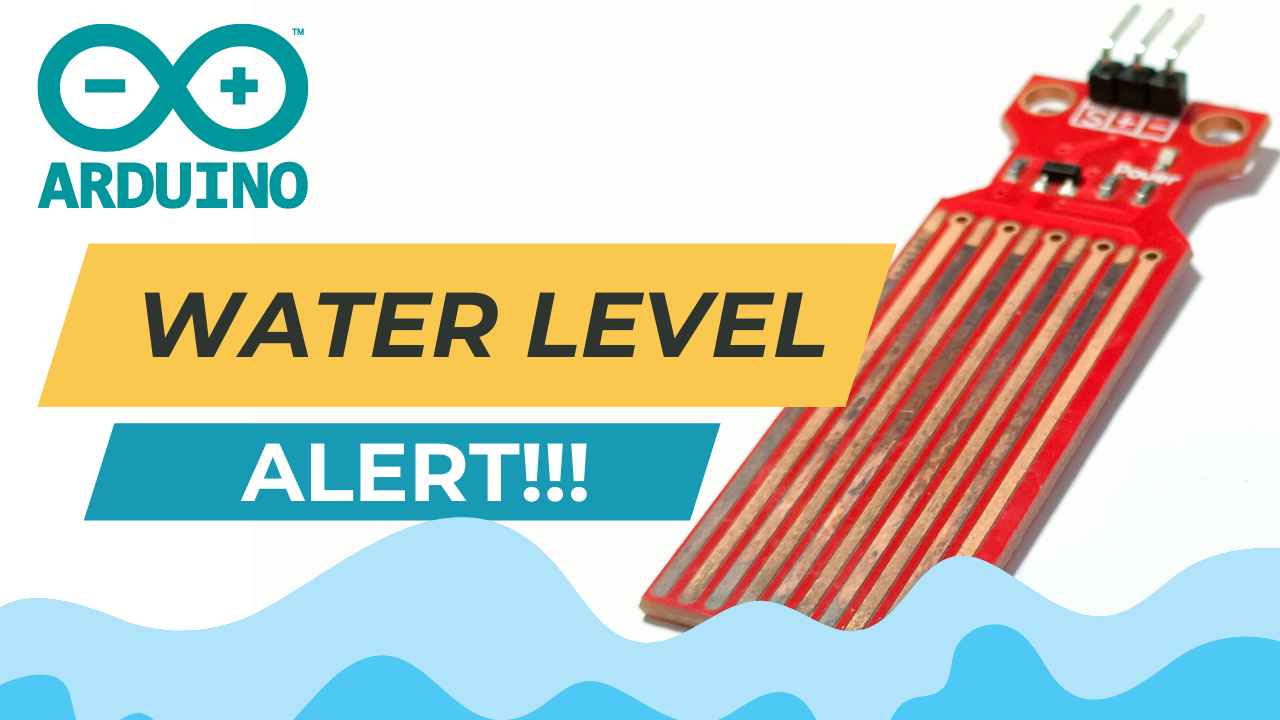
Arduino Water Level Sensor Tutorial: Monitor Water Levels wi...
34K views · Jul 27, 2024 arduinointro.com
In this video, we’ll show you how to create a simple yet effective water level monitoring system using an Arduino and a water level sensor. Perfect for beginners, this step-by-step tutorial will guide you through wiring the components, coding the Arduino, and implementing a practical application to prevent water tank overflow. Overview: 1. Introduction: We start by introducing the components needed for the project, including an Arduino, water level sensor, LED, and basic wiring. 2. Wiring Diagram: A clear explanation of how to connect the water level sensor and LED to the Arduino. 3. Code Walkthrough: Detailed step-by-step breakdown of the code used to read the water level sensor and control the LED indicator. 4. Practical Application: Demonstrating the project in action with a water tank, showing how the system alerts when water levels are high. 5. Explanation of Water Level Sensor: A brief, easy-to-understand explanation of what a water level sensor is and how it works. 6. Conclusion: Ideas for extending the project, such as adding a buzzer or integrating with an IoT platform. Whether you're new to Arduino or looking for a fun and practical project, this video has you covered. Don't forget to like, comment, and subscribe for more DIY Arduino projects!
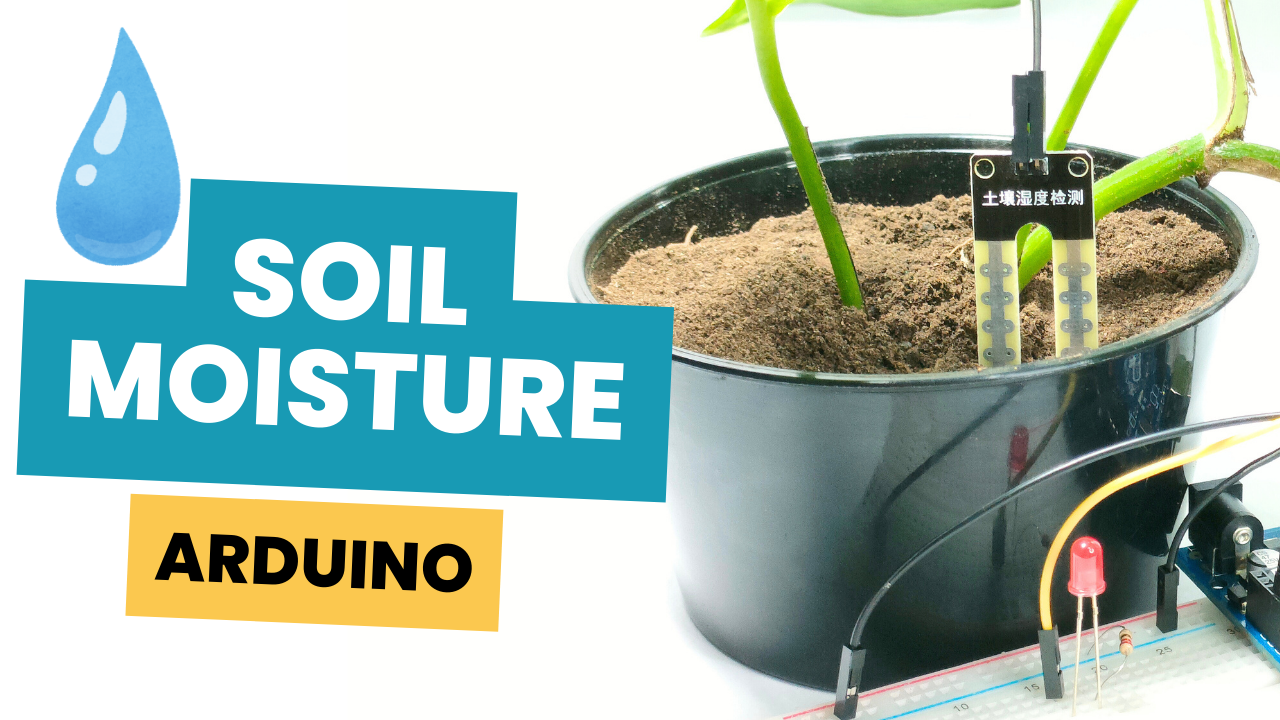
How to Use a Soil Moisture Sensor with Arduino - Step-by-Ste...
27K views · Jul 19, 2024 arduinointro.com
Learn how to use a soil moisture sensor with an Arduino in this step-by-step tutorial! 🌱💧 In this video, we'll show you how to set up and code an Arduino project to monitor soil moisture levels and control an LED indicator. Perfect for gardening enthusiasts, Arduino beginners, and DIY tech fans! Welcome to Arduino Intro! In this video, we’ll guide you through using a soil moisture sensor with an Arduino to help you keep track of your plants' moisture levels. Here's what you'll learn: 1. Components Needed: We'll go over all the components required for this project, including the soil moisture sensor, an Arduino Uno, an LED, a 220-ohm resistor, a breadboard, and jumper wires. 2. Wiring Setup: A detailed explanation of how to correctly wire the soil moisture sensor and LED to your Arduino. 3. Code Walkthrough: We provide and explain the Arduino code step-by-step, making it easy for you to understand how everything works. 4. Understanding Components: Learn how a soil moisture sensor functions to give you a deeper understanding of the project. 5. Live Demonstration: Watch as we upload the code to the Arduino and see the project in action, with real-time soil moisture readings displayed on the Serial Monitor and an LED indicator.
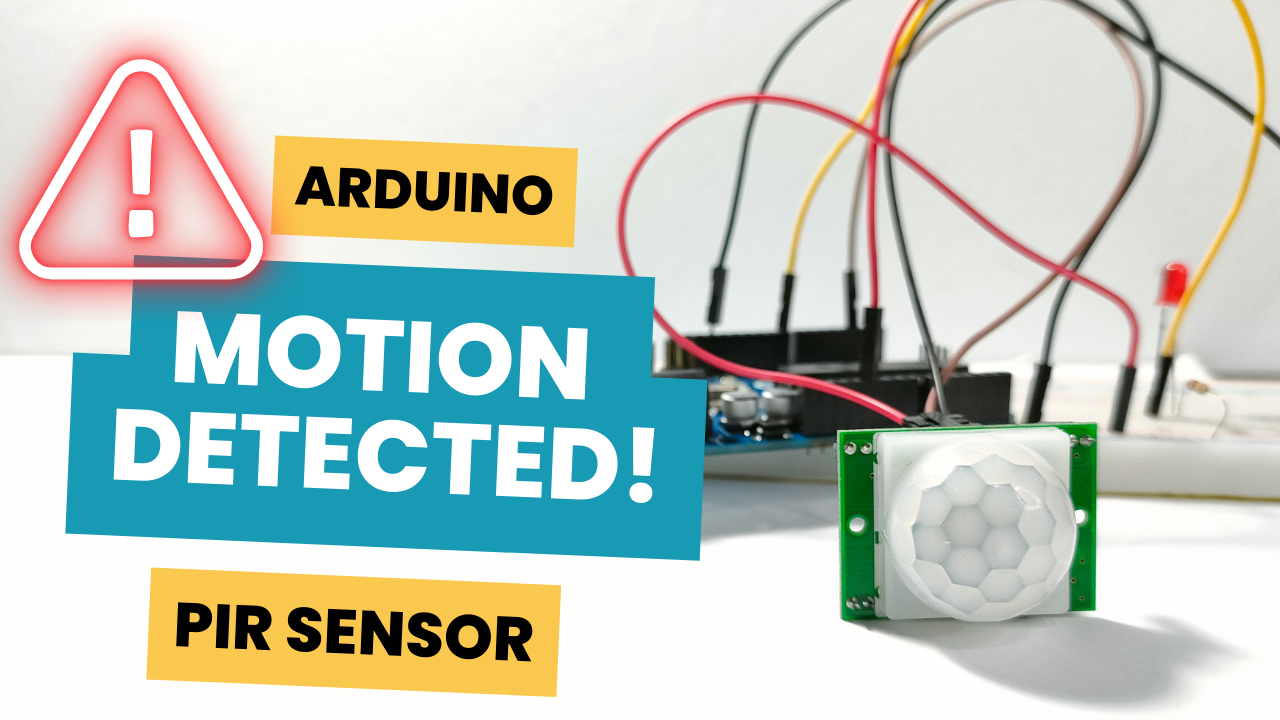
How to Use a PIR Sensor with Arduino for Motion Detection
237K views · Jul 17, 2024 arduinointro.com
Unlock the power of motion detection with Arduino! In this video, we’ll show you how to use a Passive Infrared (PIR) sensor with Arduino to detect motion and light up an LED. Perfect for beginners and enthusiasts, this project lays the foundation for building advanced security systems and automated lighting. By the end of this video, you’ll have a working motion detection system that you can expand into more complex projects like security alarms or automated lighting. Materials Needed: 1. Arduino Board 2. PIR Sensor 3. LED (optional) 4. 220 Ohm Resistor (for the LED) 5. Breadboard and Jumper Wires
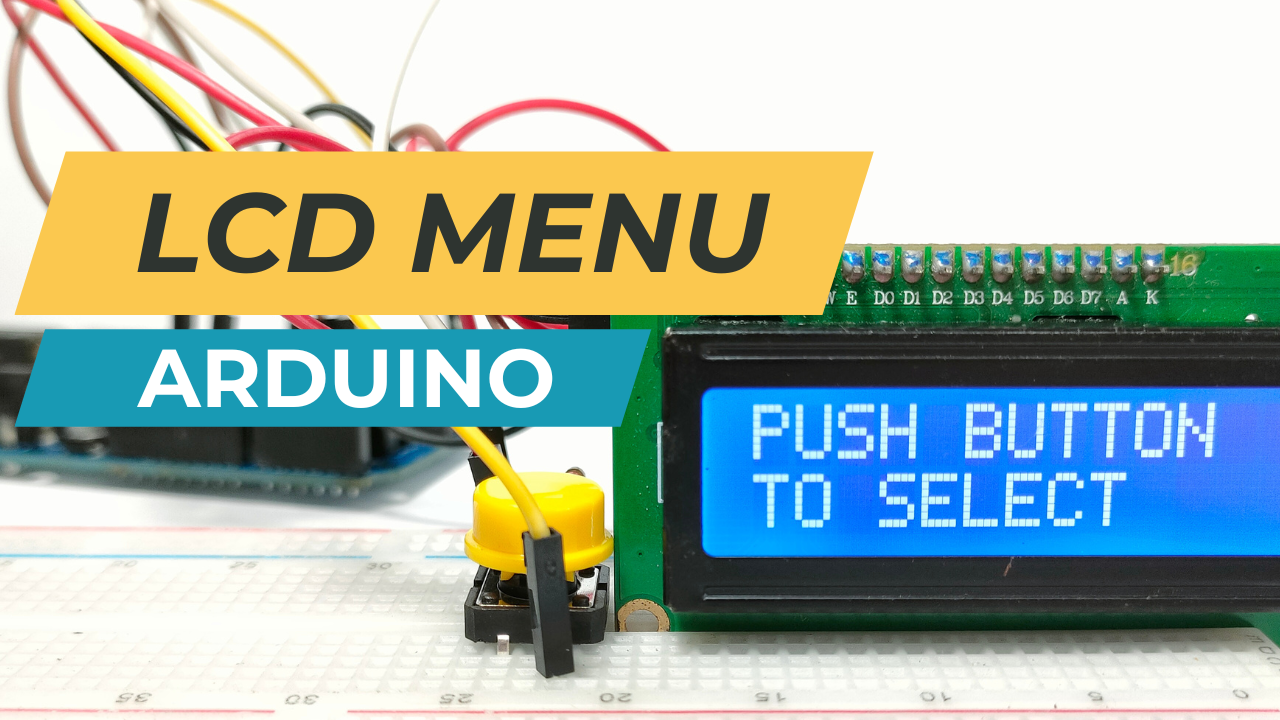
Arduino Pushbutton Menu System with I2C LCD Display Tutorial
222K views · Jul 15, 2024 arduinointro.com
Learn how to create a pushbutton-controlled menu system using an Arduino and an I2C LCD display! In this tutorial, we guide you step-by-step through the process of setting up the hardware, writing the code, and demonstrating a practical application. Perfect for Arduino beginners and enthusiasts looking to expand their skills. In this video, we will: 1. List all the components needed for this project, including an Arduino Uno, pushbutton, 16x2 I2C LCD display, and more. 2. Show you how to connect the pushbutton and the LCD to the Arduino. 3. Walk you through the code, explaining each part in detail. 4. Demonstrate a practical application of the menu system, using it to control an LED in different modes. 5. Offer tips on how you can customize and expand this project for your own needs.
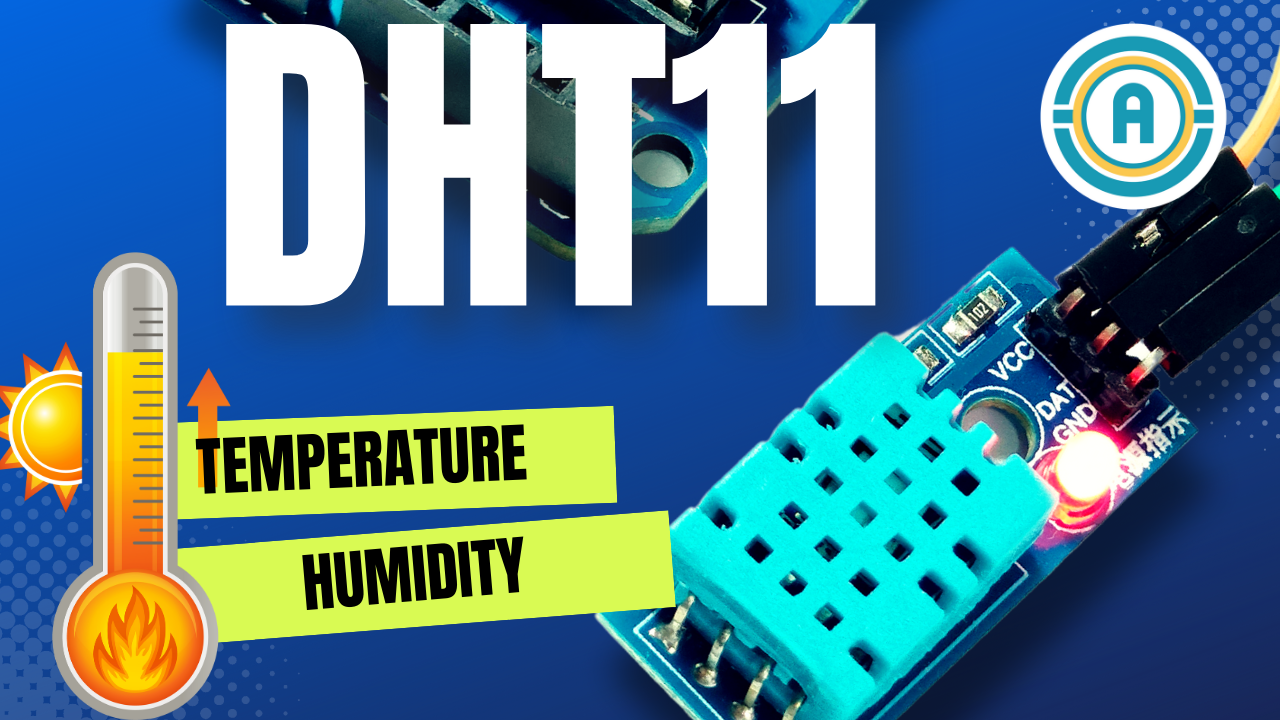
How to Use the DHT11 Temperature Sensor with Arduino | Displ...
99K views · Jul 9, 2024 arduinointro.com
DHT11 Sensor | Arduino Tutorial | Temperature and Humidity Sensor In this video, we will show you how to use the DHT11 temperature and humidity sensor with Arduino to display readings on the serial monitor. Whether you're a beginner or an experienced maker, this step-by-step guide will help you understand and implement this essential sensor in your projects. Overview: Welcome to Arduino Intro! In this tutorial, we'll dive into using the DHT11 sensor with Arduino. You'll learn what the DHT11 sensor is, how to wire it to your Arduino, install the necessary libraries, and write code to read temperature and humidity data. We’ll also explain the code in detail so you can understand how everything works together.
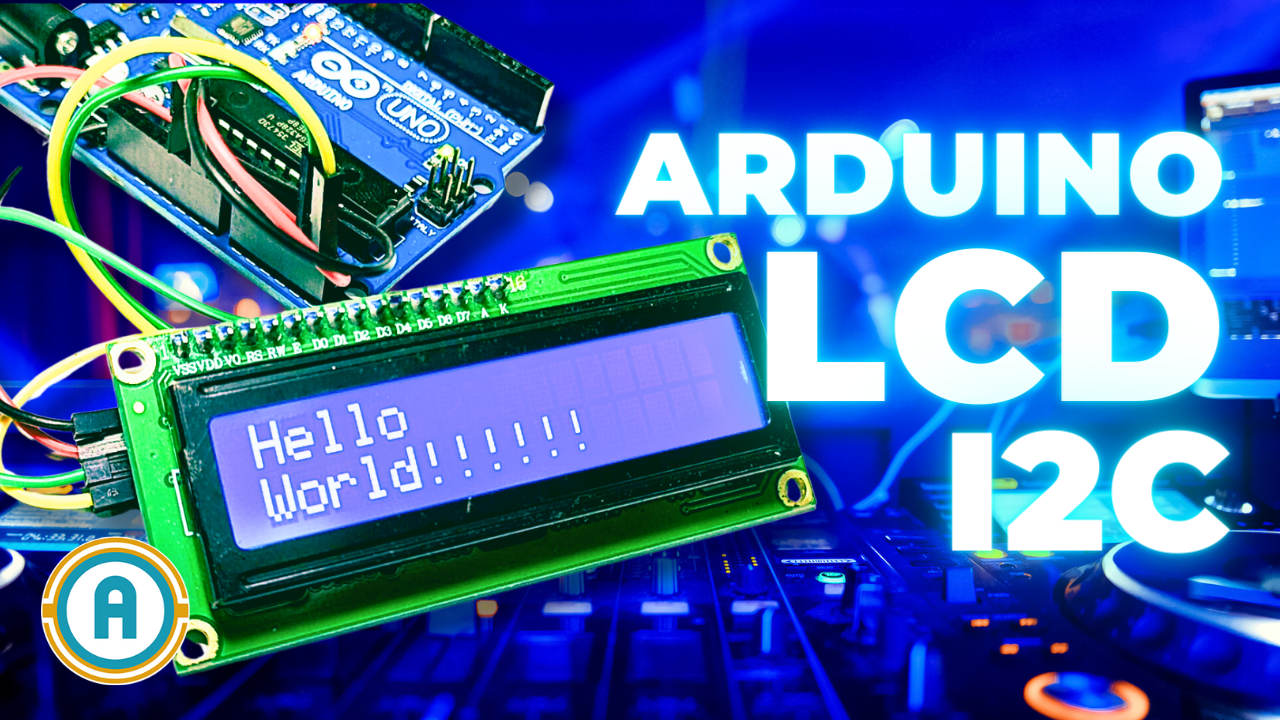
Arduino I2C LCD Tutorial: Step-by-Step Guide for Beginners
111K views · Jul 4, 2024 arduinointro.com
Learn how to connect and use an I2C LCD with Arduino in this comprehensive beginner's tutorial! 📟🚀 In this video, we'll guide you step-by-step through the process of wiring and coding an I2C LCD module with an Arduino board. Whether you're new to Arduino or looking to enhance your projects with a clear display, this tutorial is perfect for you. We'll cover everything from the components you need to the code required to get your I2C LCD up and running. What you'll learn: 1. Introduction to I2C LCD: Understand the basics and benefits of using an I2C LCD with Arduino. 2. Components and Wiring: Step-by-step instructions on how to connect your I2C LCD module to the Arduino. 3. Installing the LiquidCrystal_I2C Library: How to install the necessary library in the Arduino IDE. 4. Writing the Code: Detailed walkthrough of the code to control your I2C LCD. 5. Uploading and Testing: How to upload the code to your Arduino and test the LCD display. 6. Customizing Your Display: Tips on how to modify the code to display custom messages. By the end of this video, you'll have a fully functional I2C LCD display integrated with your Arduino project, capable of showing custom messages and providing a dynamic display for your electronics projects.
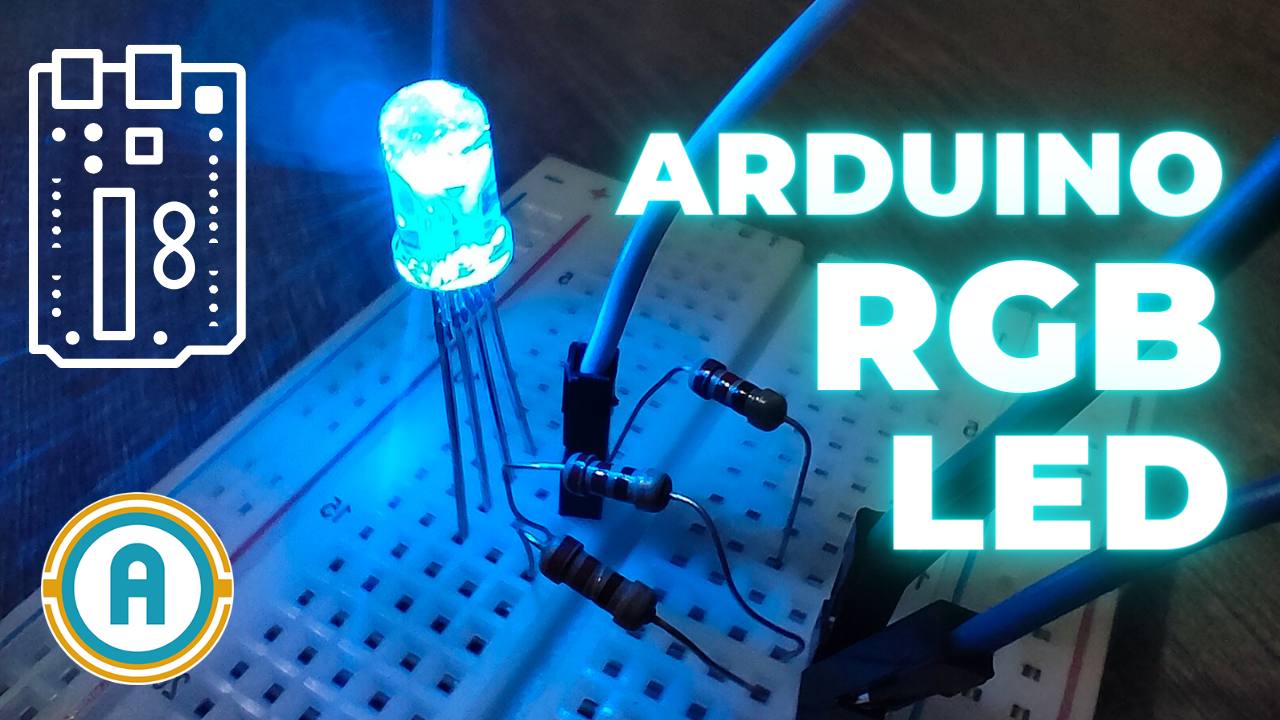
RGB LED Programming with Arduino: Light Up Your Projects
45K views · Jul 2, 2024 arduinointro.com
In this comprehensive tutorial, we'll show you how to control an RGB LED with an Arduino. Whether you're new to Arduino projects or looking to expand your skills, this video will guide you through the process of setting up and programming an RGB LED to create stunning light effects. By the end of this video, you'll have a solid understanding of how to use an RGB LED with Arduino, opening up endless possibilities for your DIY projects. Don't forget to like, subscribe, and hit the bell icon to stay updated with more Arduino tutorials and project ideas! #Arduino #RGBLED #ArduinoProjects #LEDEffects #DIYArduino #ArduinoTutorial Visit our website: https://www.arduinointro.com Link to the code: https://www.arduinointro.com/articles/projects/how-to-control-an-rgb-led-with-arduino-a-step-by-step-guide Video Overview: 1. Components Needed: Learn what components you'll need for this project, including an Arduino board, an RGB LED, resistors, a breadboard, and jumper wires. 2. Circuit Setup: Step-by-step instructions on how to connect your RGB LED to the Arduino using a breadboard and jumper wires. 3. Coding RGB Control: Detailed walkthrough of the code required to control the RGB LED, including setting up PWM pins and creating color mixes. 4. Real-time Demonstration: Watch as we upload the code to the Arduino and demonstrate the RGB LED cycling through different colors.
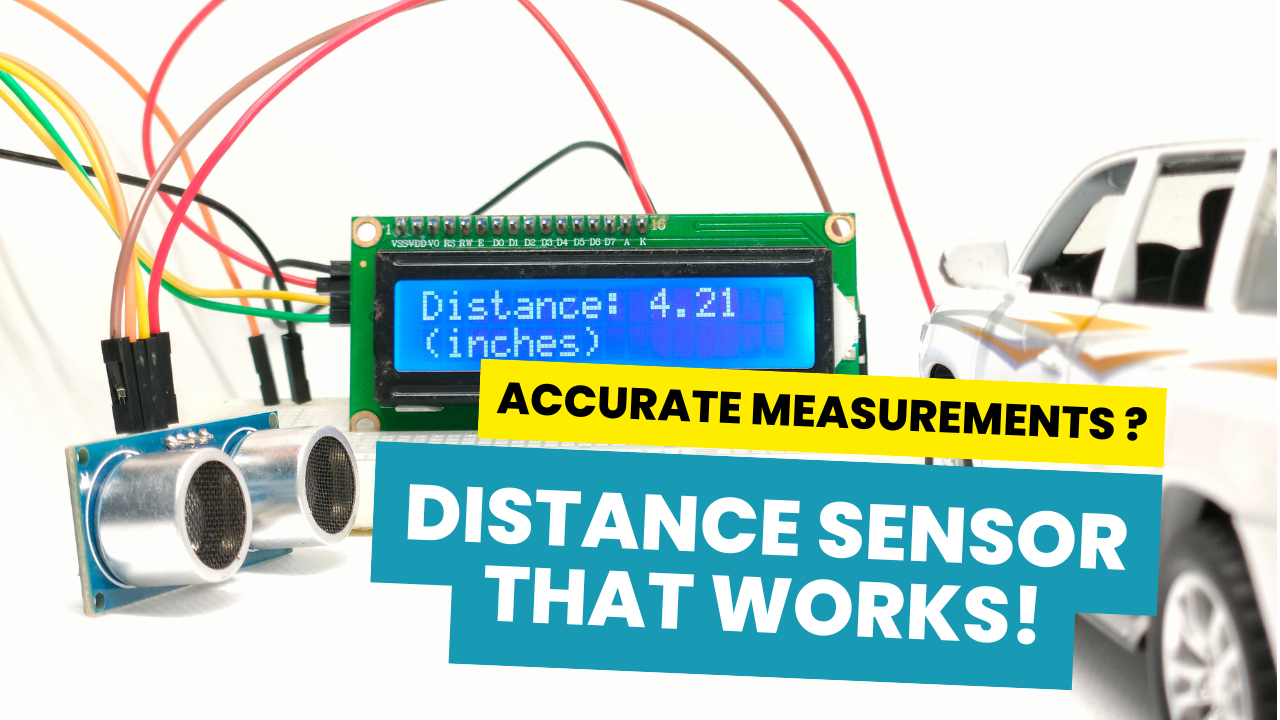
Measure Distance LIKE A PRO with Arduino and HCSR04 Ultrason...
10K views · Jan 19, 2025 arduinointro.com
Learn how to measure distance like a pro using Arduino and the HCSR04 ultrasonic sensor in this tutorial. Accurately calculate distances up to 4 meters with ease using this simple and cost-effective method. Whether you're a beginner or an experienced maker, this video will guide you through the process of setting up and programming your Arduino board to work with the HCSR04 sensor. You'll learn how to connect the sensor, write the code, and troubleshoot common issues. By the end of this video, you'll be able to create your own distance-measuring projects with confidence. So, let's get started and take your DIY projects to the next level! ********************************* Link to code: https://www.arduinointro.com/articles/projects/mastering-distance-measurement-a-comprehensive-guide-to-using-ultrasonic-sensor-with-lcd-and-arduino Link to I2C LCD library: https://www.arduinointro.com/articles/projects/displaying-characters-using-the-i2c-liquid-crystal-display-lcd