
This is an introductory and exploratory course on Physical Computing with Arduino covering 4 major units, namely:
- Introduction to Arduino Physical Computing Platform
- Interfacing Sensors with Arduino
- Working with Actuators, and;
- Display and Monitoring Systems
Each unit covers all the necessary learning competencies and the related educational resources such as online articles, hands-on activities, explainer videos, and sample projects. This course guide enables students to learn and discover Arduino for education through a series of hands-on activities that they can do at home or in school.
UNIT 1Introduction to Arduino Physical Computing PlatformContent StandardThe learners demonstrate an understanding of the interaction of the hardware and software components in Arduino.Performance StandardThe learners shall be able to independently make and program LED electronic circuits using Arduino. |
|
Unit Topic Content |
|
Learning Competencies |
|
Hands-on ExercisesLearn Arduino Intro App |
|
Online Articles |
|
Explainer Videos |
|
Sample Projects |
|
|
Introduction to Arduino Microcontroller |
|
1. Define the Arduino Physical Computing Platform
2. Determine the parts of an Arduino microcontroller
3. Identify the features of the Arduino IDE |
|
|
|
All You Need to Know About Arduino https://www.arduinointro.com/articles/projects/all-you-need-to-know-about-arduino |
|
|
DIY Arduino Lampshade https://www.arduinointro.com/articles/diy/diy-arduino-lampshade
How To Create Your Zodiac Sign Using Recyclable Materials and LEDs
How to Make a Cloud Mood Lamp with Arduino https://www.arduinointro.com/articles/diy/how-to-make-a-cloud-mood-lamp-with-arduino
How to Make a Garden Sunset Lantern with Arduino https://www.arduinointro.com/articles/diy/how-to-make-a-garden-sunset-lantern-with-arduino
How To Make a D-I-Y LED Wall Lamp Using Arduino https://www.arduinointro.com/articles/diy/how-to-make-a-d-i-y-led-wall-lamp-using-arduino
Making an Arduino Mushroom LED Lights Decoration https://www.arduinointro.com/articles/diy/making-an-arduino-mushroom-led-lights-decoration
How to Make a D-I-Y Nano Infinity Gauntlet Decorative Table Lamp Using Arduino
DIY Flameless Campfire Using LEDs https://www.arduinointro.com/articles/diy/diy-flameless-campfire-using-leds
|
|
|
|
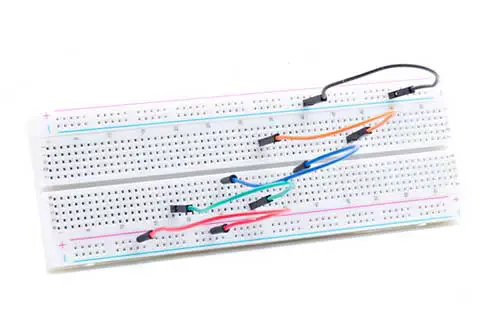
Using the Breadboard |
|
4. Define a breadboard
5. Determine the proper use of a breadboard
6. Identify the purpose of jumper wires |
|
|
|
Learn How to Use a Breadboard https://www.arduinointro.com/articles/projects/learn-how-to-use-a-breadboard
|
|
|
|||
|
LED Circuits and Arduino IDE
Arduino Functions:
|
|
7. Define an LED
8. Explain the purpose of a resistor |
|
|
|
Making the Arduino Blinking LED Project (a Complete Tutorial)
|
|
|
|||
|
|
9. Create an LED circuit using Arduino
10. Write an Arduino sketch to turn on and turn off an LED |
|
Project 1. Blink (turn on/off an LED) |
||||||||
|
Working with more than 1 LED
|
|
11. Create a breadboard circuit with 2 LEDs attached to different pins
12. Write an Arduino sketch/code to turn on and turn off more than 1 LED. |
|
Project 2: Alternate Blink
Project 3: Running Lights |
|
How to Make an Alternate Blink and Running Lights Effect https://arduinointro.com/articles/projects/how-to-make-an-alternate-blink-and-running-lights-effect
|
|
|
|||
|
Parallel LED Circuits
|
|
13. Make a parallel connection with 2 LEDs in 1 Pin
14. Make a parallel connection with 4 LEDs and 2 Pins
|
|
Project 4: 2 LEDs 1 Pin
Project 5: 4 LEDs 2 Pins
|
|
2 LEDs 1 Pin, 4 LEDs 2 Pins: Make Your LED Projects Brighter
|
|
|
|||
|
Fade Effect Arduino Functions:
|
|
15. Define a PWM pin
16. List the PWM pins in the Arduino Uno board
17. Discuss how an LED fade effect works.
18. Demonstrate a fading effect using 1 LED. |
|
Project 7: Fade in Fade Out |
|
Become a Master of the Fade in Fade out Effect (Arduino Style)
|
|
|
|||
|
19. Sequencing a fading effect for two LEDs |
2 LEDs Alternate Fade Effect (Using the for-loop) https://www.arduinointro.com/articles/projects/2-leds-alternate-fade-effect-using-the-for-loop |
||||||||||
|
Random LED Brightness |
20. Define the random() and randomSeed() functions.
21. Identify the syntax of the random() and randomSeed() functions
22. Use random numbers to determine the brightness of an LED
23. Apply random brightness to more than 1 LED |
Randomizing LED Brightness Using random() and randomSeed() in Arduino
|
|
||||||||
|
RGB LED |
24. Identify the 2 types of RGB LED
25. Name the pins of the RGB LED
26. Identify the correct circuit for the RGB LED
27. Write an Arduino sketch to mix the colors of the RGB LED |
How to Control an RGB LED with Arduino: A Step-by-Step Guide
Mixing Colors in Arduino Using the KS and KY RGB LED Module
|
|
|
|
UNIT 2Interfacing Sensors with ArduinoContent StandardThe learner demonstrates an understanding of the concepts and underlying principles of various sensors.Performance StandardThe learners shall be able to independently create a robotics application applying the functions and capabilities of sensors. |
|
Unit Topic Content |
|
Learning Competencies |
|
Hands-on ExercisesLearn Arduino Intro App |
|
Online Articles |
|
Explainer Videos |
|
Sample Projects |
|
|
Pushbutton/Switch
Arduino Functions:
|
|
1. Define a Pushbutton
2. Identify the correct breadboard circuit for a pushbutton or switch.
3. State the syntax of the if-else statement
4. Analyze how an if-else statement works. |
|
|
|
Using Simple Pushbutton Switches to Light Up LEDs https://arduinointro.com/articles/projects/using-simple-pushbutton-switches-to-light-up-leds
|
|
|
|
Mini Frisbee Sensor-Based Arduino Project https://www.arduinointro.com/articles/diy/mini-frisbee-sensor-based-arduino-project
Arduino DIY Hockey Game with LEDs https://www.arduinointro.com/articles/diy/arduino-diy-hockey-game-with-leds
Ring Toss Arduino DIY Sensor-Based Game https://www.arduinointro.com/articles/diy/ring-toss-arduino-diy-sensor-based-game
DIY Arduino Bowling Game https://www.arduinointro.com/articles/diy/diy-arduino-bowling-game
SHOOT: A Make-Shift Mini-Arcade Game (With Arduino Sensors) https://www.arduinointro.com/articles/diy/shoot-a-make-shift-mini-arcade-game-with-arduino-sensors
Arduino Skee Ball Classic Arcade Game https://www.arduinointro.com/articles/diy/arduino-skee-ball-classic-arcade-game
How to Make a D-I-Y Mini Billiard Game (Sensor-Based Game) https://www.arduinointro.com/articles/diy/how-to-make-a-d-i-y-mini-billiard-game-sensor-based-game
DIY Mini Bucket Toss Game With Arduino https://www.arduinointro.com/articles/diy/diy-mini-bucket-toss-game-with-arduino
Making the Arduino DIY Pinball Machine https://www.arduinointro.com/articles/diy/making-the-arduino-diy-pinball-machine
3 stacks x 3 shots: an Arduino Game Prototype https://www.arduinointro.com/articles/diy/3-stacks-x-3-shots-an-arduino-game-prototype
|
|
|
5. Determine the current state of a pushbutton. |
|
Project 8: Push the button
|
|||||||||
|
6. Create a breadboard circuit with a pushbutton and an LED
7. Write an Arduino sketch/code to turn on and turn off an LED using a pushbutton.
|
|
Project 9: Switch on Switch off |
|||||||||
|
|
8. Change the brightness of an LED using 2 pushbuttons |
|
Project 10: Light Controller |
||||||||
|
9. Make an LED remember its current state every time a pushbutton is pressed.
|
|
Sticky Switch Project |
|||||||||
|
Touch Sensor
Working Principle of Touch Sensors
Creating different modes using if-else if statement |
|
10. Define the Touch sensor
11. Determine the pins of the Touch sensor
12. Describe the working principle of a Touch sensor |
|
|
|
Make User-Friendly Arduino Projects with a Touch Sensor
|
|
|
|||
|
13. Identify the correct connection of the Touch sensor to the Arduino board
14. Write an Arduino sketch/code to read the value of a touch sensor.
|
|
Project 11: Touch Sensor value |
|||||||||
|
|
15. Control an LED using the Touch sensor
|
|
Project 12: LED Touch |
|
|||||||
|
16. Create a mode functionality using the touch sensor |
|
Changing Modes with a Touch |
|
Adding a Mode Functionality to Your Arduino Projects Using a Touch Sensor
|
|
|
|||||
|
Light Sensor
LDR (Light Dependent Resistor)
|
|
17. Define an LDR (Light Dependent Resistor)
18. Explain how a light sensor works |
|
|
|
Light Sensor: How to Make Your Robots React to Light https://www.arduinointro.com/articles/projects/light-sensor-how-to-make-your-robots-react-to-light |
|
||||
|
19. Make a light sensor using an LDR
20. Determine the value of a light sensor |
|
Project 15: Light Sensor Reading |
|||||||||
|
21. Write an Arduino sketch/code to turn on and turn off an LED using a light sensor. |
|
Project 16: Light-Sensing LED Basic Piezo Buzzer Project (Beeping Sound) |
|||||||||
|
Piezo Buzzer |
22. Define the tone() function
23. Produce sounds using a piezo buzzer
|
|
Buzzer + LED + Sensor |
Adding Sound to Arduino Using the MH-FMD Piezo Buzzer Module
|
|||||||
|
Tilt Sensor |
|
24. Define a tilt sensor
25. Determine how a tilt sensor works |
|
|
|
Tilt Sensor with Arduino Easy Tutorial https://www.arduinointro.com/articles/projects/tilt-sensor-with-arduino-easy-tutorial
|
|
|
|||
|
26. Write an Arduino sketch/code to read the value of a tilt sensor.
|
|
Tilt Sensor Value |
|||||||||
|
27. Write an Arduino sketch/code to turn on and turn off an LED using a tilt sensor.
|
|
Tilt Sensor with 1 LED
2 Tilt Sensor 2 LEDs |
|||||||||
|
Proximity Sensors
Infrared Obstacle Sensor
Relational and Conditional Operators
Working with 2 Sensors in 1 Project |
|
28. Define Proximity Sensor
29. State the working principle of a proximity sensor. |
|
|
|
Detecting Objects Using the Infrared (IR) Obstacle Sensor
|
|
|
|||
|
30. Identify the proper connection of an infrared sensor to an Arduino board
31. Write an Arduino sketch/code to read the value of an infrared sensor.
|
|
Project 11: Touch Sensor value (*using an IR Sensor) |
|||||||||
|
32. Write an Arduino sketch/code to turn on and turn off an LED using an infrared sensor.
|
|
Project 12: LED Touch (*using an IR Sensor) |
|||||||||
|
33. Differentiate the conditional operators in Arduino.
34. Differentiate the relational operators in Arduino
35. Combine an infrared sensor and touch sensor in 1 project. |
|
2-Sensor Project with 1 LED
2-Sensor Project with 2 LEDs
|
|
Combining the Infrared Sensor and Touch Sensor in 1 Arduino Project (with Circuit and Sketch) |
|
|
|||||
|
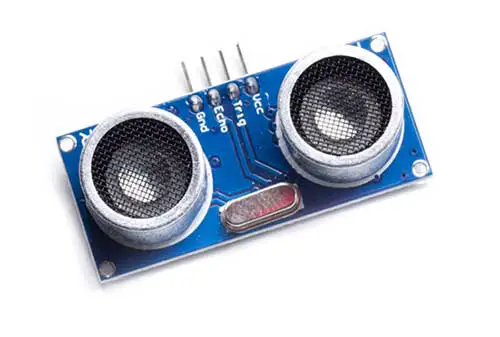
Ultrasonic Sensor |
|
36. Define an ultrasonic sensor
37. State how ultrasonic sensors work
|
|
|
|
Using the HC-SR04 Ultrasonic Sensor to Detect Objects https://www.arduinointro.com/articles/projects/using-the-hc-sr04-ultrasonic-sensor-to-detect-objects
|
|
|
|||
|
38. Identify the pins of the ultrasonic sensor
39. Measure the distance in inches using an ultrasonic sensor
|
|
Project 22: Sonar Distance Calculator |
|||||||||
|
40. Write an Arduino sketch/code to turn on and turn off an LED using an ultrasonic sensor.
|
|
Ultrasonic Sensor with 1 LED |
|||||||||
|
Potentiometer |
|
41. Define a potentiometer
42. Determine the correct wiring of a potentiometer
43. Describe the working principle of a potentiometer (variable resistor) |
|
|
|
Adding Potentiometers in Your Arduino Projects https://www.arduinointro.com/articles/projects/adding-potentiometers-in-your-arduino-projects |
|
|
|||
|
44. Write a sketch to read the value of a potentiometer
|
|
Project 43: Potentiometer Value |
|||||||||
|
45. Explain the map() function |
|
Project 44: LED Brightness Controller |
|||||||||
|
46. Control LEDs using a potentiometer
|
|
Making a LED Meter with a Potentiometer |
|
Making a LED Meter with a Potentiometer https://www.arduinointro.com/articles/projects/making-a-led-meter-with-a-potentiometer
|
|
|
UNIT 3Working with ActuatorsContent StandardThe learner demonstrates an understanding of the concept and underlying principles of actuators.Performance StandardThe learners shall be able to independently create a robotics application applying the functions and capabilities of actuators. |
|
Unit Topic Content |
|
Learning Competencies |
|
Hands-on ExercisesLearn Arduino Intro App |
|
Online Articles |
|
Explainer Videos |
|
Sample Projects |
|
|
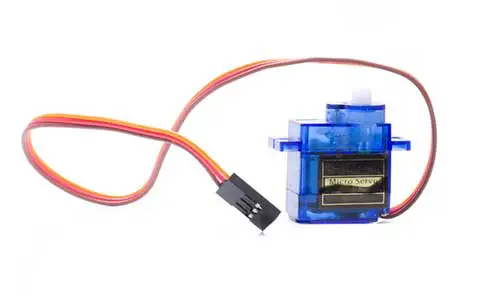
Servo Motors
Connecting a Servo Motor to the Arduino Board
Controlling 2 Servo Motors
Using the for-loop to control a servo motor |
|
1. Define an actuator
2. Define servo motor
|
|
|
|
Servo Motors Made Simple with Arduino https://www.arduinointro.com/articles/projects/servo-motors-made-simple-with-arduino
|
|
|
|
Taz the TRASHmanian Devil: A DIY Arduino Trash Bin https://www.arduinointro.com/articles/diy/taz-the-trashmanian-devil-a-diy-arduino-trash-bin
The Fortune-Telling Skills of Robby the Robot https://www.arduinointro.com/articles/diy/the-fortune-telling-skills-of-robby-the-robot
Home-y Organizer: An Arduino Servo and Sensor Project https://www.arduinointro.com/articles/diy/home-y-organizer-an-arduino-servo-and-sensor-project
DIY LED Lighted Santa Claus Robot https://www.arduinointro.com/articles/diy/diy-led-lighted-santa-claus-robot
MERVO: The Entertainment Servo Robot https://www.arduinointro.com/articles/diy/mervo-the-entertainment-robot
DIY Smart Trash Bin with LEDs and IR sensor https://www.arduinointro.com/articles/diy/diy-smart-trash-bin-with-leds-and-ir-sensor
|
|
|
|
3. Determine the correct wiring of a servo motor
4. Write an Arduino sketch/code to move a servo motor at certain angles
|
|
Project 32: Wiper |
|
|||||||
|
|
5. Connect 2 servo motors to an Arduino board.
6. Write a sketch to move 2 servo motors.
|
|
Project 33: Double Wiper
Project 34: Follow the Leader |
|
|||||||
|
|
7. Use a for-loop to make smooth motor movements
|
|
Smooth Servo Motion
Adding the Infrared Sensor and LED for Object Detection |
|
Simple Radar System with Infrared and Servo Motor https://www.arduinointro.com/articles/projects/simple-radar-system-with-infrared-and-servo-motor
|
|
|
||||
|
Servo Motors and Potentiometers
Servo Motors and Pushbutton Switches
Increment and Decrement Operator |
|
8. Determine the proper wiring of a potentiometer and a servo motor.
9. Write an Arduino sketch/code to control the angles of a servo motor using a potentiometer
|
|
Project 45: Potentiometer Servo Control |
|
Realtime Servo Motor Control with Switches and Potentiometers
|
|
||||
|
|
10. Write an Arduino sketch/code to control the angles of a servo motor using 2 potentiometers
|
|
Project 46: Double Servo Pot Control |
||||||||
|
|
11. Define the increment and decrement operators
12. Determine the proper wiring of 2 pushbuttons and a servo motor.
13. Write an Arduino sketch/code to control the angles of a servo motor using pushbutton switches
|
|
Project 48: Servo Switch Control |
|
Realtime Servo Motor Control with Switches and Potentiometers |
|
|
||||
|
Servo Motors and Proximity Sensors |
|
14. Identify the correct wiring of an infrared sensor and a servo motor
15. Write an Arduino sketch/code to control the angles of a servo motor using an infrared sensor
|
|
Sensory Reaction
Sensory Double Reaction |
|
Making Servo Motors React to Sensors https://www.arduinointro.com/articles/projects/making-servo-motors-react-to-sensors
|
|
|
UNIT 4Display and Monitoring SystemsContent StandardThe learner demonstrates an understanding of the concept and underlying principles of Liquid Crystal Displays (LCD).Performance StandardThe learners shall be able to independently create an environment monitoring system applying the functions and capabilities of a Liquid Crystal Display. |
|
Unit Topic Content |
|
Learning Competencies |
|
Hands-on ExercisesLearn Arduino Intro App |
|
Online Articles |
|
Explainer Videos |
|
Sample Projects |
|
|
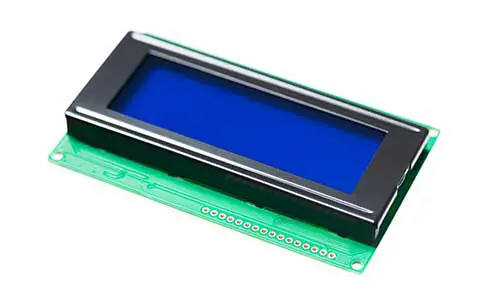
Liquid Crystal Display
I2C (inter-integrated communication) Protocol
I2C LCD Library
I2C LCD Functions |
|
1. Define an I2C LCD
|
|
|
|
Displaying Characters Using the I2C Liquid Crystal Display (LCD)
|
|
|
|
|
|
|
|
2. Determine the correct wiring of the I2C LCD
3. Determine the Arduino libraries to use for the I2C LCD.
4. Install the required libraries for I2C LCD
5. Identify the basic commands for the I2C LCD.
6. Write an Arduino sketch/code to display characters on the I2C LCD
|
|
Project 49: LCD Hello World |
||||||||
|
LCD Custom Characters
LCD Scrolling Effect |
|
7. Identify the commands to create a custom character
8. Design a custom character using an online character generator tool.
|
|
Project 50: LCD Custom Characters |
|
Create Custom Characters for the I2C LCD Easily https://www.arduinointro.com/articles/projects/create-custom-characters-for-the-i2c-lcd-easily
|
|
|
|||
|
|
9. Determine the commands in making a text scrolling effect
10. Explain the process of making a scrolling effect
11. Write an Arduino sketch/code to display scrolling characters on the I2C LCD.
|
|
LCD Scrolling Effect |
||||||||
|
Using Pushbuttons and LEDs with LCD (Display LED Status) |
|
12. Make the proper circuit for the pushbutton, LEDs, and LCD
13. Monitor the status of an LED using the I2C LCD
|
|
Project 52: LCD LED Status |
|
Make Interactive Arduino Projects Using Pushbutton and LCD
|
|
|
|||
|
|
14. Create a mode functionality using pushbuttons and LCD
|
|
Project 51: LCD Switch Modes |
||||||||
|
Using Potentiometers and LEDs with LCD (Displaying Potentiometer Value) |
|
15. Display the value of a potentiometer on the I2C LCD
16. Use a potentiometer to control LEDs and display their status on the screen. |
|
Simple LED Meter |
|
Simple LED Meter Using Potentiometer and I2C LCD (Quick Tutorial) https://www.arduinointro.com/articles/projects/simple-led-meter-using-potentiometer-and-i2c-lcd
|
|
|